file: ./content/docs/faq.mdx
meta: {
"title": "FAQ",
"icon": "CircleHelp"
}
import KeyboardShortcut from '@/components/KeyboardShortcut';
import { Callout } from 'fumadocs-ui/components/callout';
import { InlineTOC } from 'fumadocs-ui/components/inline-toc';
Welcome to the Zen Browser FAQ section! Here, you'll find answers to common questions and helpful tips to enhance your experience with Zen Browser. If your question isn't covered here, feel free to explore our community forums [r/zen\_browser](https://www.reddit.com/r/zen_browser) or reach out to the support team.
## How can I use horizontal tabs?
Zen Browser will not support horizontal tabs in the near future. The decision to focus on **Vertical Tabs** is a core design choice, with the entire Zen Browser experience built around this concept. This approach is intended to maximize screen space and improve navigation, making vertical tabs an essential part of Zen's philosophy.
## Will there be mobile version for Zen Browser?
At the moment, our team does not have the time or resources to develop Android or iOS versions of Zen Browser. Additionally, we believe that Zen’s unique features, particularly its design around vertical tabs, do not translate well to the mobile form factor. As such, we do not currently have plans to develop a mobile version of Zen Browser.
## Why can't Zen Browser play DRM-protected content?
This only affects Microsoft Windows and MacOS
[Digital Rights Management](https://wikipedia.org/wiki/Digital_rights_management) (DRM) is a technology used to control how digital content, such as videos and music, can be accessed and used. DRM is commonly used by streaming services to protect copyrighted content. When you try to play DRM-protected content, the website verifies if the necessary DRM software is available on your browser. Most browsers use [**Widevine**](https://www.widevine.com), a DRM technology developed by Google, to facilitate this.
Zen Browser currently lacks DRM support, as it does not yet have a Widevine license. This means DRM-protected media cannot be played in Zen Browser for the foreseeable future.
We’re in the process of obtaining a Widevine license and are currently awaiting approval from Google. If you’d like to help speed things along, you can express your support by contacting Google directly through their [Widevine contact form](https://www.widevine.com/contact).
Due to the lack of DRM support, you will not be able to stream content from the following services in Zen Browser:
* **HBO Max**
* **Netflix**
* **Spotify**
* **Disney+**
* **Amazon Prime Video**
* **Apple Music**
* **Google Play Movies & TV**
* **And possible other services that use DRM not listed here**
* Use a browser that has a Widevine license, such as [**Mozilla Firefox**](https://www.mozilla.org/firefox/), when streaming DRM-protected content.
* Use the native desktop app for the service you want to use
## How do I know Zen is safe?
Zen Browser is designed with a focus on security and privacy. Additionally, the browser's codebase is derived from Firefox, a well-known and trusted open-source project. Users can verify the safety of the browser by reviewing the source code available on [GitHub](https://github.com/zen-browser/desktop). Regular updates and community engagement also contribute to its security.
## How can I support Zen?
If you'd like to support the development of Zen Browser, you can do so through their official donation platforms. Contributions help the small team continue improving the browser and adding new features. You can support Zen Browser in the following ways:
* **Patreon**: Visit [https://www.patreon.com/zen\_browser](https://www.patreon.com/zen_browser) to make recurring donations and gain access to updates and possible rewards.
* **Ko-fi**: You can also support Zen Browser with one-time donations via [https://ko-fi.com/zen\_browser](https://ko-fi.com/zen_browser).
Your support helps the team maintain and enhance Zen Browser for everyone!
## How do I use the Split View feature?
Use shortcuts to perform Split View actions faster!
1. Select multiple tabs by left-clicking them while holding the key, or left-click 2 tabs while holding the key to select all tabs in between
2. Right click a tab, and select `Split x Tabs`
3. Change the view mode by pressing the `[|]` button in the top address bar
## How to switch tabs by scrolling?
You can enable this feature by changing a setting in the browser's configuration. Here's how:
1. Open the `about:config` page. This page contains advanced settings for the browser.
2. Search for `toolkit.tabbox.switchByScrolling`
3. Toggle the setting to `true` by double-clicking on it
Once this setting is enabled, you can hover your mouse over the tab bar and use your mouse wheel to scroll through the tabs, making it easier to navigate between them.
## Where do I report problems and bugs?
New features are not bugs. Please see [Where do I recommend features?](#where-do-i-recommend-features) below
If you want to report an issue or a bug with the browser, you can do so on the browser's GitHub page. Before submitting your request, it's mandatory to check if the issue has already been reported. You can do this by searching through existing issues on the [GitHub issues page](https://github.com/zen-browser/desktop/issues).
Keep in mind that the Zen Browser team is currently very small, so it might take some time for your request to be reviewed and addressed. The team is dedicated to improving the browser, but with limited resources, they prioritize the most critical and popular requests. Your patience and thoroughness in reporting can help make Zen Browser better for everyone.
## Where do I recommend features?
If you want to recommend features or new ideas for Zen, you can do so on the GitHub discussion page. Before submitting your request, it's mandatory to check if the issue or feature has already been reported. You can do this by searching through existing issues on the [GitHub discussions page](https://github.com/zen-browser/desktop/discussions).
It may also be a good idea to see the [Zen Browser Subreddit](https://www.reddit.com/r/zen_browser/) where there are active discussions of development. Please remember again that the team is small and always in need of help, so if you can't find a way to develop the new feature yourself, it will only come once someone is available and has enough interest to build it. Careful descriptions and explanation of the point of the feature may help.
## How can I sync my data across multiple devices?
Zen Browser integrates with Firefox Sync, allowing you to sync your addons, bookmarks, history, passwords, and other browser data across multiple devices. To enable Firefox Sync in Zen Browser:
1. **Open the Zen Browser Settings**
2. **Navigate to the "Sync" tab**
3. **Sign in with your Mozilla Account.** (If you don't have an account, you'll need to create one)
4. **Select what data you wish to sync**
After signing in and selecting your preferences, your data will be synced across all devices where you are signed in with the same Mozilla account.
## How do I use RTX Video Super Resolution?
To enable Zen Browser to use the feature
1. **Open 'about:config'**
2. **Search for 'gfx.webrender.dcomp-video-hw-overlay-win-force-enabled'**
3. **Double click the flag to toggle it to 'true'**
4. **Restart the browser**
Refer to [Nvidia's RTX Video FAQ](https://nvidia.custhelp.com/app/answers/detail/a_id/5448/~/rtx-video-faq) for additional information.
## Transparency bug
Some users encounter the bug where websites are partially transparent, to resolve it follow bellow:
1. **Url `about:config`**
2. Search for `browser.tabs.allow_transparent_browser`
3. Set the flag to `false`
4. **Restart the browser**
## Themes/Mods broken
Some users may encounter a bug where themes are broken, to resolve it to follow the steps below:
1. Go to your profiles folder (Linux: `~/.zen/` or Flatpak: `~/.var/app/app.zen_browser.zen/zen/`, Windows: `%APPDATA%/zen/Profiles`)
2. Go into the folder of the profile you are using (e.g. with the (release) suffix)
3. Delete (or edit) the zen-themes.json file and restart the browser.
It's recommended to backup the file before updating it manually. By editing you could break the browser
file: ./content/docs/index.mdx
meta: {
"title": "Documentation",
"description": "Welcome to Zen Browser's documentation",
"icon": "BookOpen"
}
import {
SpeechIcon,
BookIcon,
PaletteIcon,
HelpCircleIcon,
HeartIcon,
ShieldIcon,
Paintbrush,
Hammer
} from 'lucide-react';
Welcome to **Zen Browser's Documentation!** Here, you'll find everything you need to get the most out of your browsing experience. Dive in to explore how Zen can make your browsing more secure, private, and efficient.
} title="User Manual" href="/user-manual" description="Complete user guide and features" />
} title="CSS Live Editing" href="/guides/live-editing" description="Live CSS editing for customizing the browser" />
} title="Build the Browser" href="/contribute/desktop" description="Build the browser from source" />
} title="Mods Registry" href="/themes-store/themes-marketplace" description="Custom themes and modifications" />
} title="FAQ" href="/faq" description="Frequently asked questions" />
} title="Security" href="/security" description="Security features and protocols" />
} title="Code of Conduct" href="/contribute/code-of-conduct" description="Community guidelines" />
} title="Contribute" href="/contribute" description="How to contribute to the project" />
file: ./content/docs/security.mdx
meta: {
"title": "Privacy & Security",
"description": "At Zen Browser, your online safety and privacy are our top priorities. We've implemented a range of security features to ensure you're protected while browsing.",
"icon": "ShieldCheck"
}
import { Callout } from 'fumadocs-ui/components/callout';
All passwords, cookies, and cache in Zen Browser are **managed by Firefox**. This means your saved passwords are **automatically encrypted**, providing an extra layer of security to keep your login credentials safe. Cookies and cache are also handled according to Firefox's strict privacy policies, ensuring your data is stored securely and only accessible to you.
For more information visit [Firefox Privacy and Security](https://support.mozilla.org/es/products/firefox/privacy-and-security)
## Adjusting Security Settings
Zen Browser lets you customize privacy and security settings to improve your browsing safety. If you want to adjust or change these settings:
1. Click the `menu button` and select `Settings`.
2. On the sidebar, go to the `Privacy & Security` section.
***
## Security
Zen Browser is built on the **latest version of Firefox**, one of the most secure browsers available today. This means you benefit from all of Firefox's security patches and updates as soon as they are released, keeping you safe from known vulnerabilities.
### 1. Staying Up-to-Date with Firefox
Zen Browser tracks Firefox updates very closely:
* We update Zen to the latest Firefox release within **0–72 hours** so we can always stay up to date with security fixes.
* We test upcoming versions using Firefox **RC builds** on the *Twilight* branch about **one week before** each official release.
You can check which Firefox version Zen is currently based on here:\
[🔗 Firefox Versions](https://github.com/zen-browser/desktop?tab=readme-ov-file#firefox-versions)
### 2. OCSP Enabled
Zen Browser uses **OCSP (Online Certificate Status Protocol)** to check the validity of a website’s security certificate. This ensures that you only connect to safe websites with up-to-date and valid certificates, protecting you from malicious sites that may have expired or revoked certificates.
### 3. HTTPS Only Mode
**HTTPS Only Mode** ensures that you connect securely to websites by using the HTTPS version whenever possible. HTTPS encrypts the communication between you and the website, protecting your data from being intercepted by hackers.
You can enable HTTPS-Only Mode in **all windows** or **private windows only**.
For more information visit [HTTPS-Only Mode in Firefox](https://support.mozilla.org/en-US/kb/https-only-prefs)
### 4. Deceptive Content and Dangerous Software Protection
Zen Browser helps protect you from **phishing, malware, and fraudulent websites**. It uses URL filters and real-time checks to block harmful content, making your browsing experience safer.
To learn more, visit [Block deceptive content and dangerous downloads in Firefox](https://support.mozilla.org/en-US/kb/block-deceptive-content-and-dangerous-downloads-firefox)
### 5. SSL – Treat Unsafe Negotiation as Broken by Default
Zen Browser treats insecure SSL connections (those that don't meet modern security standards) as broken by default. This means that if a **website is not properly secured**, Zen Browser will alert you and **block the unsafe connection**, preventing potential security risks.
***
## Privacy settings
### 1. Tracking Protection
To protect your privacy, Zen Browser includes **tracking protection**. This feature automatically blocks websites and advertisers from tracking your online activity, making it harder for third parties to collect your data and show you targeted ads.
You can choose from three levels of Tracking Protection: **Standard**, **Strict**, or **Custom**.
### 2. DNS over HTTPS
Zen Browser allows the users to enable DNS over HTTPS, which **sends your request for a domain name through an encrypted connection**, providing a secure DNS and making it harder for others to see which website you’re about to access.
You can choose from three protection levels: **Default Protection**, **Increased Protection**, or **Max Protection**.
***
These security features work behind the scenes to provide a safe and private browsing experience. With Zen Browser, you can browse with confidence knowing that your security is always a top priority.
file: ./content/docs/contribute/code-of-conduct.mdx
meta: {
"title": "Code of Conduct",
"description": "This is the code of conduct for the community. It outlines the expectations for behavior and how to report unacceptable behavior."
}
## Our Pledge
We as members, contributors, and leaders pledge to make participation in our community a harassment-free experience for everyone, regardless of age, body size, visible or invisible disability, ethnicity, sex characteristics, gender identity and expression, level of experience, education, socio-economic status, nationality, personal appearance, race, religion, or sexual identity and orientation.
We pledge to act and interact in ways that contribute to an open, welcoming, diverse, inclusive, and healthy community.
## Our Standards
Examples of behavior that contributes to a positive environment for our community include:
* Demonstrating empathy and kindness toward other people
* Being respectful of differing opinions, viewpoints, and experiences
* Giving and gracefully accepting constructive feedback
* Accepting responsibility and apologizing to those affected by our mistakes, and learning from the experience
* Focusing on what is best not just for us as individuals, but for the overall community
Examples of unacceptable behavior include:
* The use of sexualized language or imagery, and sexual attention or advances of any kind
* Trolling, insulting or derogatory comments, and personal or political attacks
* Public or private harassment
* Publishing others’ private information, such as a physical or email address, without their explicit permission
* Other conduct which could reasonably be considered inappropriate in a professional setting
## Enforcement Responsibilities
Community leaders are responsible for clarifying and enforcing our standards of acceptable behavior and will take appropriate and fair corrective action in response to any behavior that they deem inappropriate, threatening, offensive, or harmful.
Community leaders have the right and responsibility to remove, edit, or reject comments, commits, code, wiki edits, issues, and other contributions that are not aligned to this Code of Conduct, and will communicate reasons for moderation decisions when appropriate.
## Scope
This Code of Conduct applies within all community spaces, and it also applies when an individual is officially representing the community in public spaces. Examples of representing our community include using an official email address, posting via an official social media account, or acting as an appointed representative at an online or offline event.
## Enforcement
Instances of abusive, harassing, or otherwise unacceptable behavior may be reported to the community leaders responsible for enforcement at \[insert contact method]. All complaints will be reviewed and investigated promptly and fairly.
All community leaders are obligated to respect the privacy and security of the reporter of any incident.
## Enforcement Guidelines
Community leaders will follow these Community Impact Guidelines in determining the consequences for any action they deem in violation of this Code of Conduct:
### 1. Correction
**Community Impact**: Use of inappropriate language or other behavior deemed unprofessional or unwelcome in the community.
**Consequence**: A private, written warning from community leaders, providing clarity around the nature of the violation and an explanation of why the behavior was inappropriate. A public apology may be requested.
### 2. Warning
**Community Impact**: A violation through a single incident or series of actions.
**Consequence**: A warning with consequences for continued behavior. No interaction with the people involved, including unsolicited interaction with those enforcing the Code of Conduct, for a specified period of time. This includes avoiding interactions in community spaces as well as external channels like social media. Violating these terms may lead to a temporary or permanent ban.
### 3. Temporary Ban
**Community Impact**: A serious violation of community standards, including sustained inappropriate behavior.
**Consequence**: A temporary ban from any sort of interaction or public communication with the community for a specified period of time. No public or private interaction with the people involved, including unsolicited interaction with those enforcing the Code of Conduct, is allowed during this period. Violating these terms may lead to a permanent ban.
### 4. Permanent Ban
**Community Impact**: Demonstrating a pattern of violation of community standards, including sustained inappropriate behavior, harassment of an individual, or aggression toward or disparagement of classes of individuals.
**Consequence**: A permanent ban from any sort of public interaction within the community.
## Attribution
This Code of Conduct is adapted from the [Contributor Covenant][homepage], version 2.1, available at [https://www.contributor-covenant.org/version/2/1/code\_of\_conduct.html](https://www.contributor-covenant.org/version/2/1/code_of_conduct.html).
Community Impact Guidelines were inspired by [Mozilla's code of conduct enforcement ladder](https://github.com/mozilla/diversity).
For answers to common questions about this code of conduct, see the FAQ at [https://www.contributor-covenant.org/faq](https://www.contributor-covenant.org/faq). Translations are available at [https://www.contributor-covenant.org/translations](https://www.contributor-covenant.org/translations).
[homepage]: https://www.contributor-covenant.org
file: ./content/docs/contribute/index.mdx
meta: {
"title": "Contributing",
"description": "Contributing to Zen Browser"
}
import { GlobeIcon, BookAIcon, BookIcon, HammerIcon } from 'lucide-react'
import { GithubInfo } from 'fumadocs-ui/components/github-info';
Thank you for considering contributing to Zen Browser! We appreciate your time and effort in improving this project. The following is a set of guidelines for contributing to Zen Browser. These guidelines are intended to make it easier for you to get involved.
## Types of Contributions
We welcome a wide range of contributions, including but not limited to:
* **Bug Fixes**: Resolve existing issues in the code.
* **New Features**: Implement new features or enhance existing ones.
* **Documentation**: Improve the clarity and depth of documentation.
* **Code Refactoring**: Clean up the code to improve readability, performance, or maintainability.
* **UI/UX Enhancements**: Improve the user interface or user experience of Zen Browser.
## Getting Started
To help you get started with contributing, we have created separate guides for each repository:
} description="Getting Started with Zen Browser Development" href="/contribute/desktop" />
} description="Getting Started with Zen's Homepage Development" href="/contribute/www" />
} description="Getting Started with Documentation Contributions" href="/contribute/docs" />
} description="Getting Started with Translations" href="/contribute/translation" />
Please follow the appropriate guide based on the repository you want to contribute to.
### Reporting Bugs
If you find a bug, please open an issue and describe the problem in detail. Include steps to reproduce the bug, the expected behavior, and any relevant information about your environment. Please verify that the bug has not been reported already.
Open the issue in it's corresponding GitHub repository:
* [Desktop Browser App](https://github.com/zen-browser/desktop/issues)
* [Zen's Custom Mods](https://github.com/zen-browser/theme-store)
* [Zen's Homepage Website](https://github.com/zen-browser/www)
* [This documentation Website](https://github.com/zen-browser/docs)
### Suggesting Features
We welcome suggestions for new features or improvements to existing ones. To suggest a feature, please start a new Github discussion in the Ideas category.
*Use the correct Github Repository based on the list above*
***
## Code of Conduct
Please note that this project is governed by a [Code of Conduct](/contribute/code-of-conduct). By participating in this project, you agree to abide by its terms.
## License
By contributing to Zen Browser, you agree that your contributions will be licensed under the [MPL-2.0 License](https://github.com/zen-browser/desktop/blob/main/LICENSE).
***
Thank you for your interest in contributing to Zen Browser! We look forward to your contributions.
file: ./content/docs/contribute/translation.mdx
meta: {
"title": "Translations",
"description": "How to contribute to the translations for Zen Browser."
}
Thank you for your interest in contributing to the translations for Zen Browser! Ensuring that Zen Browser is accessible to users around the world is a key priority, and your contributions help make this possible. This guide will walk you through the process of getting started with translating Zen Browser using Crowdin.
If you want to translate a language that is not currently available in the Crowdin project, please reach out to the developers on Discord. We’ll be happy to add it for you!
## Prerequisites
Before you begin, you will need to have the following:
* **A Crowdin Account**: You can sign up for free at [Crowdin](https://crowdin.com).
* **Basic Knowledge of the Language**: A good understanding of the language you are translating to is essential.
## Step 1: Join the Zen Browser Translation Project
1. Visit the [Zen Browser Translation Project on Crowdin](https://crowdin.com/project/zen-browser).
2. Click on the "Join" button to become a contributor to the project.
3. Select the language you want to contribute to from the list of available languages.
## Step 2: Start Translating
Once you have joined the project and selected your language, you can start translating:
1. Navigate to the language you selected.
2. You will see a list of files that need translation. Click on any file to start translating.
3. Translate the strings from English to your selected language. Ensure that the translations are accurate and clear.
4. Save your translations as you work.
## Step 3: Review and Suggest Improvements
In addition to translating, you can also review translations made by others:
1. Go to your selected language.
2. Review the translations and suggest improvements if necessary.
3. Approve translations that are correct and meet the quality standards.
## Step 4: Communicate with Other Translators
Crowdin provides communication tools to collaborate with other translators:
* **Comments**: Leave comments on specific strings if you have questions or suggestions.
* **Discussions**: Participate in project-wide discussions to coordinate with other translators.
## Step 5: Stay Updated
Crowdin allows you to track the progress of the translation project and stay updated on new strings that need translation:
* **Notifications**: Enable notifications in your Crowdin account to be alerted when new content is available for translation.
* **Progress Tracking**: Use the progress bars to see how much of the translation is complete for your selected language.
## Additional Resources
* [Zen Browser Translation Project on Crowdin](https://crowdin.com/project/zen-browser)
* [Crowdin Documentation](https://support.crowdin.com/)
* [Contribution Guidelines](/contribute)
* [Code of Conduct](/contribute/code-of-conduct)
***
Thank you for helping to make Zen Browser accessible to a global audience! Your contributions are invaluable.
file: ./content/docs/contribute/www.mdx
meta: {
"title": "Homepage",
"description": "Learn how to set up and contribute to the development of Zen Browser's homepage."
}
This guide will walk you through the steps required to set up and contribute to the development of Zen Browser's homepage. Whether you're fixing bugs, adding new features, or enhancing the design, this guide will help you get started.
## Prerequisites
Before you begin, make sure you have the following installed on your machine:
* [**Git**](https://git-scm.com/): Version control system to clone the repository and manage your code.
* [**Node.js**](https://nodejs.org/): JavaScript runtime for running the development server and building the project.
* [**pnpm**](https://pnpm.io/): Fast, disk-efficient Node package manager used by this project.
## Step 1: Fork the Repository
1. Navigate to the [Zen Browser Website Repository](https://github.com/zen-browser/www).
2. Click on the "Fork" button at the top right of the repository page. This creates a personal copy of the repository under your GitHub account.
## Step 2: Clone the Repository
Once you have forked the repository, clone it to your local machine using the following command:
```bash
git clone https://github.com//www.git
cd www
```
Replace `` with your GitHub username.
## Step 3: Install Dependencies
Navigate to the project directory and install the required dependencies:
```bash
pnpm install
```
This command installs all the necessary packages listed in the `package.json` file and respects the exact versions defined in `pnpm-lock.yaml`.
## Step 4: Build the Project
To build the project files:
```bash
pnpm run build
```
This command will compile and process all the source files into a production-ready format.
## Step 5: Start the Development Server
After installing the dependencies, you can start the development server:
```bash
pnpm run dev
```
This command will start a local server and open the homepage in your default web browser. The server will automatically reload whenever you make changes to the code.
## Step 6: Make Your Changes
You can now start making changes to the homepage. The project structure is as follows:
* **src/**: Contains the source code for the homepage.
* **public/**: Contains static files like images and HTML templates.
* **package.json**: Lists the project's dependencies and scripts.
Feel free to explore and modify the files to implement new features or fix bugs.
## Step 7: Test Your Changes
Before submitting your changes, make sure they work as expected. Check the functionality across different pages and ensure that your changes do not introduce any new issues.
## Step 8: Commit and Push Your Changes
Once you are satisfied with your changes, commit them to your local repository. **All commits must:**
1. Follow the [Conventional Commits](https://www.conventionalcommits.org/) specification (checked automatically by **commitlint**).
2. Commits must be signed. You can learn more about Commit Signing [here](https://docs.github.com/en/authentication/managing-commit-signature-verification/signing-commits).
Example:
```bash
git add .
git commit -m "feat(www): add dark mode toggle"
```
Push your changes to your forked repository:
```bash
git push origin main
```
## Step 9: Create a Pull Request
After pushing your changes, go to the original Zen Browser Homepage Repository and submit a pull request:
1. Navigate to the repository you forked from.
2. Click on the "Pull Requests" tab.
3. Click on "New Pull Request" and select your branch.
4. Provide a clear and concise description of your changes.
5. Submit the pull request.
Your pull request will be reviewed by the maintainers, and you may be asked to make some adjustments. Once approved, your changes will be merged into the main branch.
## Additional Resources
* [Zen Browser Homepage Repository](https://github.com/zen-browser/www)
* [Contribution Guidelines](/contribute)
* [Code of Conduct](/contribute/code-of-conduct)
***
Thank you for contributing to Zen Browser's homepage! Your contributions help make the project better for everyone.
file: ./content/docs/guides/1password.mdx
meta: {
"title": "1Password Integration",
"description": "How to integrate 1Password Desktop App with Zen Browser"
}
This Guide is designed to help you integrate [1Password Desktop App](https://1password.com/downloads) with Zen Browser, for a more **straight forward workflow** when accessing your credentials using this password manager browser extension.
1Password browser integrations follows a [list of well-known/trusted browser](https://support.1password.com/1password-browser-connection-security/), with this integration account information and encryption keys are transferred using this connection to allow the 1Password app and browser extension to share your vaults and lock state and allowing you to unlock your Browser Extension Vault with [bio-metric](https://en.wikipedia.org/wiki/Biometrics) data.
Since Zen Browser is still under development and [under the usage threshold](https://1password.community/discussion/comment/719323#Comment_719341) 1Password takes in consideration Zen Browser is not within this list causing the 1Password Browser integration to fail.
## Workarounds
That being said, there are workaround methods to add Zen Browser to this *Trusted Browsers* list.
### Linux
You can create a *Custom Allowed Browsers* file that 1Password will use to allow Zen Browser -- or other non-officially supported browser-- to integrate with 1Password's desktop app.
Your 1Password application and the Zen browser need to be installed *directly* to your machine, not through a container-like program such as `flatpak` or `snap`. Additionally, they both need to be owned by the `root` user.
If they are not installed directly to the system, Zen *will not* be able to talk to 1Password.
If they are not owned by `root`, Zen *will* be able to talk to the native 1Password app but will not be able to be verified by the "Native Core" of 1Password.
See: [Connect additional browsers to the 1Password app](https://support.1password.com/additional-browsers/?linux)
#### 1. Create 1Password's config directory
```bash
sudo mkdir /etc/1password
```
#### 2. Create the Custom Allowed Browsers file
```bash
sudo touch /etc/1password/custom_allowed_browsers
```
#### 3. Add Zen Browser to this custom list
```bash
echo "zen-bin" | sudo tee -a /etc/1password/custom_allowed_browsers
```
#### 4. Ensure the right permissions are set for the Custom Allowed Browsers file
```bash
sudo chown root:root /etc/1password/custom_allowed_browsers && sudo chmod 755 /etc/1password/custom_allowed_browsers
```
#### 5. Restart both programs.
In order to pick up the changes you just made, both 1Password and Zen need to be restarted.
***
Special thanks to [u/xmansyx](https://www.reddit.com/user/xmansyx/) and [u/feelspeaceman](https://www.reddit.com/user/feelspeaceman/)
Sources:
* [1Password Integration fix (Linux) - Reddit](https://www.reddit.com/r/zen_browser/comments/1gcm33v/1password_integration_fix_linux/)
* [1Password Extension fix for other Browsers on Linux - edb tools!](https://edb.tools/posts/1password-extension-fix/)
***
### MacOS and Windows
In MacOS and Windows you can use the Graphical Interface of the Desktop app to add Zen Browser to the trusted browsers list.
1. Go into the 1Password desktop app and open Settings.
2. In the Browser tab, click "Add Browser".
3. In your Applications folder, find and add "Zen Browser", then authorize 1Password when prompted.
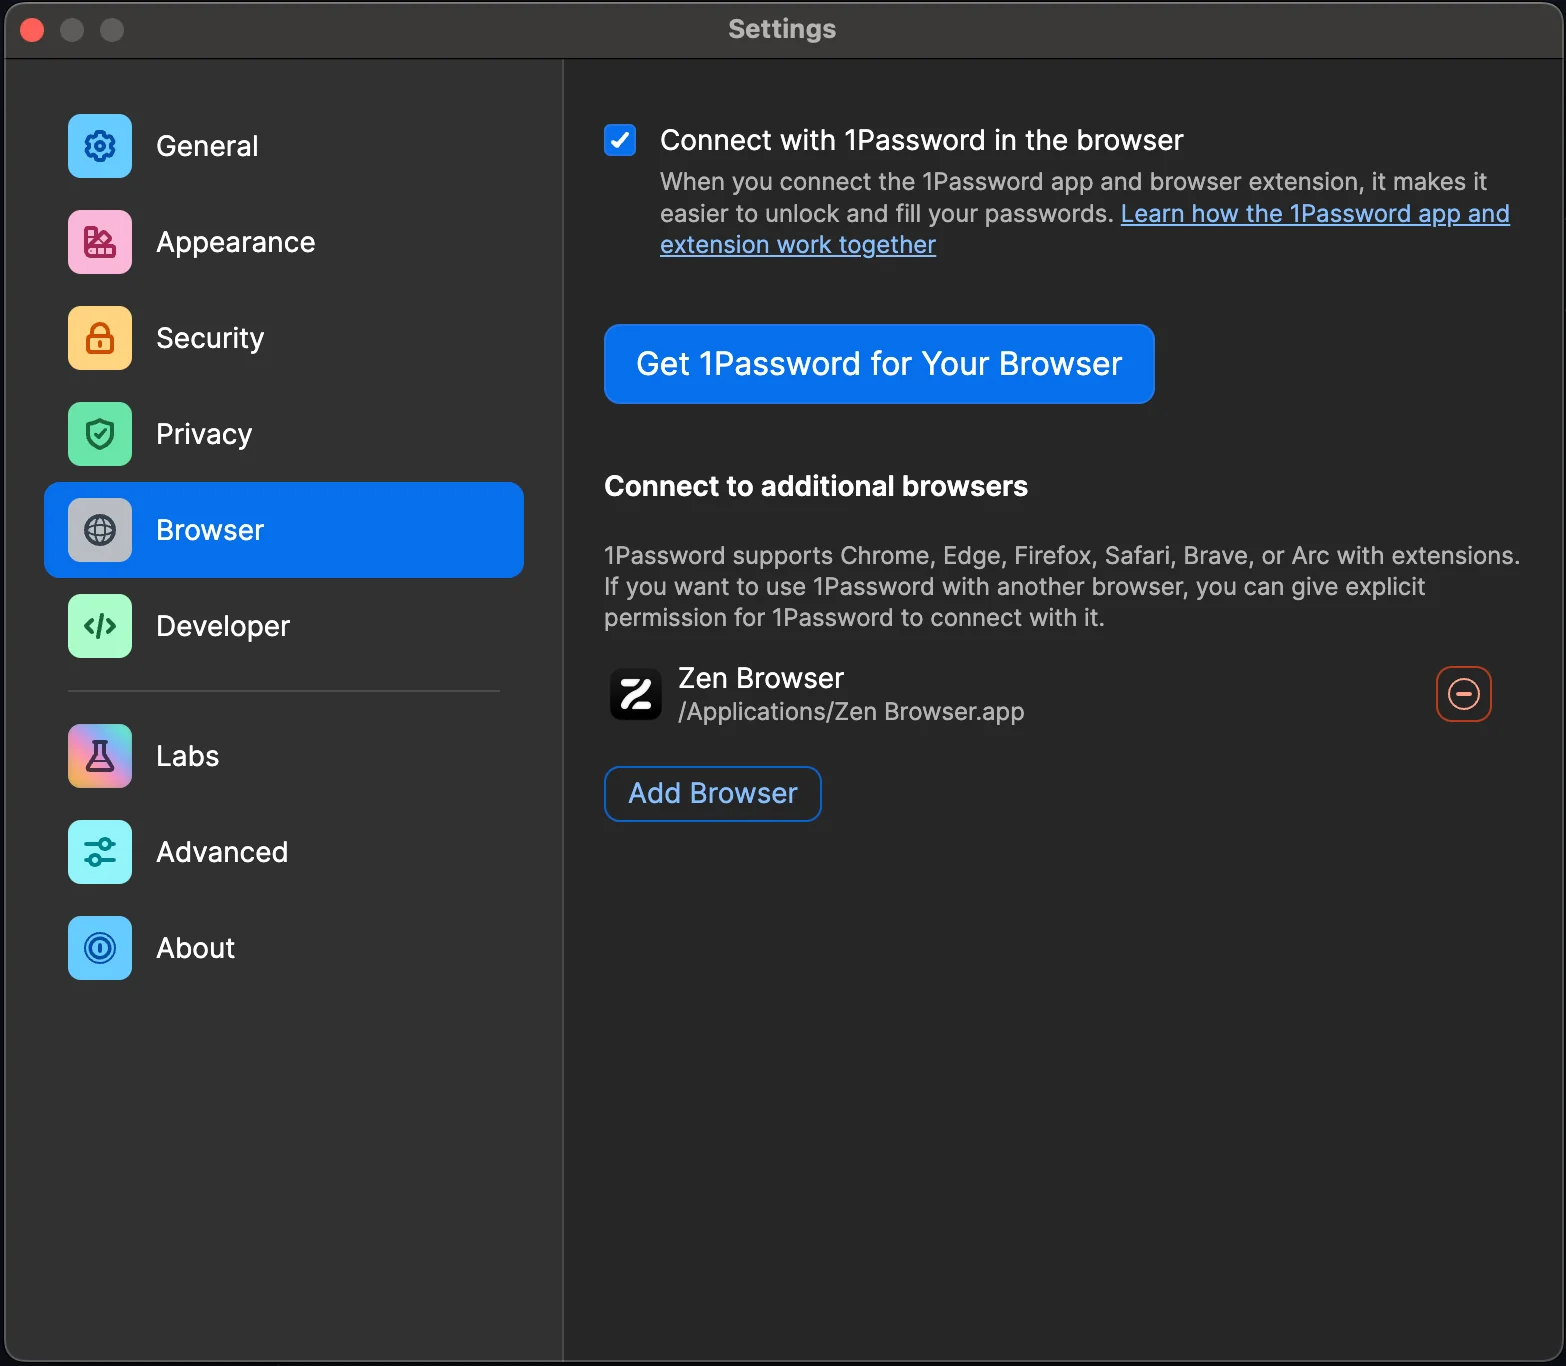
If you would like to contribute with Screenshots for steps 1, 2 and 3 send me a message in our [Discord Server](https://discord.gg/zen-browser) **@mr. docs**
file: ./content/docs/guides/about-config-flags.mdx
meta: {
"title": "Hidden/Advanced Preferences",
"description": "A list of useful flags in Zen Browser's Advanced Preferences page (about:config)."
}
These are a variety of settings that can change Zen's appearance, behavior, and more. To access them, go to `about:config` in Zen Browser, and search for the title of the flag. Some of these flags may require a restart to work.
### Appearance
#### `zen.theme.content-element-separation`
Changes the size of the border around the browser window. 8 by default.
#### `zen.theme.accent-color`
The color hex value of Zen's main accent color.
#### `zen.theme.essentials-favicon-bg`
Enables a colorful icon for when an essential tab is selected, based on the website's favicon. Enabled by default.
#### `zen.theme.gradient`
Allows setting custom sidebar colors. Enabled by default.
#### `zen.theme.gradient.show-custom-colors`
Allows setting a color hex as your sidebar color. Disabled by default.
#### `zen.view.experimental-rounded-view`
??? Disabled by default.
#### `zen.view.grey-out-inactive-windows`
If a window is inactive, the theme color fades to gray. Enabled by default.
#### `zen.watermark.enabled`
Shows a splash screen briefly when Zen is opened. Enabled by default.
### Transparency & Blur
#### `zen.theme.acrylic-elements`
Windows-specific. Allows use of Windows' Acrylic protocol for a blur effect in Zen. Enabled by default on Windows.
#### `zen.widget.linux.transparency`
Linux-specific. Makes the browser UI transparent.
#### `browser.tabs.allow_transparent_browser`
Changes the default website background to your theme color. Disabled by default.
Enabling could break the way certain websites look.
### Tabs
#### `zen.tab-unloader.excluded-urls`
A comma-separated list of URLs exempt from being unloaded.
#### `zen.tabs.dim-pending`
Dims unloaded tabs. Enabled by default.
#### `zen.tabs.rename-tabs`
Allows renaming pinned tabs. Enabled by default.
#### `zen.ctrlTab.show-pending-tabs`
Allow switching to unloaded tabs using Ctrl+Tab, when "Ctrl+Tab cycles through tabs in recently used order" is enabled. Disabled by default.
#### `zen.startup.smooth-scroll-in-tabs`
Turns on smooth scrolling when scrolling through tabs. Enabled by default.
#### `toolkit.tabbox.switchByScrolling`
Allows to switch tabs by scrolling when hovering over tabs. Disabled by default.
### New Tabs
#### `zen.urlbar.replace-newtab`
Replaces opening a new tab, with instead showing the URL bar and allowing you to input a query which will then open a new tab. Enabled by default.
#### `zen.workspaces.open-new-tab-if-last-unpinned-tab-is-closed`
Opens a new tab when all pinned tabs are unloaded, and all tabs are closed. Disabled by default.
### URL Bar
#### `zen.urlbar.hide-one-offs`
Hides the alternative search engines from appearing in the URL bar. Enabled by default.
#### `zen.urlbar.show-domain-only-in-sidebar`
When Single Toolbar is enabled, shows only the website domain(ex: example.com) instead of the full URL(ex: example.com/page). Enabled by default.
#### `zen.urlbar.show-protections-icon`
Shows the "protections" icon in the URL bar, which details security information about the current website. Disabled by default.
#### `zen.urlbar.wait-to-clear`
How long the URL bar saves what you typed, if you typed something in and unfocused it in milliseconds. 45000 by default.
### Sidebar
#### `zen.view.sidebar-collapsed.hide-mute-button`
Hides the mute button in Collapsed Toolbar mode.
#### `zen.view.sidebar-expanded.max-width`
Controls the width of the sidebar in Single Toolbar or Multiple Toolbars mode.
#### `zen.view.sidebar-height-throttle`
??? 200 by default.
### Window Controls
#### `zen.view.hide-window-controls`
Hides the window controls. Enabled by default.
In Single Toolbar mode, this hides the toolbar, which can then be revealed on hover.
#### `zen.view.experimental-force-window-controls-left`
Forces the window controls to appear on the left side of the window. Disabled by default.
If the sidebar is in the left side, it will appear in it.
#### `zen.view.experimental-no-window-controls`
Removes the window controls entirely. Disabled by default.
This will disable the toolbar in Single Toolbar mode.
### Workspaces
#### `zen.workspaces.swipe-actions`
Allows swiping with the trackpad on the sidebar to switch workspaces. Enabled by default.
#### `zen.workspaces.wrap-around-navigation`
When swiping through tabs, allow going to the last workspace from the first workspace by swiping left, or vice versa. Enabled by default.
#### `zen.workspaces.natural-scroll`
Turns on natural scrolling for swiping through workspaces. Disabled by default.
#### `zen.workspaces.scroll-modifier-key`
Controls the hotkey that enables hovering over the sidebar and switching workspaces by scrolling. Options are 'ctrl', 'alt', 'shift'. Default is 'ctrl'.
### Compact mode
#### `zen.view.compact.animate-sidebar`
Animates the webpage moving in/out when compact mode is enabled/disabled. Enabled by default.
#### `zen.view.compact.color-sidebar`
Colors the sidebar with your custom theme color during compact mode. Enabled by default.
#### `zen.view.compact.color-toolbar`
Colors the toolbar with your custom theme color during compact mode. Enabled by default.
#### `zen.view.show-background-tab-toast`
Shows a toast when a tab is open while compact mode is enabled. Enabled by default.
#### `zen.view.compact.show-sidebar-and-toolbar-on-hover`
Shows the sidebar/toolbar if you hover in their general area during compact mode. Enabled by default.
#### `zen.view.compact.toolbar-flash-popup`
Shows the sidebar for a moment when opening a new tab during compact mode. Disabled by default.
`zen.view.compact.toolbar-flash-popup.duration` controls the duration in milliseconds. 800 by default.
#### `zen.view.compact.toolbar-hide-after-hover.duration`
Controls the duration until which the toolbar/sidebar hides after you stopped hovering over it in compact mode. 1000 by default.
### Split View
#### `zen.splitView.enable-tab-drop`
When enabled, dropping a tab from the sidebar to the current webpage starts split view. Enabled by default.
#### `zen.splitView.min-resize-width`
The minimum width or height of any split view tab. The number represents the percentage of the screen taken up by the tab. 7 by default.
#### `zen.splitView.rearrange-hover-size`
??? 24 by default.
### Media
#### `zen.mediacontrols.enabled`
Shows a media player interface if audio is playing in another tab, or a conference call interface if you're in a conference call. Enabled by default.
#### `media.videocontrols.picture-in-picture.enabled`
Allows picture-in-picture. Enabled by default.
#### `media.videocontrols.picture-in-picture.enable-when-switching-tabs.enabled`
Automatically turns on picture-in-picture when switching tabs during video playback. Disabled by default.
### Other
#### `zen.glance.enable-contextmenu-search`
Controls whether Glance will open when performing a search or using the context menu (such as right-click search). Enabled by default.
If disabled, Glance will not open for context menu or search-triggered actions, even if Glance is enabled elsewhere.
#### `zen.keyboard.shortcuts.enabled`
Allows changing keyboard shortcuts. Enabled by default.
#### `zen.glance.open-essential-external-links`
When enabled, external links that are opened inside an essential tab will open in Glance. Enabled by default.
#### `browser.toolbars.bookmarks.visibility`
Controls when the bookmarks toolbar is shown. Options are 'always', 'newtab', 'never'. Default is 'never'.
#### `zen.downloads.download-animation`
When enabled, plays an animation when a download begins. Enabled by default.
`zen.downloads.download-animation-duration` controls the duration in milliseconds. 1000 by default.
#### `zen.haptic-feedback.enabled`
macOS-specific. Triggers haptic feedback on the trackpad's vibration motor when you drag tabs around, or change the texture in the Change Theme Colors pop-up. Enabled by default.
#### `zen.browser.is-cool`
This is true.
file: ./content/docs/guides/generic-optimized.mdx
meta: {
"title": "Optimized builds",
"description": "Why have optimized builds been removed?"
}
For Windows and Linux, Zen Browser used to have the option to download optimized builds. These builds utilized AVX2 instructions to improve performance. These builds have been removed because of the following reasons:
1. **The optimized version isn't necessarily faster**: Profile-guided optimizations (PGO) aren't working with the optimized version because Clang fails to handle them properly, leading to a crash. As a result, we cannot build optimized versions if we want to include both PGO and Link Time Optimization (LTO). Additionally, AVX2 increases power consumption and is not ideal for heavy parallel computations.
2. **AVX2 isn't supported everywhere**: There are still many devices that don't support AVX2 instructions, which makes the installation process more confusing.
In conclusion, having optimized builds is not really worth it, especially if we want to have PGO & LTO.
P.S. all optimized builds will be automatically updated to generic starting from version `1.0.2-b.4`.
View original [here](https://github.com/zen-browser/desktop/wiki/Why-have-optimized-builds-been-removed%3F)
file: ./content/docs/guides/install-linux.mdx
meta: {
"title": "Install Zen on Linux",
"description": "Available for X64 and ARM devices"
}
## Install from Flathub
The easiest way to get Zen on your Linux-based operating system is to install it from [Flathub](https://flathub.org/apps/details/app.zen_browser.zen). You can also use app stores that supports Flatpak, like GNOME Software, KDE Discover, Cosmic Store and more.
Your profile for Flatpak version of Zen will be available in `~/.var/app/app.zen_browser.zen/zen/`. You can go to `about:profiles` to check your profile name, then open the directory manually using your file manager app with the prefix path above.
## Install from Tarball Scripts
Zen provides install scripts that will install the browser directly to your home directory. Run this command from your terminal:
```
curl -fsSL https://github.com/zen-browser/updates-server/raw/refs/heads/main/install.sh | $SHELL
```
Zen will be installed in `~/.tarball-installations/zen`.
You can also use the script below to install Twilight version of Zen, which built freshly every night and contained the latest changes. You can use Zen Twilight to try new features, [catch bugs and report them](https://github.com/zen-browser/desktop/issues) before it arrived on regular Beta builds!
```
curl -fsSL https://github.com/zen-browser/updates-server/raw/refs/heads/main/install-twilight.sh | $SHELL
```
Zen Twilight will be installed in `~/.tarball-installations/zen-twilight`.
Your profile for tarball version of Zen and Zen Twilight will be available in `~/.zen/`. Check `about:profiles` to see your profile name and access the directory directly.
## Download Directly
You can also download Zen tarball and AppImage files directly, as well as formats for other OS in [latest Zen Github Releases](https://github.com/zen-browser/desktop/releases/latest) page.
file: ./content/docs/guides/live-editing.mdx
meta: {
"title": "Live Editing Zen Theme",
"description": "Learn how to live edit the appearance of Zen Browser by editing the userChrome.css file."
}
import KeyboardShortcut from '@/components/KeyboardShortcut';
import { Callout } from 'fumadocs-ui/components/callout';
This Guide will help you customize the appearance of Zen Browser by live editing the `userChrome.css` file. Follow the steps below to start customizing your browser's theme.
## Step 1: Access the Profile Folder
On the Flatpak version of Zen, the profile folder will be located at `~/.var/app/app.zen_browser.zen/.zen`.
1. Open Zen Browser.
2. Type `about:support` in the address bar and press Enter.
3. Look for the **Application Basics** section.
4. Click on **Open Profile Folder**. This will open the folder where Zen Browser stores your user data.
## Step 2: Create the `chrome` Folder
1. In the Profile Folder, create a new folder and name it `chrome`.
2. Inside the `chrome` folder, create a new blank file named `userChrome.css`.
3. Restart Zen Browser to apply the changes.
## Step 3: Open Style Editor in Zen Browser
After Zen Browser version `1.0.0-a.31` the Browser Developer Tools is disabled by default for security.
1. Open the `about:config` page. This page contains advanced settings for the browser.
2. Search for `devtools.debugger.remote-enabled` and toggle it to `true`.
3. Search for `devtools.chrome.enabled` and toggle it to `true`.
4. Search for `toolkit.legacyUserProfileCustomizations.stylesheets` and toggle it to `true`. This setting is required for `userChrome.css` to work.
1. In Zen Browser, press to open the Developer Tools.
2. Navigate to the **Style Editor** tab.
3. In the filter/search bar, type `userChrome` to locate the `userChrome.css` file you created earlier.
## Step 4: Edit the `userChrome.css` File
If a style does not apply as expected, try adding the `!important` keyword at the end of the CSS rule. This forces the browser to apply the style regardless of any other existing styles.
If you wish to edit pop-ups or menus that automatically hide, be sure to enable the `Disable Popup Auto-Hide` option from the Browser Toolbox settings menu ( ⋯ button )
1. The `userChrome.css` file should now be visible in the Style Editor.
2. You can start editing the file directly within the Style Editor.

* **Note:** You can use the **Inspect** button to hover over and select elements on the page. This allows you to learn about the `id`, `class`, or other attributes of elements, which you can then target in your `userChrome.css` file.
3. To apply your changes, save the file by clicking **Save** or by pressing .
Any changes you make to the `userChrome.css` file will be applied immediately to Zen Browser.
Use this file to customize various UI elements, such as colors, fonts, and the layout.
You can use this guide to help you [create your Zen theme and publish it.](/themes-store/themes-marketplace)
***
This guide is designed to help you quickly and efficiently customize your Zen Browser experience. Happy theming!
file: ./content/docs/guides/manage-profiles.mdx
meta: {
"title": "Managing Firefox Profiles",
"description": "Learn how to manage Firefox profiles effectively, preserving key elements of your browsing experience."
}
import { Callout } from 'fumadocs-ui/components/callout';
This Guide will give you a comprehensive understanding of Firefox profiles, helping you manage them effectively even in the most challenging situations. By following this guide, you'll learn how to preserve key elements of your browsing experience, including bookmarks, history, passwords, and more.
## Goal
This guide will help you:
* Keep bookmarks and history
* Keep passwords
* Keep logins
* Keep open tabs
* Keep your default search engine
* Preserve `about:config` settings
* Keep installed add-ons (but note that you may lose all add-on customizations)
## Steps to Follow
### 1. Open Your Current Profile Folder
This step is crucial to avoid corruption, as Firefox continuously reads and writes data while running.
1. Go to `about:support` in Firefox.
2. Under the "Application Basics" section, click on "Open Folder" next to "Profile Folder."
### 2. Copy Essential Files
* **storage folder**: If you want to keep add-on customizations (this may not work 100% of the time).
* **chrome folder**: If you want to retain your interface customizations.
After turning off Firefox, copy the following files from your profile folder:
* **places.sqlite**: Contains bookmarks and history.
* **cookies.sqlite**: Stores login sessions.
* **cert9.db + key4.db + logins.json**: Holds your saved passwords.
* **extension-preferences.json + extensions.json + extension-settings.json + extensions folder**: These files keep track of your installed add-ons (but not their custom settings).
* **search.json.mozlz4**: Stores your search engine preferences.
* **sessionCheckpoints.json + sessionstore.jsonlz4**: Saves your currently open tabs.
* **prefs.js**: Contains your `about:config` settings.
### 3. Create and Set Up a New Profile
If Firefox opens with an incompatibility error after pasting the files, go to the new profile folder and move the `compatibility.ini` file somewhere else.
1. Go to `about:profiles` in Firefox.
2. Click on "Create a New Profile."
3. Select a folder to store the new profile.
4. Launch Firefox with the new profile.
5. Go to `about:support` again and open the profile folder for the new profile.
6. **Turn off Firefox**.
7. Paste the files you copied earlier into the new profile folder.
### 4. Final Step: Set as Default Profile
After ensuring everything works correctly, go back to `about:profiles` and set the newly created profile as the default. This will make it your main profile moving forward.
By following these steps, you'll maintain a consistent and personalized browsing experience across different Firefox profiles.
file: ./content/docs/themes-store/themes-marketplace-preferences.mdx
meta: {
"title": "Preferences"
}
import { Callout } from 'fumadocs-ui/components/callout';
The `preferences.json` file allows mod developers to define custom preferences that control the behavior and appearance of mods in the Zen Browser. Each preference is defined with a `property`, a `label`, a `type`, and optionally `options` (for dropdown preferences), `defaultValue`, `placeholder` (to configure preference placeholder) and `disabledOn` (to disable property on selected OS). The `preferences.json` file contains a list of these preference objects at its root.
## Preferences fields
### Field: `property` - Property name
The `property` field is a string that should follow Firefox's preference naming schema, similar to `about:config` entries. The `property` name can be any valid string that aligns with this schema.
For example: `mod.mymod.background_color`
### Field: `label` - Label
The `label` field is the description that will be visible to users in the Zen Mods settings page.
This field accepts a string and allows white space.
For example: `Changes the background color`
### Field: `type` - Preference type
| **Property** | **Type** | **Accepted Values** |
| ------------ | --------------- | --------------------------------------------------------------------------------- |
| `checkbox` | Boolean | `true`, `false` |
| `dropdown` | Array\[Options] | The `value` of an option must be a string (`"blue"`) or an integer (`1`) |
| `string` | String | The `value` of an option must be a string (`"blue"`) (a valid CSS property value) |
#### Type: `checkbox`
The `checkbox` type allows a togglable input to enable or disable a property.
```json title="Checkbox Example"
{
"property": "mod.mymod.enable_dark_mode",
"label": "Enable dark mode",
"type": "checkbox"
}
```
#### Type: `dropdown`
The `dropdown` type allows to select a single choice on multiple options.
```json title="Dropdown Example"
{
"property": "mod.mymod.background_color",
"label": "Background color",
"type": "dropdown",
"options": [
{
"label": "Green",
"value": "green"
},
{
"label": "Blue",
"value": "blue"
}
]
}
```
#### Type: `string`
The `string` type is a text input that allows to insert valid css values without being a selection.
```json title="String Example"
{
"property": "mod.mymod.tab_padding",
"label": "Set tab padding",
"type": "string"
}
```
### Field: `options` - Options (only for `type`: `dropdown`)
The `options` field is an array of option objects, only available for the `dropdown` type. This field must be an array containing one or more option objects.
```json
"options": [
{
"label": "Light",
"value": "light"
},
{
"label": "Dark",
"value": "dark"
}
]
```
Each option object defines a possible value for the dropdown menu. It contains two fields: `label` and `value`.
* The `label` is the description that will be displayed in the dropdown menu. This field accepts a string and allows white space.
* The `value` field contains the value that will be assigned as a CSS property. Only `string` or `int` values are valid. Strings may not contain white space or special characters.
```json title="Example"
{
"label": "Green",
"value": "green" // valid string
}
```
```json title="Invalid Example" {3}
{
"label": "Invalid option",
"value": [] // invalid, only string/int are allowed
}
```
### Field: `defaultValue` - Default Value (optional)
The `defaultValue` field is an optional field that allows the preference to have a pre-selected value.
This field accepts a value based on the preference `type`:
| **Type** | **Default Value Type** | **Accepted Values** |
| ---------- | ---------------------- | --------------------------------------------------------------------------------- |
| `checkbox` | Boolean | `true`, `false` |
| `dropdown` | Array\[Options] | Any `value` contained in the options array. |
| `string` | String | The `value` of an option must be a string (`"blue"`) (a valid CSS property value) |
### Field: `disabledOn` - Disabled On (optional)
Some CSS modifications may not function properly on all operating systems. You can use the property `disabledOn` to specify on which operating systems the preference should be available.
This field accepts an array of the following values: `macos`, `linux` or/and `windows`.
For example:
```json title="Disabled on MacOS" {2}
{
"disabledOn": ["macos"] // disables the preference for MacOS
}
```
```json title="Disabled on Windows and Linux" {2}
{
"disabledOn": ["windows", "linux"] // disables the preference for Windows and Linux
}
```
```json title="Disabled on all OS" {2}
{
"disabledOn": ["windows", "linux", "macos"] // disables the preference entirely
}
```
### Field: `placeholder` - Placeholder (optional) (only for `type`: `dropdown` and `string`)
The `placeholder` field is an optional field that allows to change the placeholder value for the preference.
This field accepts a string and allows white space.
For example: `e.g: 10px`
***
See Full Example
Below is a full example of what a `preferences.json` file might look like with multiple preference objects in its root. Each object represents a preference defined for a mod:
```json
[
{
"property": "mod.mymod.enable_dark_mode",
"label": "Enable dark mode",
"type": "checkbox",
"defaultValue": true
},
{
"property": "mod.mymod.background_color",
"label": "Background color",
"type": "dropdown",
"placeholder": "Select a color",
"defaultValue": "green",
"options": [
{
"label": "Green",
"value": "green"
},
{
"label": "Blue",
"value": "blue"
}
]
},
{
"property": "mod.mymod.show_bookmarks_bar",
"label": "Show bookmarks bar",
"type": "string",
"disabledOn": ["macos"]
}
]
```
In this example:
* The `preferences.json` file contains a list of three preference objects.
* Each object defines a `property`, `label`, and `type`.
* Optionally, each object defines either a `defaultValue`, `disabledOn` or `placeholder`.
* Dropdown preferences have to include an `options` field, with each option having a `label` and a `value`.
***
## Using preferences in the mod's CSS
Once you have defined your preferences in the `preferences.json` file, you can use them in your mod’s CSS to modify the appearance or behavior based on the user’s selections.
To detect preference changes in CSS, we are going to be using a universal `-moz-pref` media query.
### Checkbox Preferences
Checkbox preferences can be detected in your CSS using the `-moz-pref` media query, which evaluates the boolean value (`true` or `false`, amongst other things) of a checkbox preference.
For example, if you have a preference to enable dark mode in your mod:
```json
{
"property": "mod.mymod.enable_dark_mode",
"label": "Enable dark mode",
"type": "checkbox"
}
```
You can use the following CSS to change the background color when the dark mode preference is enabled:
```css {1}
@media (-moz-pref("mod.mymod.enable_dark_mode")) {
body {
background-color: #000;
color: #fff;
}
}
```
You can also have negative conditions
```css {1}
@media not (-moz-pref("mod.mymod.enable_dark_mode"));
```
### Dropdown Preferences
For dropdown preferences, you can detect the selected value using the `-moz-pref` media query, which compares the value of a preference and a certain value you provide it.
For example, if you have a preference to select the background color from a dropdown menu:
```json
{
"property": "mod.mymod.background_color",
"label": "Background color",
"type": "dropdown",
"options": [
{
"label": "Green",
"value": "green"
},
{
"label": "Blue",
"value": "blue"
}
]
}
```
You can use the following CSS to change the background color based on the selected value:
```css {2,8,14}
body {
/* Green background */
@media (-moz-pref("mod.mymod.background_color", "green")) {
background-color: #008000;
color: #000;
}
/* Blue background */
@media (-moz-pref("mod.mymod.background_color", "blue")) {
background-color: #0000ff;
color: #fff;
}
}
```
In this example:
* The background color and text color change based on the value selected in the `background_color` dropdown.
* The selector `@media (-moz-pref("mod.mymod.background_color", "value")){:css}` checks the `background_color` attribute and applies the relevant styles based on the selected option.
***
See Full Example
Suppose your `preferences.json` file includes these two preferences:
```json
[
{
"property": "mod.mymod.enable_dark_mode",
"label": "Enable dark mode",
"type": "checkbox"
},
{
"property": "mod.mymod.background_color",
"label": "Background color",
"type": "dropdown",
"options": [
{
"label": "Green",
"value": "green"
},
{
"label": "Blue",
"value": "blue"
}
]
}
]
```
You can combine the CSS like this:
```css
/* Checkbox for dark mode */
@media (-moz-pref("mod.mymod.enable_dark_mode")) {
body {
background-color: #000;
color: #fff;
}
}
/* Dropdown for background color selection */
body {
@media (-moz-pref("mod.mymod.background_color", "green")) {
background-color: #008000;
color: #000;
}
@media (-moz-pref("mod.mymod.background_color", "blue")) {
background-color: #0000ff;
color: #fff;
}
}
```
This allows users to:
* Toggle dark mode on/off using the checkbox.
* Select a background color from the dropdown, which dynamically changes the background and text colors based on the user's choice.
### String Preferences
String preferences can be detected in your CSS using the `var(--property)` operator. The preference property is saved at `:root` level.
`property` fields defined in `preferences.json` using the `"string"` type will have one key difference when used in your mod's CSS: dots (`.`) in the `property` name are replaced with hyphens (`-`).
E.g. `mod.mymod.background_color` becomes `mod-mymod-background_color` in the CSS file.
This transformation ensures that the property can be used as an attribute selector or inside a media query.
For example, if you have a preference to enable dark mode in your mod:
```json
{
"property": "mod.mymod.background_color",
"label": "Background color",
"type": "string"
}
```
You can use the following CSS to change the background color when the dark mode preference is enabled:
```css {2}
.myClass {
background-color: var(--mod-mymod-background_color);
}
```
file: ./content/docs/themes-store/themes-marketplace-submission-guidelines.mdx
meta: {
"title": "Submission Guidelines"
}
import { Callout } from 'fumadocs-ui/components/callout';
If you are a \[mod developer] and would like to submit your mod, please follow these guidelines:
1. **Mod requirements**:
* Your mod must be compatible with Zen Browser.
* Your mod must be open-source.
* Your mod must not contain any malicious code.
* Your mod must not violate any copyright laws.
2. **Mod Validation**:
* Your mod's name must be unique and less than `25` characters.
* Your mod's description must be less than `100` characters.
* Your mod's screenshot must be a `PNG` with a size of `600x400` (it can be resized after upload).
* Your mod must contain a valid `README` describing the mod and how to use it.
* If your mod has any preferences values, they must be set in the `preferences` text area as a `JSON` object.
* See how preferences work [here](./themes-marketplace-preferences.mdx).
3. **Mod Submission**:
* To submit your mod, please create an issue [here](https://github.com/zen-browser/theme-store/issues/new?assignees=\&labels=new-theme\&projects=\&template=create-theme.yml\&title=%5Bcreate-theme%5D%3A+)
* Fill out the template with the required information.
* Once you have submitted your mod, it will be analyzed by a bot and a pull request will be created.
* If your mod is approved, it will be added to the Mods Registry.
4. **Mod Update**:
* If you would like to update your mod, please create an issue [here](https://github.com/zen-browser/theme-store/issues/new)
* Please explain the changes you have made.
5. **Mod Removal**:
* The mod may be removed if it is no longer being actively maintained and it's causing issues for users
* The mod may be removed at the dev team's discretion for any reason, including but not limited to misalignment with the project’s scope, aesthetics, or goals.
* The mod may be removed if it causes compatibility issues, disrupts user experience, or introduces unresolved bugs.
Mods are automatically updated and generated by the bot. If your mod is not approved, you will receive a message with the reason why it was not approved.
file: ./content/docs/themes-store/themes-marketplace.mdx
meta: {
"title": "Information"
}
The Mods Registry is a place where you can find and install mods for Zen Browser.
## How to install a mod
1. Open Zen Browser.
2. Click on the mod you would like to install on the [Mods Registry](https://www.zen-browser.app/mods).
3. Click on the "Install" button.
## For mod developers
If you are a mod developer and would like to submit your mod, please follow the instructions on the [Submission Guidelines](./themes-marketplace-submission-guidelines.mdx) page.
file: ./content/docs/user-manual/bookmarks.mdx
meta: {
"title": "Bookmarks",
"description": "Managing bookmarks in Zen"
}
import { Tab, Tabs } from 'fumadocs-ui/components/tabs';
import KeyboardShortcut from '@/components/KeyboardShortcut';
Zen, as a fork of Firefox, inherits its webpage bookmarking system primarily from Firefox itself, with some additional Zen enhancements. Zen offers two vertical tab layouts: **Single toolbar layout**, which integrates a compact address bar into the vertical tabs toolbar, and **Multiple toolbars layout**, featuring a traditional, full-size address bar in a separate horizontal toolbar. This guide covers the basics of creating and managing bookmarks, tailored to your chosen Zen layout.
## How Do I Bookmark a Page
To bookmark a page, find and click on the bookmark icon in the address bar. A pop up dialog will allow you to name and move your bookmark.
Did you know Zen offers Workspaces specific bookmarks?
{/* TODO: insert video of popup dialog */}
In **Single toolbar layout**, you must first expand your compact address bar by clicking on it then find the icon there.
In **Multiple toolbars layout**, you will find the bookmark icon exposed on the right of your address bar.

While you could use your mouse to click the bookmark icon, we recommend using the keyboard shortcut for bookmarking, especially in **Single toolbar layout**.
Alternatively, you can bookmark a single tab by right-clicking it and selecting `"Bookmark Tab..."` from the context menu, which opens a detailed bookmarking dialog with options for *tagging* and *keywords*.
To bookmark multiple or all open tabs, select them in the vertical tabs toolbar, right-click, and choose `"Bookmark Tabs..."` from the context menu. This will bookmark the selected tabs into a new bookmark folder.
## How Do I Find and Manage My Bookmarks
You can access, edit, organize and delete your bookmarks in a variety of ways in Zen.
### Recent Bookmarks
You can find your recently added bookmarks through Zen's application menu. Click the `...` icon located in Zen's toolbar to open the application menu. In the expanded menu, locate and select the `"Bookmarks >"` option to view a list of your recently added bookmarks, making it easy to find any you may have lost track of.
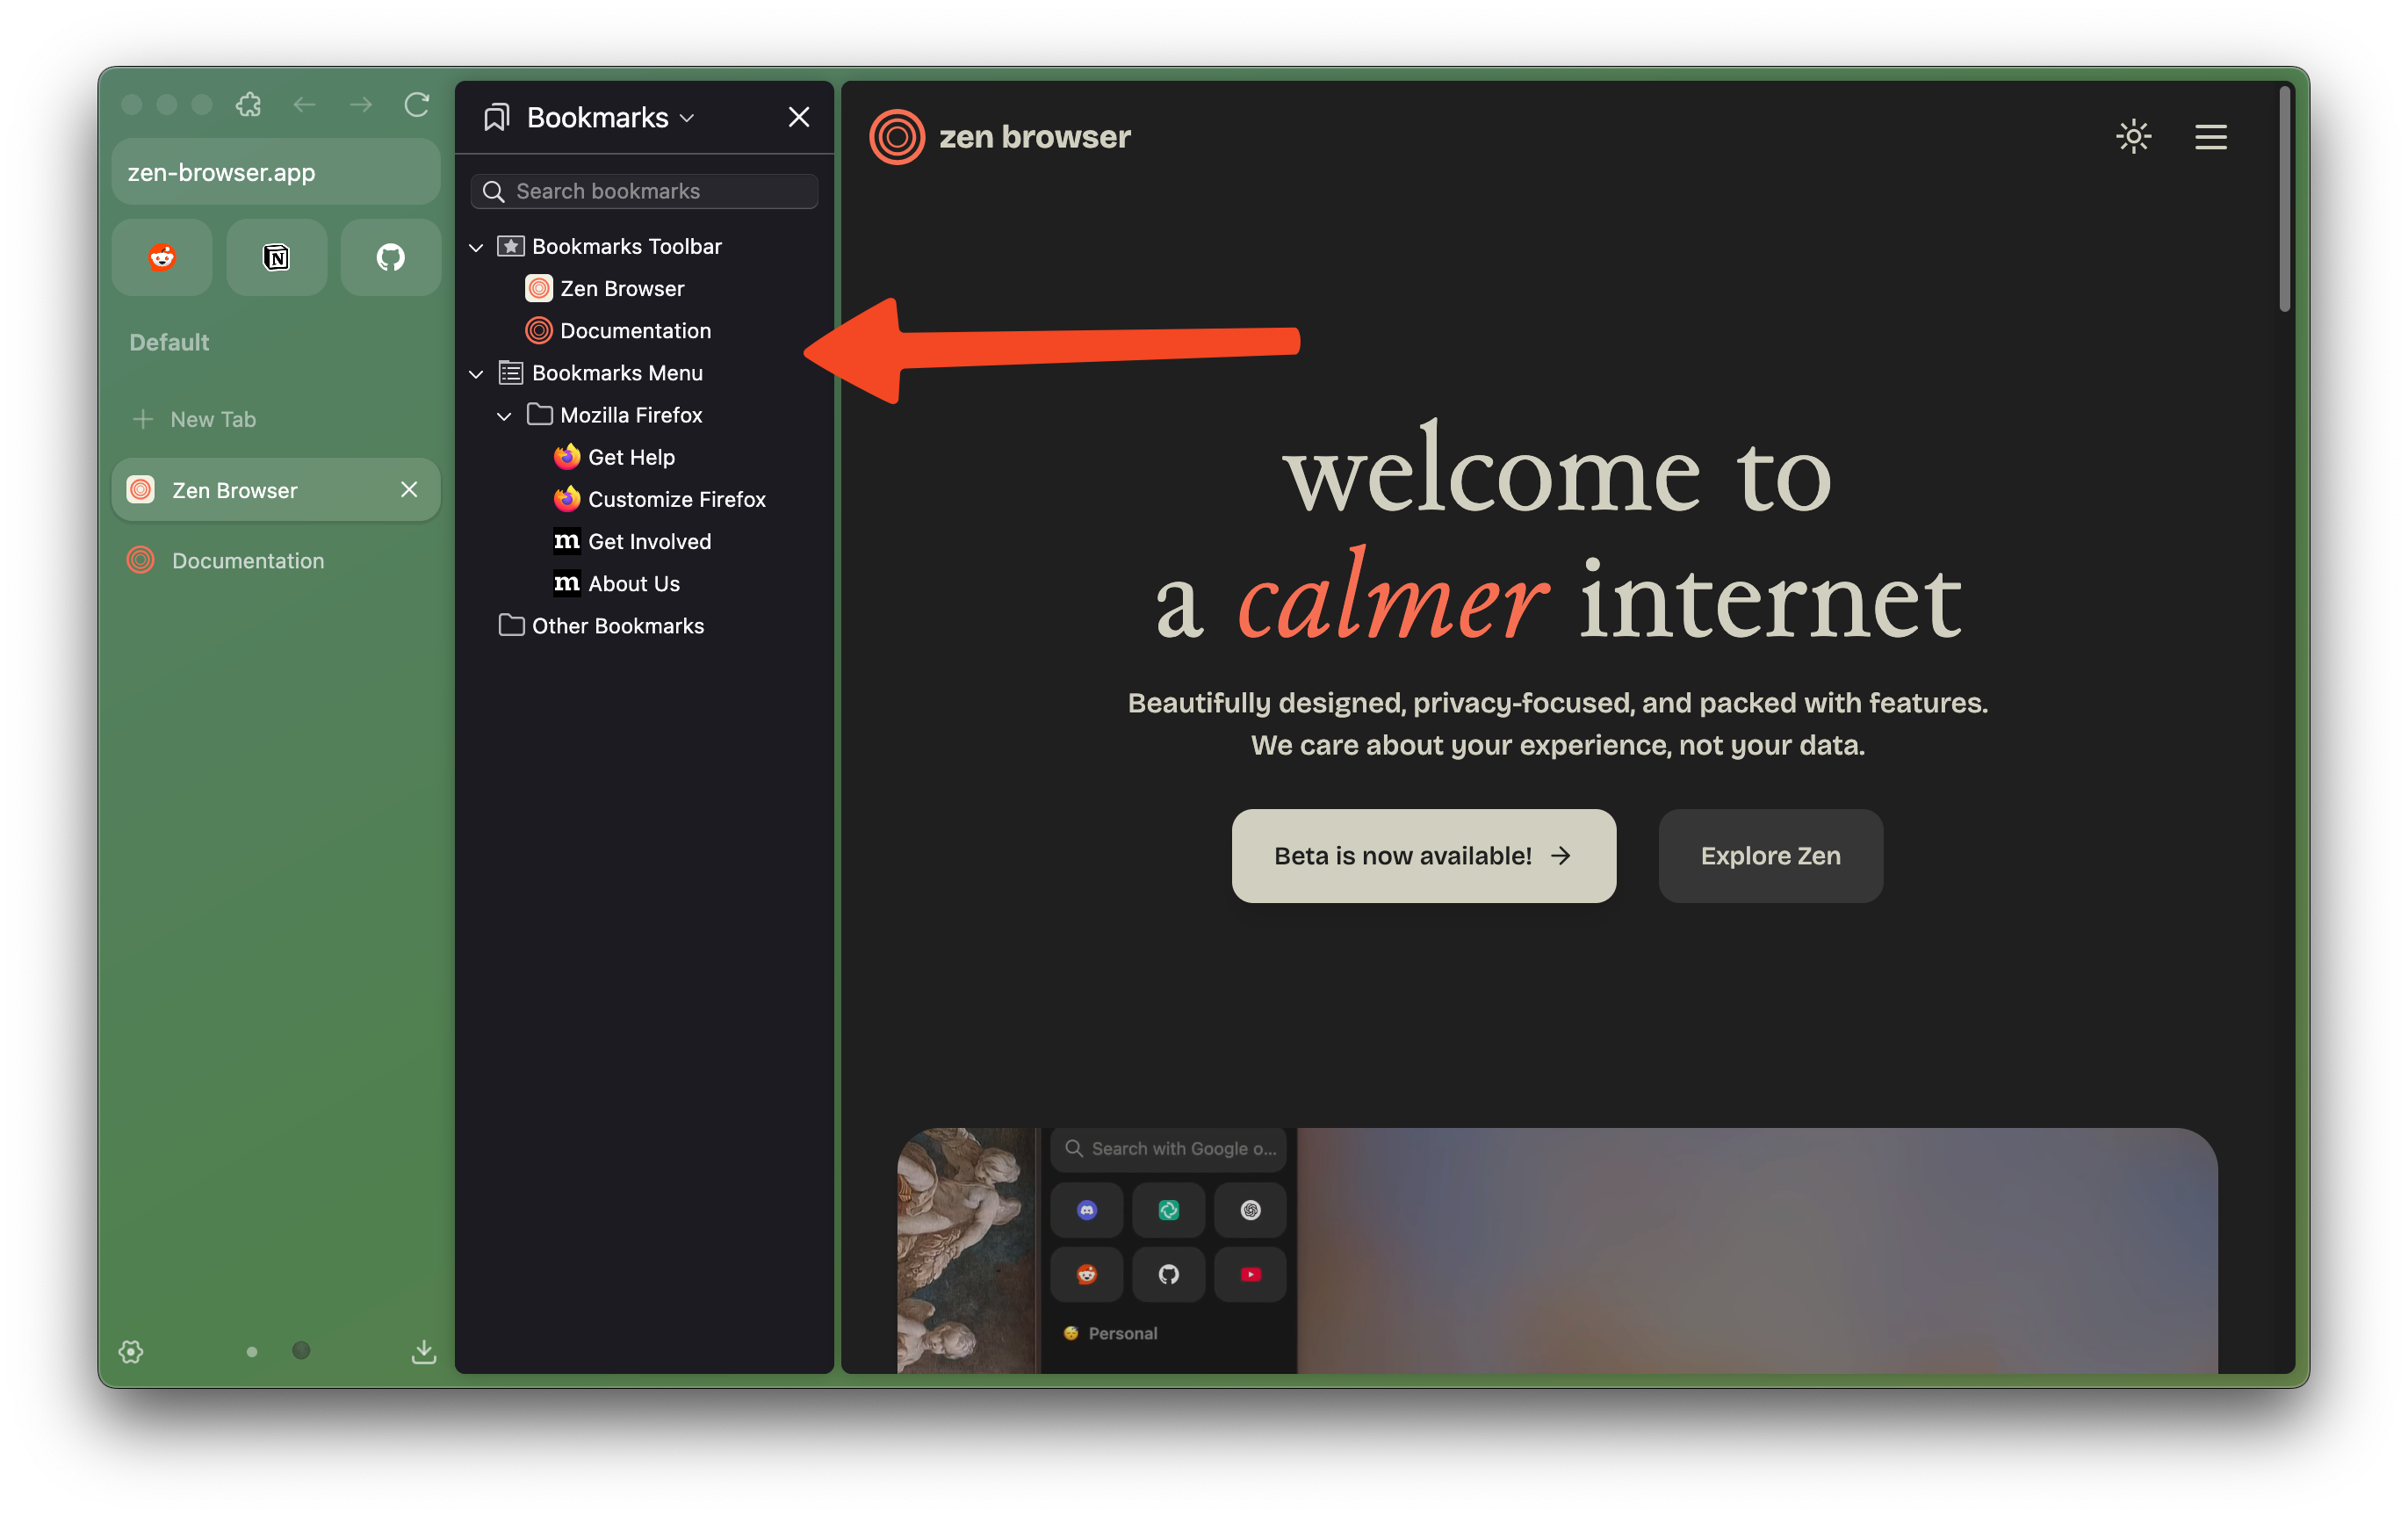
### Bookmarks Toolbar and Bookmarks Menu
Taken from the default behavior of Gecko, Zen offers 3 locations (or, groups) for bookmarks:
* **Bookmarks Toolbar**: This can be considered a public location for bookmarks, displayed in the browser's [chrome](https://developer.mozilla.org/en-US/docs/Glossary/Chrome). You typically find it beneath the main browser toolbar, which is featured in **Multiple toolbars layout** in Zen, while in **Single toolbar layout**, hovering your cursor to the top edge will display the hidden Bookmarks Toolbar, next to your window controls. To toggle the visibility of your Bookmarks Toolbar, use the shortcut
{/* TODO: *insert video* */}
If you want to fully hide the Bookmarks Toolbar, you can change these settings in `about:config`
* `browser.toolbars.bookmarks.visibility = 'never'`: Never show your Bookmarks, revert by changing value to `'always'`.
* `zen.view.experimental-no-window-controls = 'true'`: disable hovering window controls in **Single toolbar layout**, effectively remove access to the Bookmarks Toolbar.
* **Bookmarks Menu**: This can be considered a private location for bookmarks, only accessible via opening the Bookmarks Sidebar or the Bookmarks Library.
* **Other Bookmarks**: Location for your miscellaneous unorganized bookmarks. Other Bookmarks will show up at the end of the Bookmarks Toolbar but you can choose to hide it by right clicking and disable `"Show Other Bookmarks"`.
### Bookmarks Sidebar
Your bookmarks are also available via what is known as the [Firefox Sidebar](https://support.mozilla.org/kb/use-firefox-sidebar-access-bookmarks-history-synced). The Sidebar can be opened by adding a Sidebar button to your controls, or preferably by using the shortcut to open the Bookmarks Sidebar. You can find all of your bookmarks here including entries from both Bookmarks Toolbar and Bookmarks Menu, in the form of a tree structure explorer with access to a searching function at the top.
{/* TODO: *insert video/image* */}
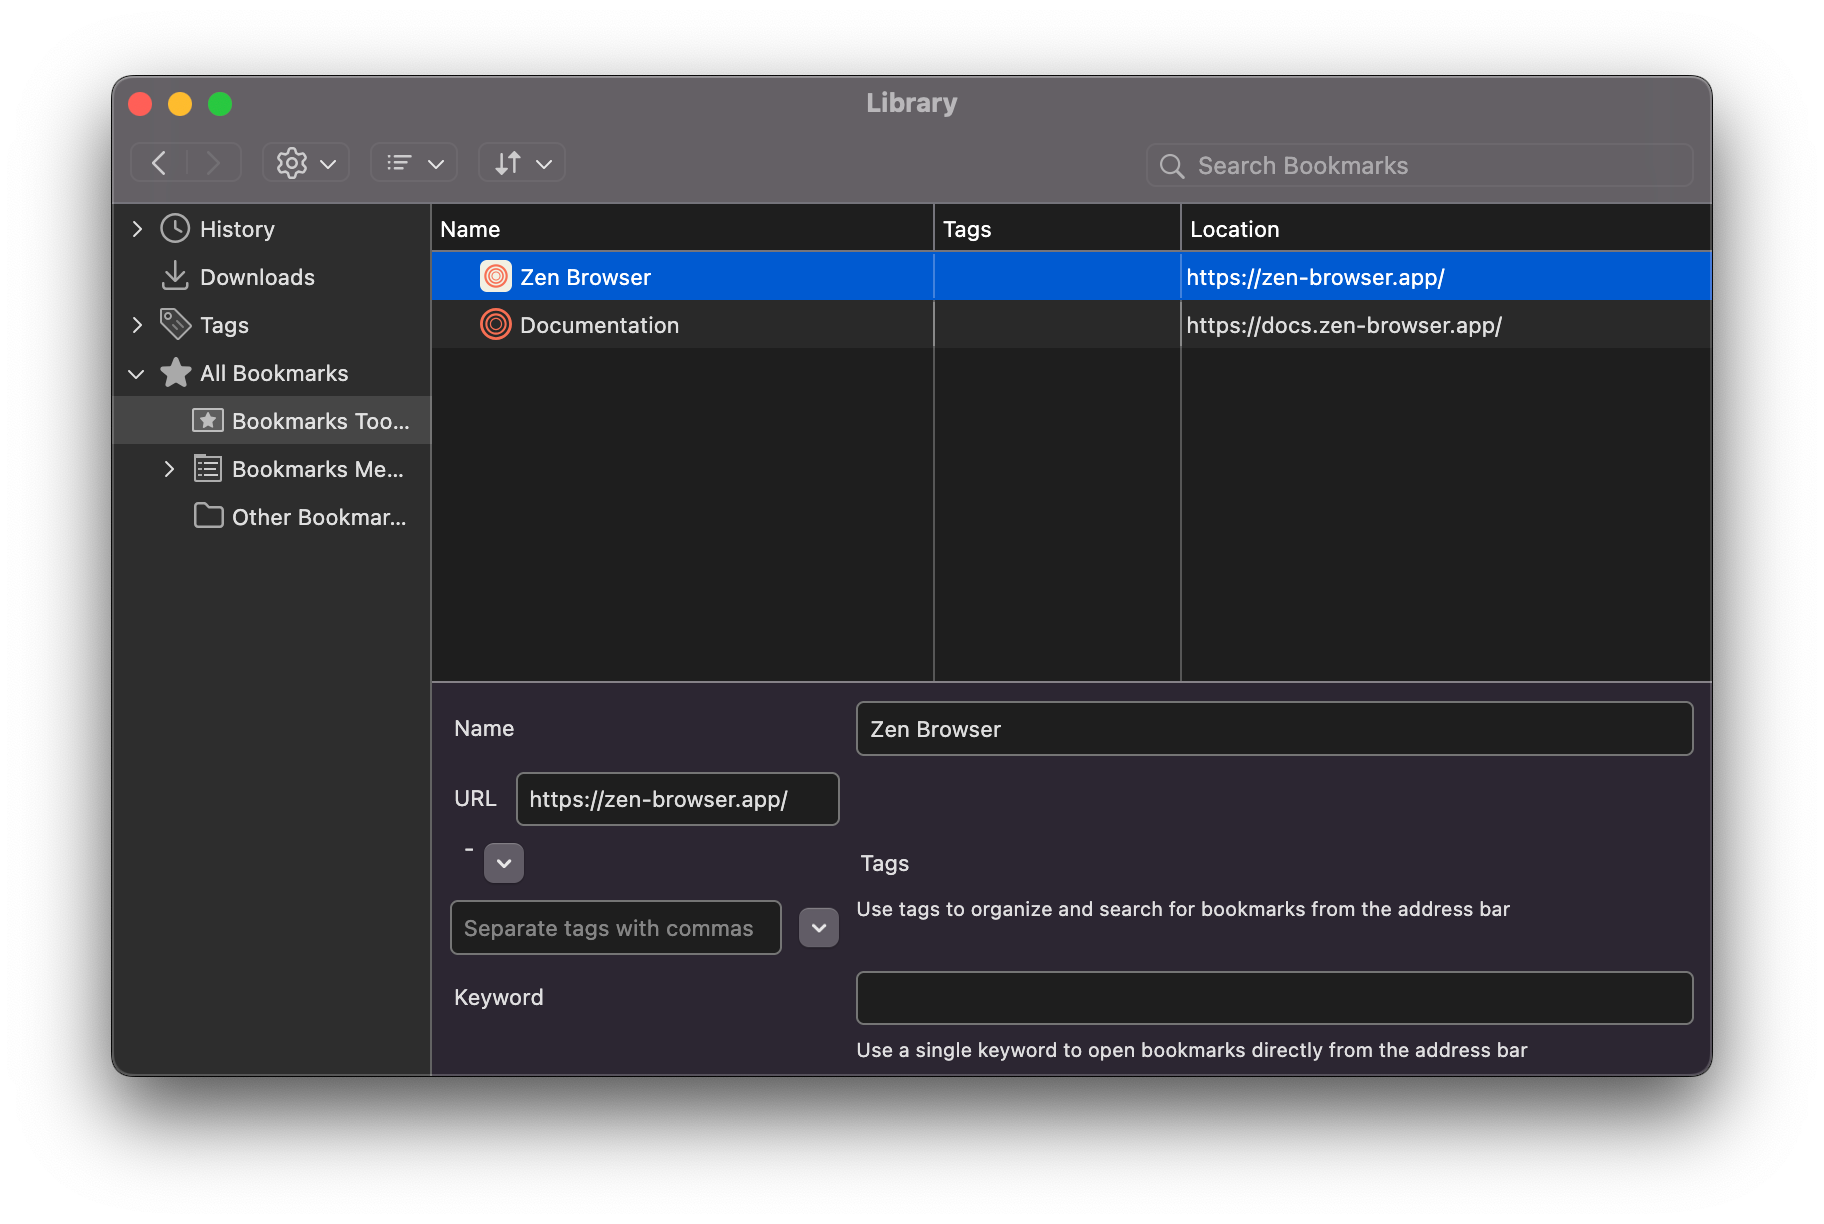
### Bookmarks Library
The Firefox Library is a unified manager for Bookmarks, History, and Downloads. You can access the Library by the shortcut or from the application menu `"Bookmarks"`>`"Manage bookmarks"`. While most of its functions here have already been offered via the Bookmarks Sidebar, the Library is important for your purpose of Importing and Backing up Zen's bookmarks.
*All shortcuts can be modified via `Settings > Keyboard Shortcuts`.*
Learn more about Bookmarks in Mozilla Support: [https://support.mozilla.org/kb/bookmarks-firefox](https://support.mozilla.org/kb/bookmarks-firefox)
file: ./content/docs/user-manual/compact-mode.mdx
meta: {
"title": "Compact Mode",
"description": "Minimalistic interface for focused browsing"
}
import KeyboardShortcut from '@/components/KeyboardShortcut';
Compact Mode is one of Zen's main features. It lets you hide all browser toolbars and gives a wider view of the website you're currently visiting.
You can activate this feature by right-click on an empty area on the `toolbar > "Compact Mode" > "Enable compact mode"`, or use keyboard shortcut.
{
}
In Single Toolbar mode, activating Compact Mode will hide the tab sidebar. You can access the tab sidebar by hovering the side edge of the browser (based on whether `"Tabs on the right"` is activated or not).
In Multiple Toolbar or Collapsed Toolbar mode, you can choose which bar to hide. These options are accessible below "Compact Mode" > "Enable compact mode" when right clicking the toolbar:
* **Hide sidebar**: Hides the tab sidebar, accessible when hovering side edge of the browser.
* **Hide toolbar**: Hides the top toolbar, accessible when hovering top edge of the browser.
* **Hide both**: Hides both top toolbar and tab sidebar.

You can also use these extra shortcuts to show the hidden bars, suitable for heavy keyboard users. Unlike usual hovering gesture, showing sidebar/toolbar using these shortcuts is done persistently, until you pressed the shortcut again to hide it.
* **Toggle Floating Sidebar**: - Shows the tab sidebar for all toolbar modes
* **Toggle Floating Toolbar**: - Shows the top toolbar for Multiple & Collapsed Toolbar mode
*All shortcuts can be modified via `Settings > Keyboard Shortcuts`.*
file: ./content/docs/user-manual/extensions.mdx
meta: {
"title": "Extensions",
"description": "Get to know how extensions work in Zen"
}
import KeyboardShortcut from '@/components/KeyboardShortcut';
Extensions are a small software piece that enhance and personalize a browser by adding or modifying browser function and features. Example of commonly installed extensions includes ad blockers, easy reader mode, privacy and tracking managers, media downloaders, password managers, and tweaks for commonly used websites.
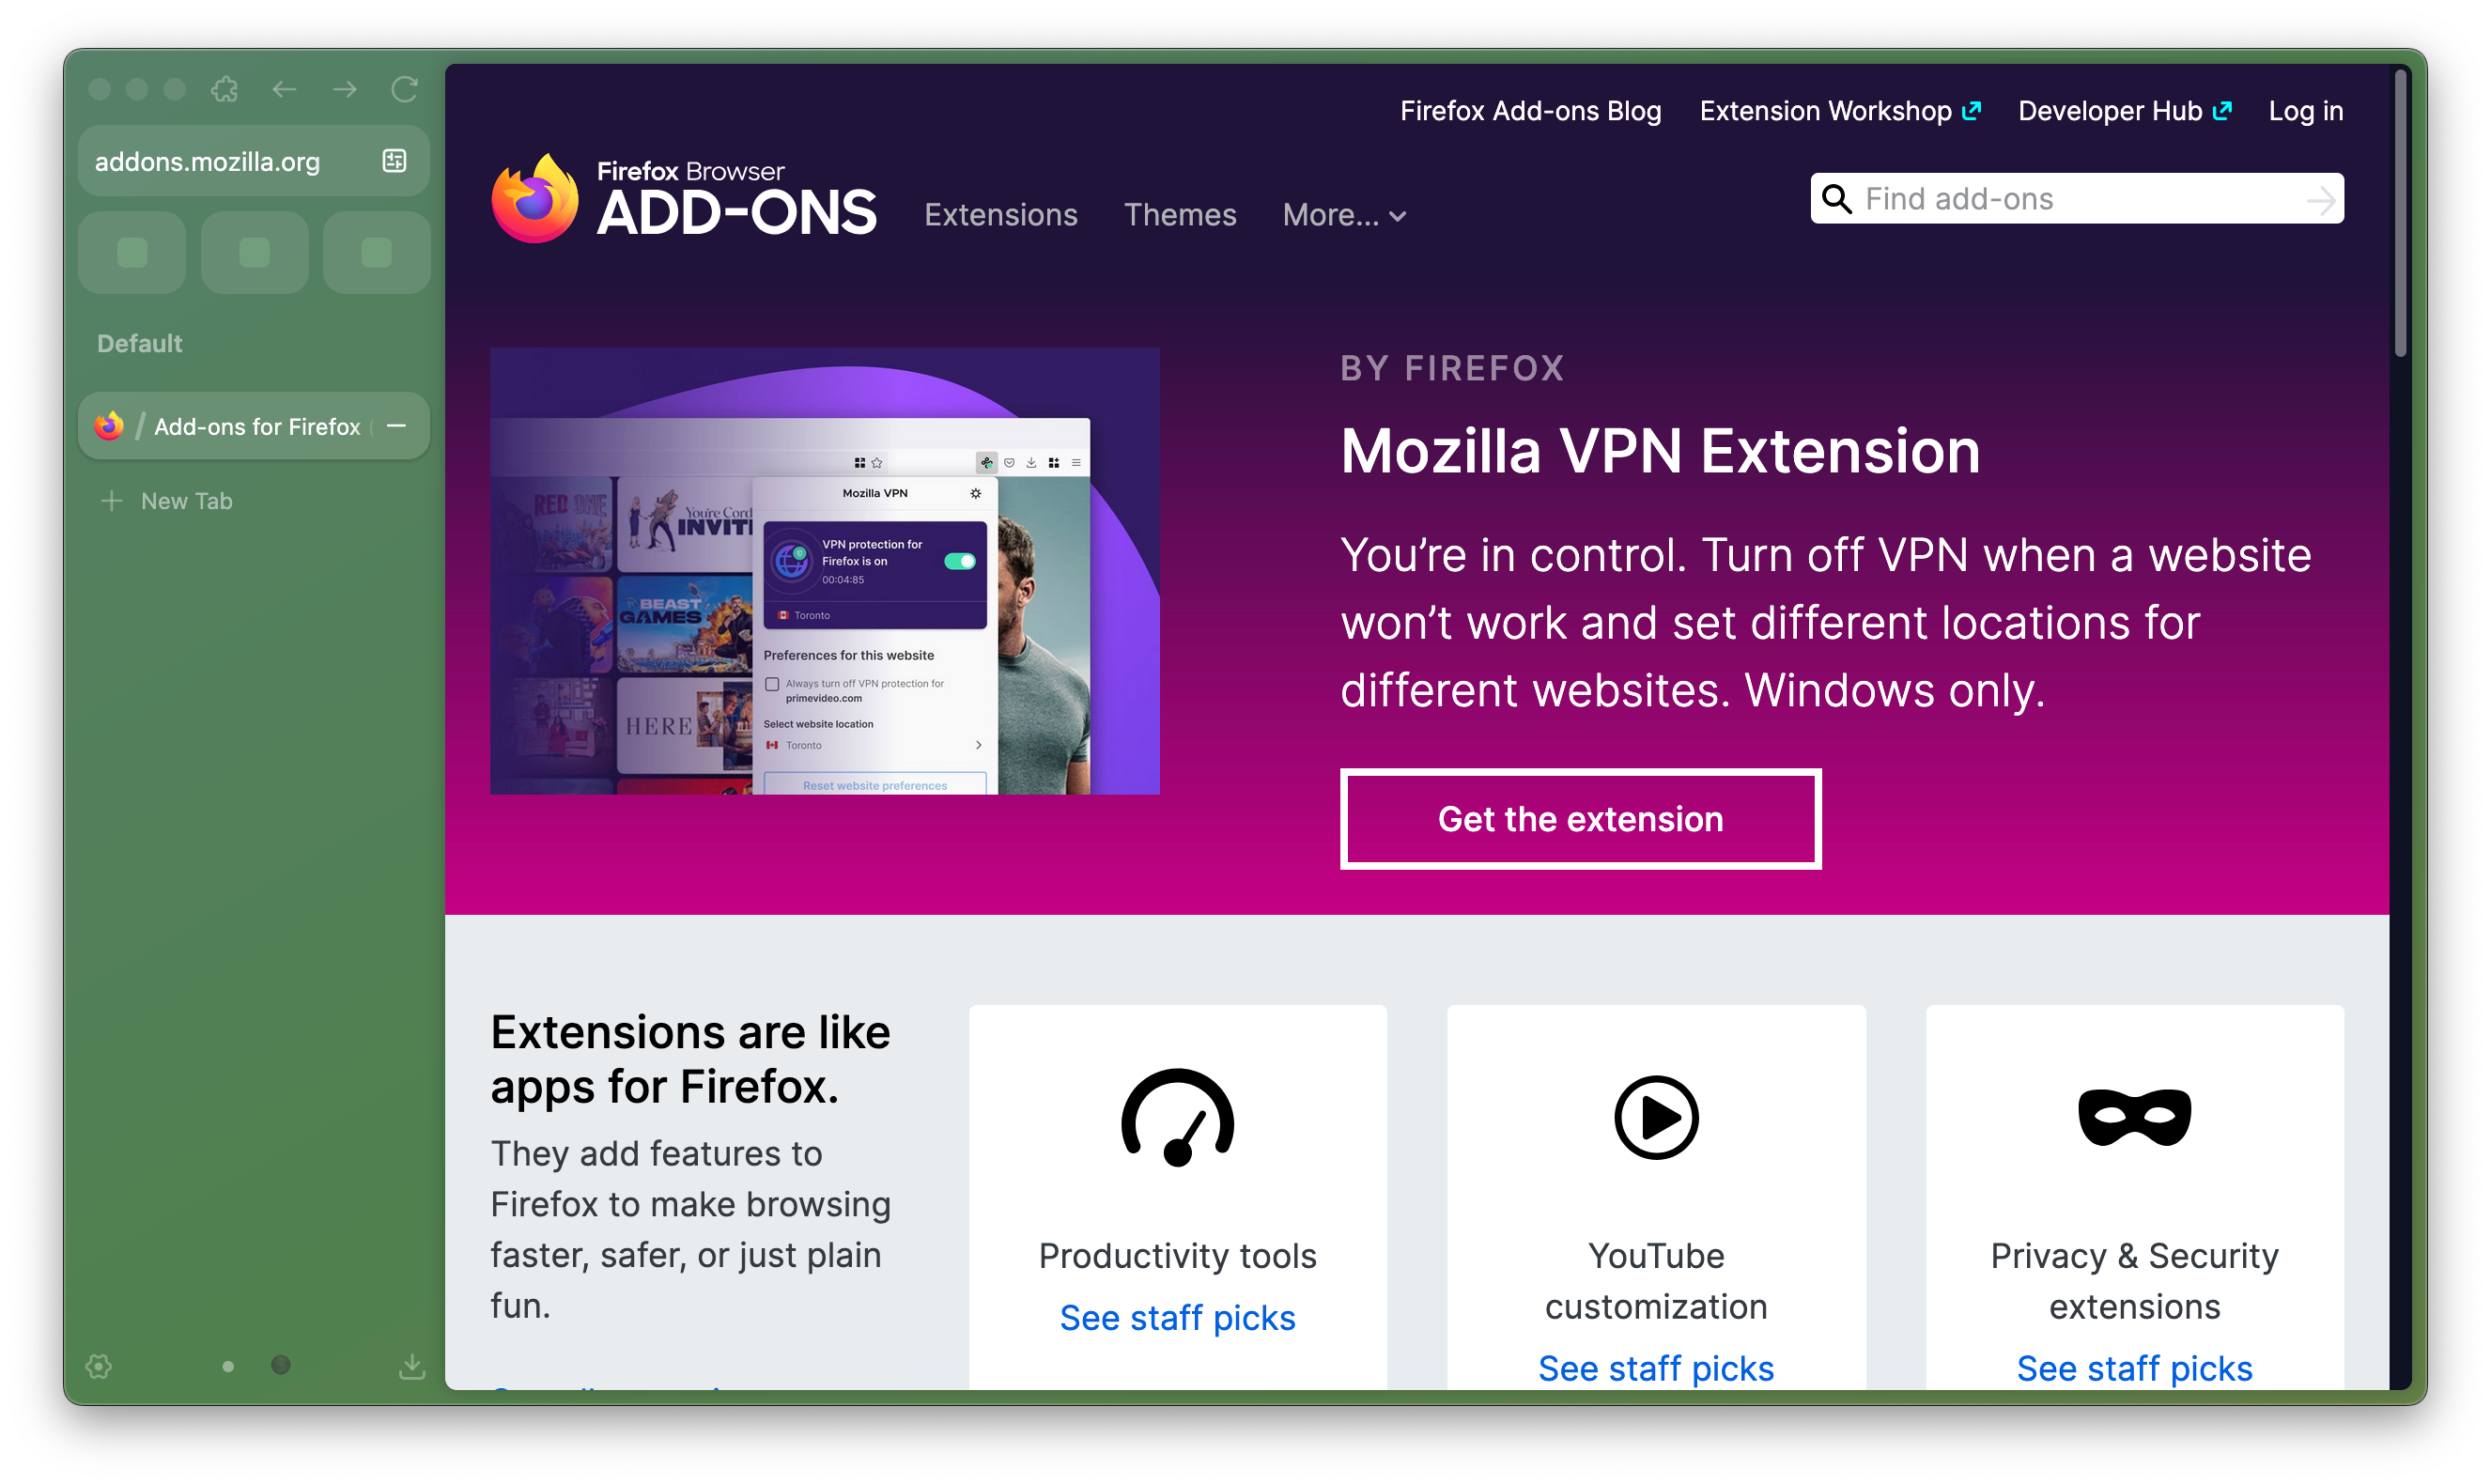
Since Zen is based on Mozilla Firefox, you can install extensions from the same source: [https://addons.mozilla.org](https://addons.mozilla.org).
Due to fundamental difference on how Zen does theming, Firefox themes are not supported in Zen. Extensions are made with HTML, CSS and Javascript. Depending on the permissions you enabled when installing, extensions generally affect websites you visit. Meanwhile, Zen Mods are made with CSS and only affect the browser UI.
### Manage Extensions using Settings Hub
When you launch Zen, there will be an settings icon in the URL bar. Clicking this icon opens a pop-up that shows a list of installed Extensions and other settings. You can click an extension's icon in the pop-up to run the extension or right-click it to perform common actions like Pin to Toolbar, Manage Extension to access extension settings, Remove Extension, or [Report Extension to Mozilla](https://support.mozilla.org/en-US/kb/reporting-extensions-and-themes-abuse).
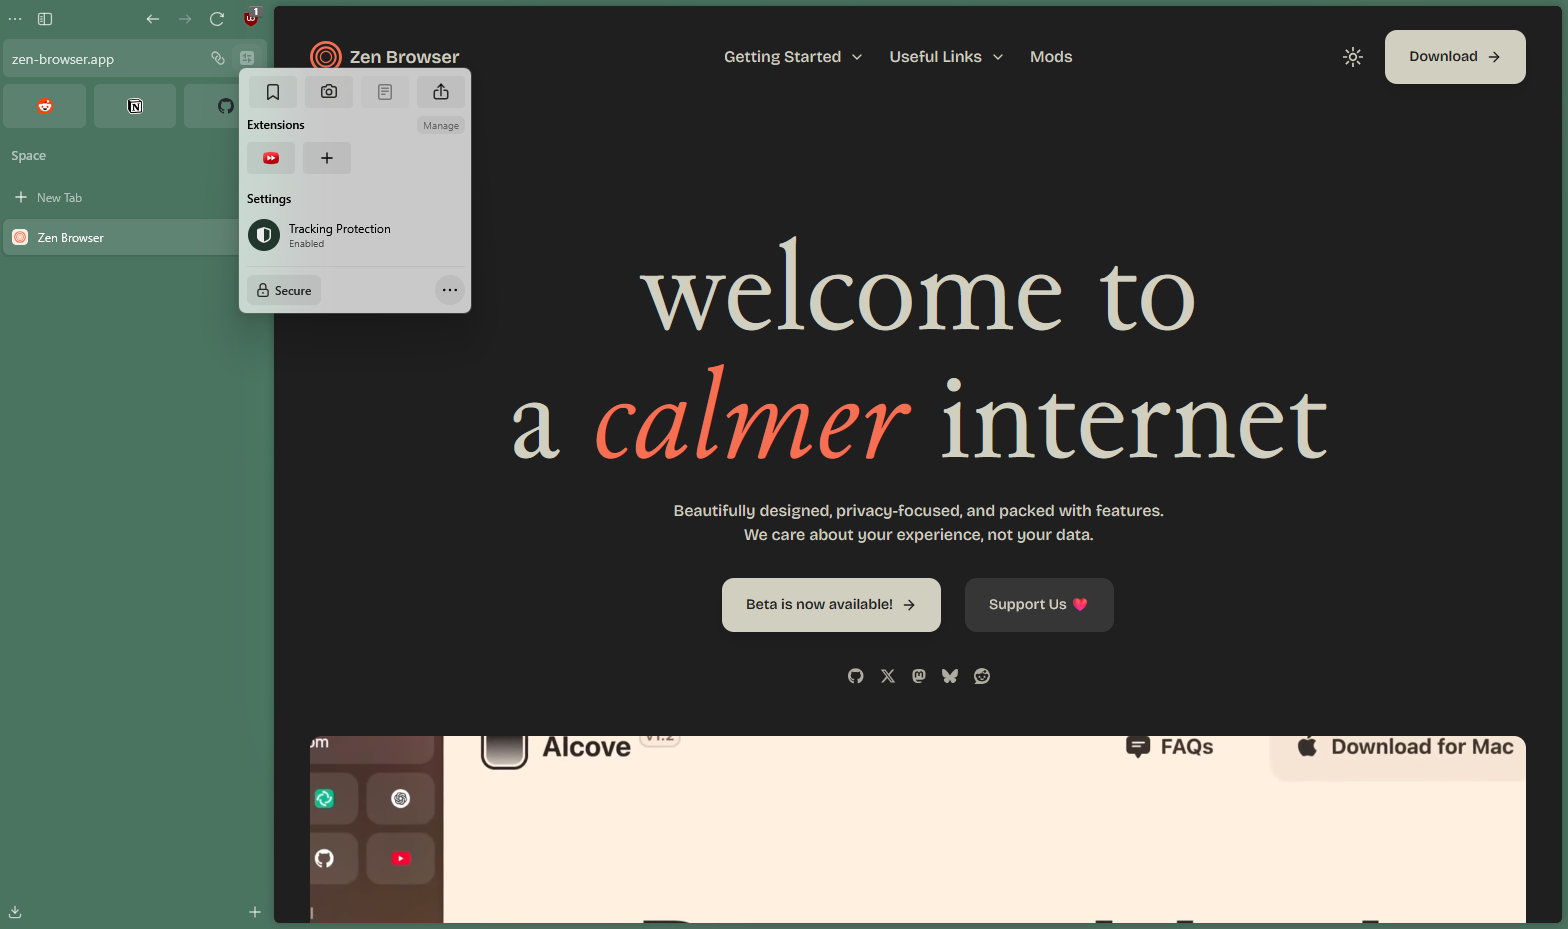
You can install new extension by clicking plus icon, which brings you to Add-ons Manager page, showing extension recommendations curated by Firefox.
### Manage Extensions from Add-ons Manager
Add-Ons Manager is a page that primarily let you see extension details, manage its preferences, assign shortcuts, disable and remove extensions. You can access Add-Ons Manager by:
* Open the settings icon in the URL bar > Click **Manage** located at the top of the pop-up.
* Open the main menu > Click "Add-ons and themes".
* Press the default keyboard shortcut .
Select "Extensions" and you can see the list of your installed extensions. You can click on each extensions name to expand the details, or click toggle in each extension to disable or enable it.
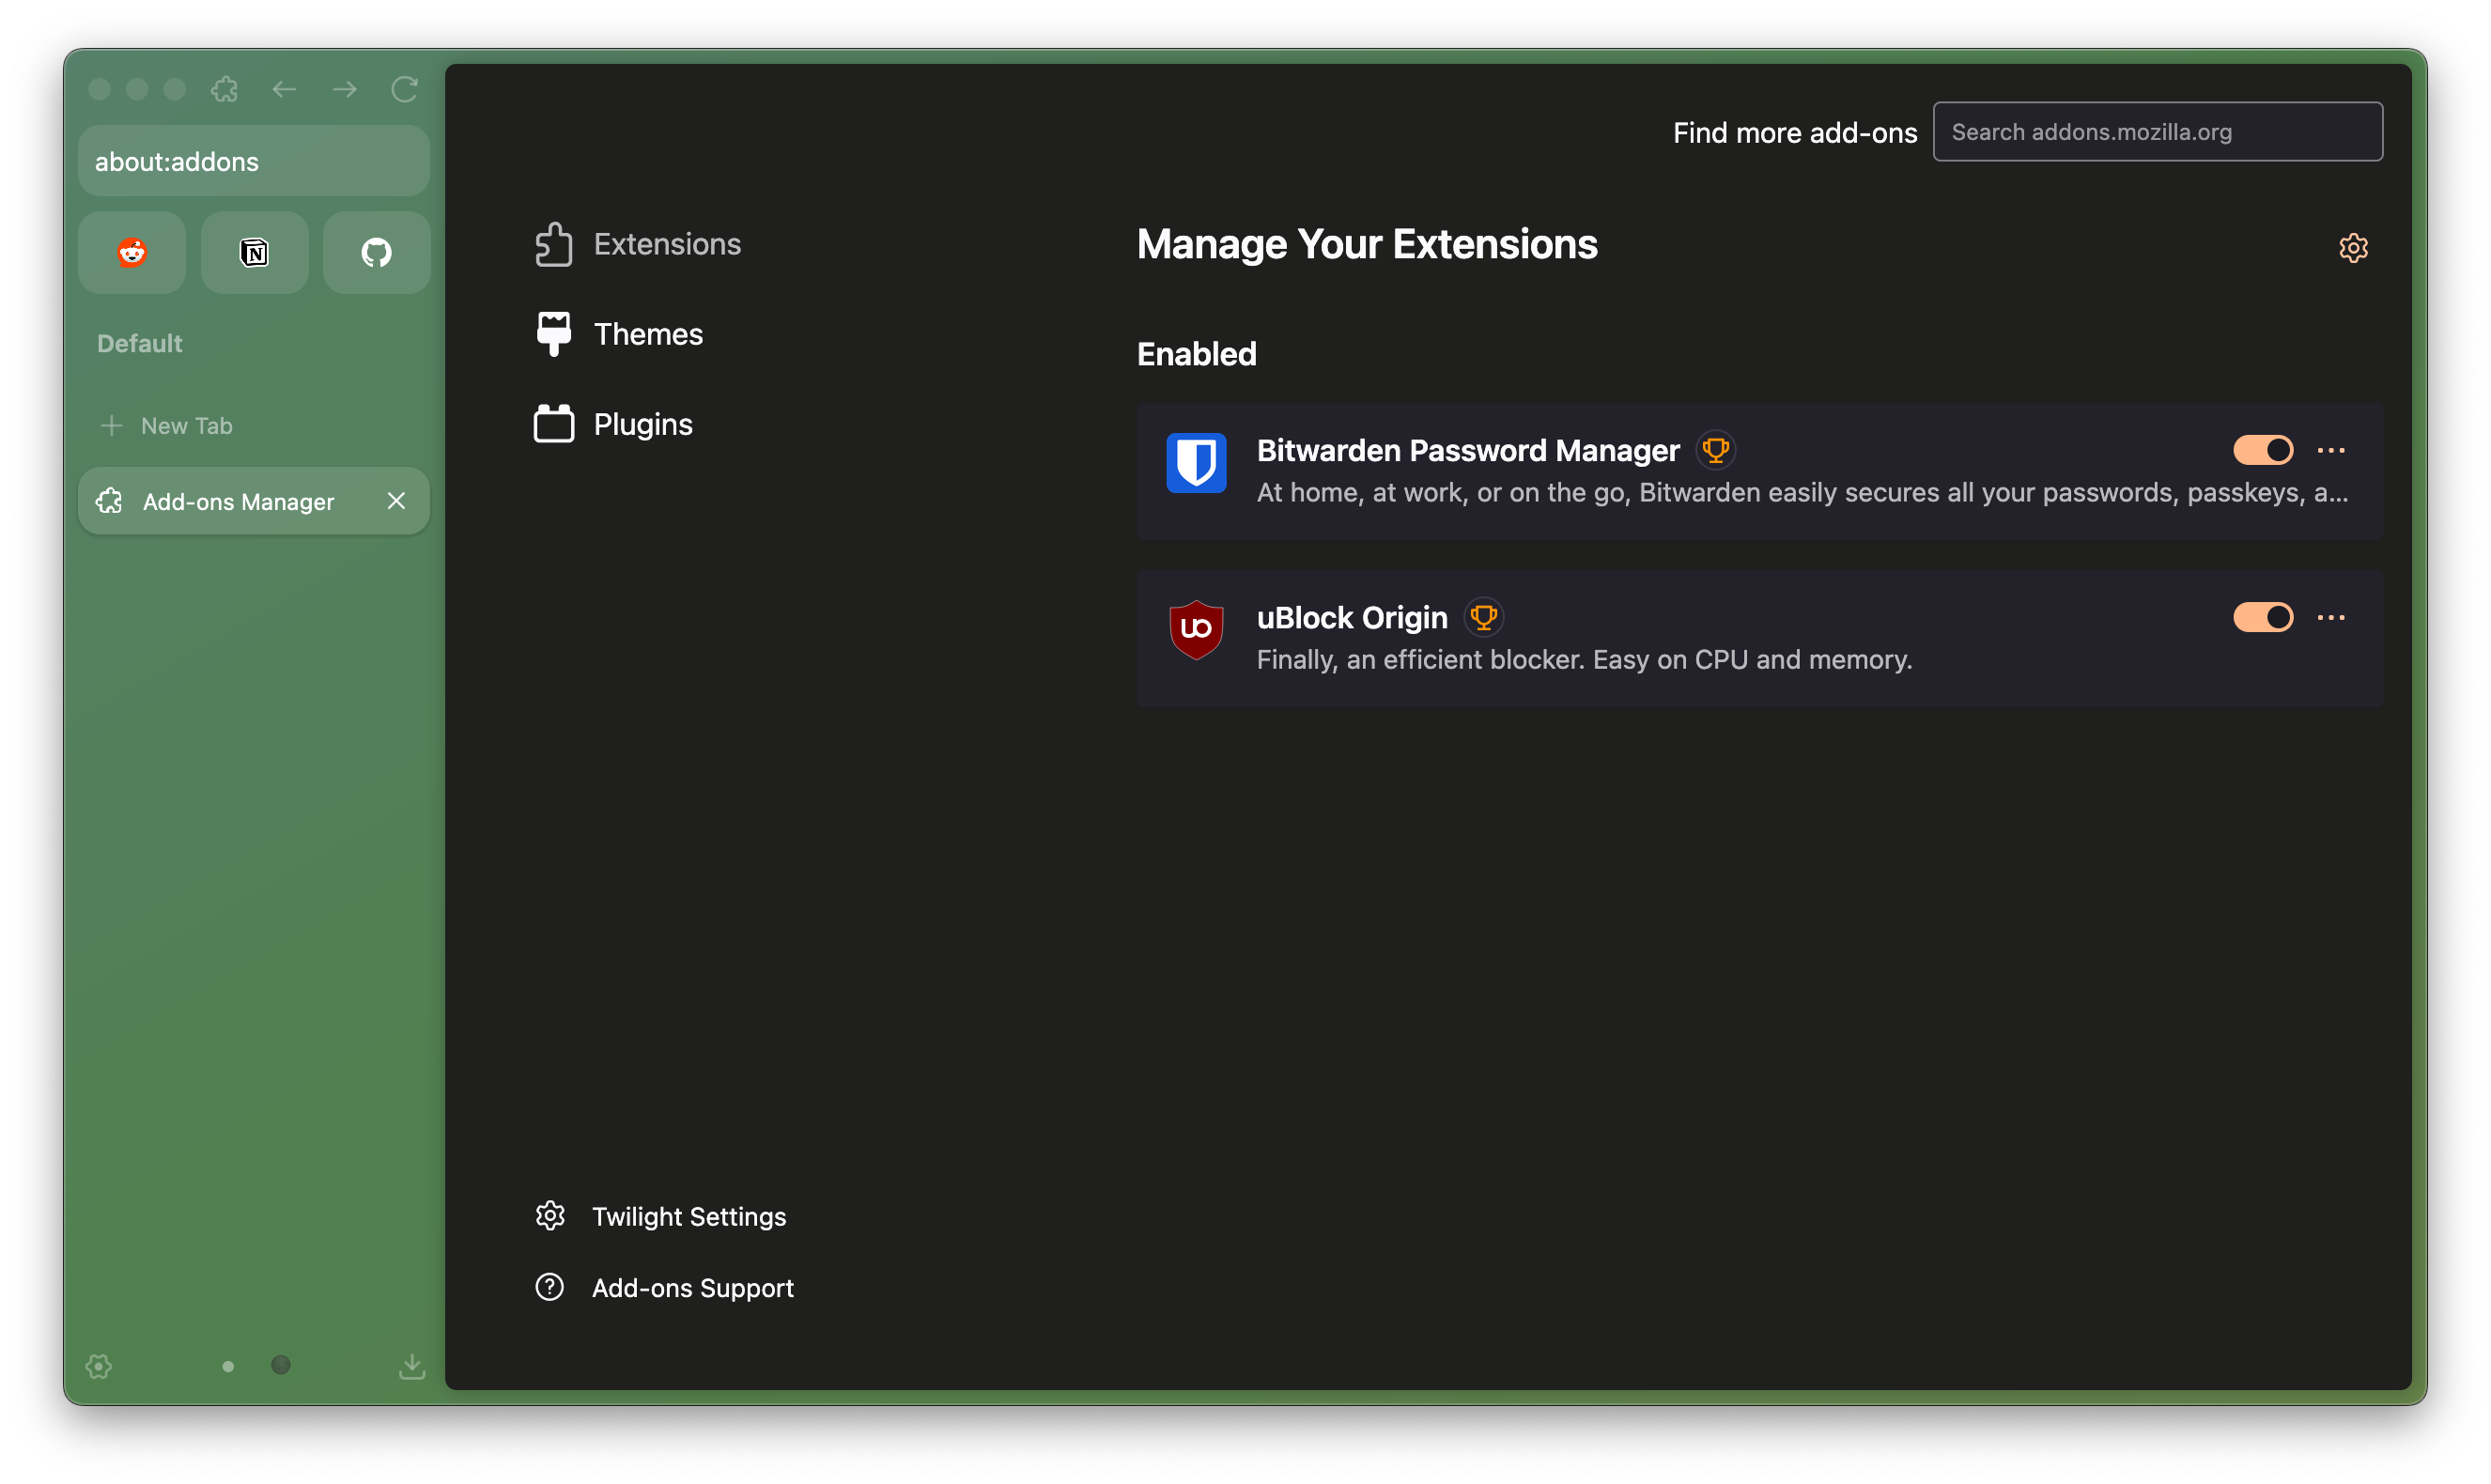
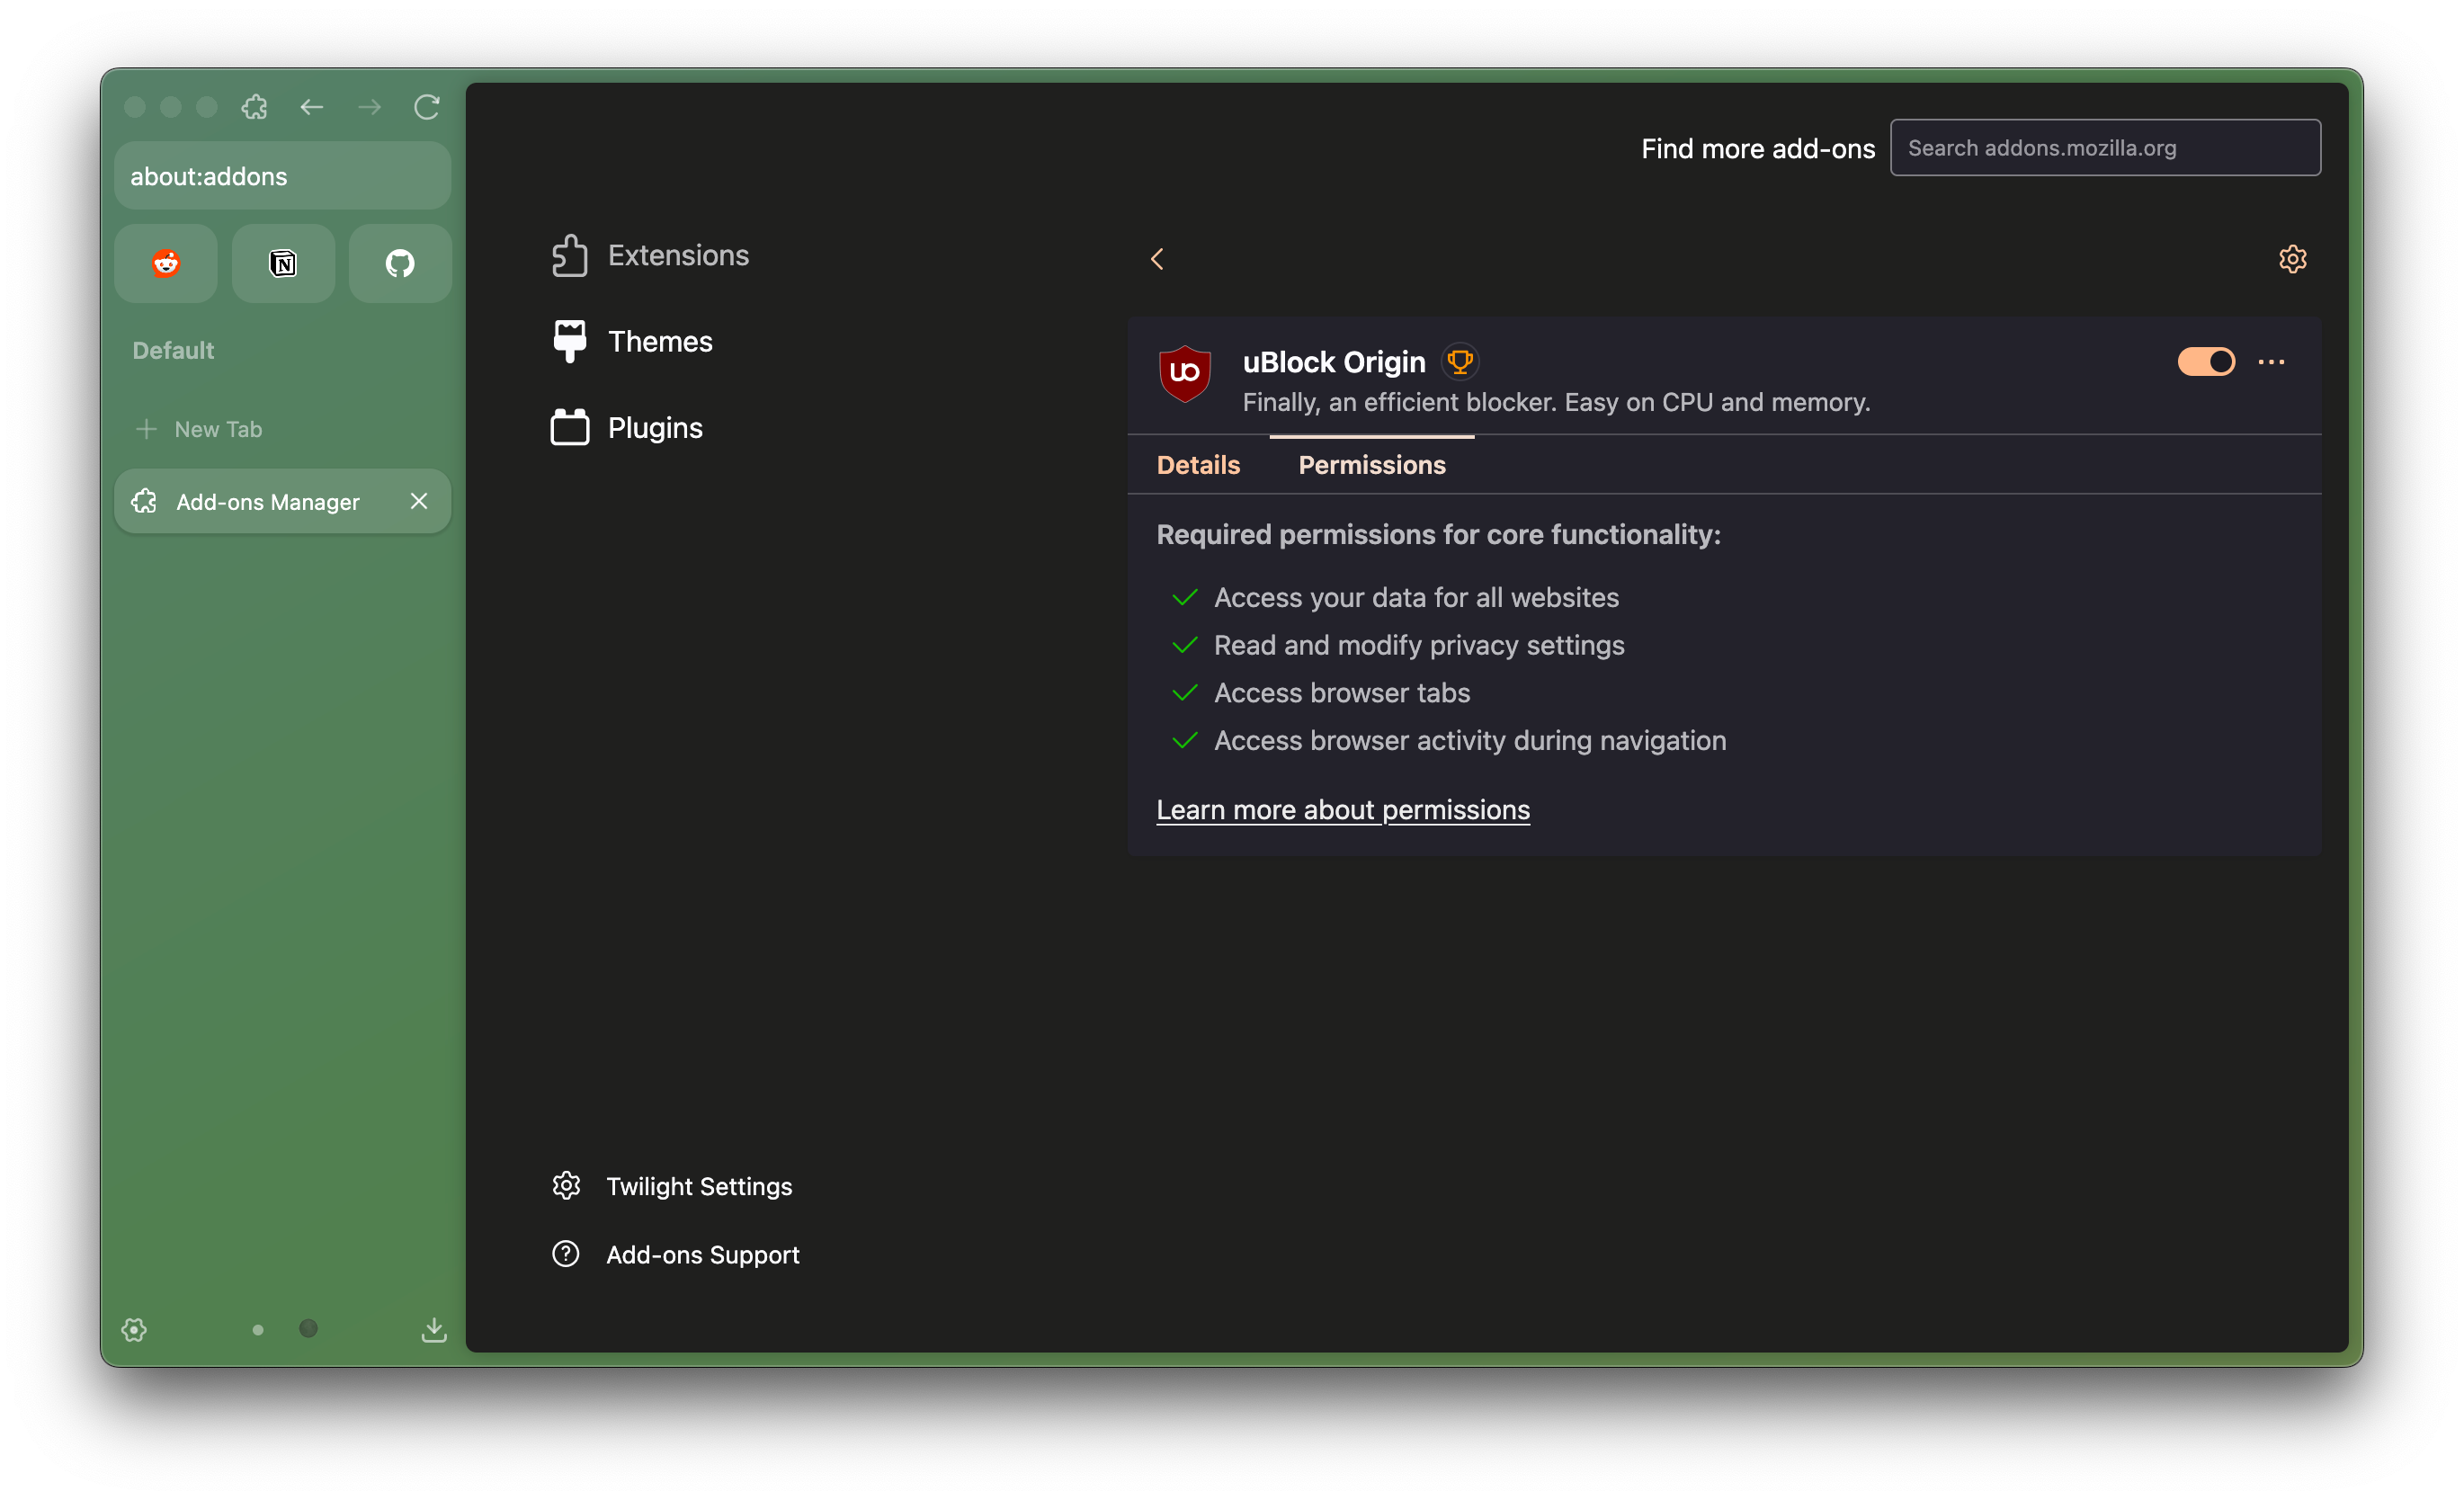
The expanded page of individual extensions includes:
* Extension details, with link to homepage and extension ratings in addons.mozilla.org
* Toggle to allow automatic updates.
* Toggle to allow extension to run in Private Windows (off by default).
* Toggle to allow extension to run on sites restricted by Mozilla (off by default).
* Accessing list of permissions required by the extension, as well as optional permissions toggle for added functionality.
* Additional Preferences tab (availability varies across extensions). Most extensions has their own preference page, that can be accessed from its extension toolbar button.
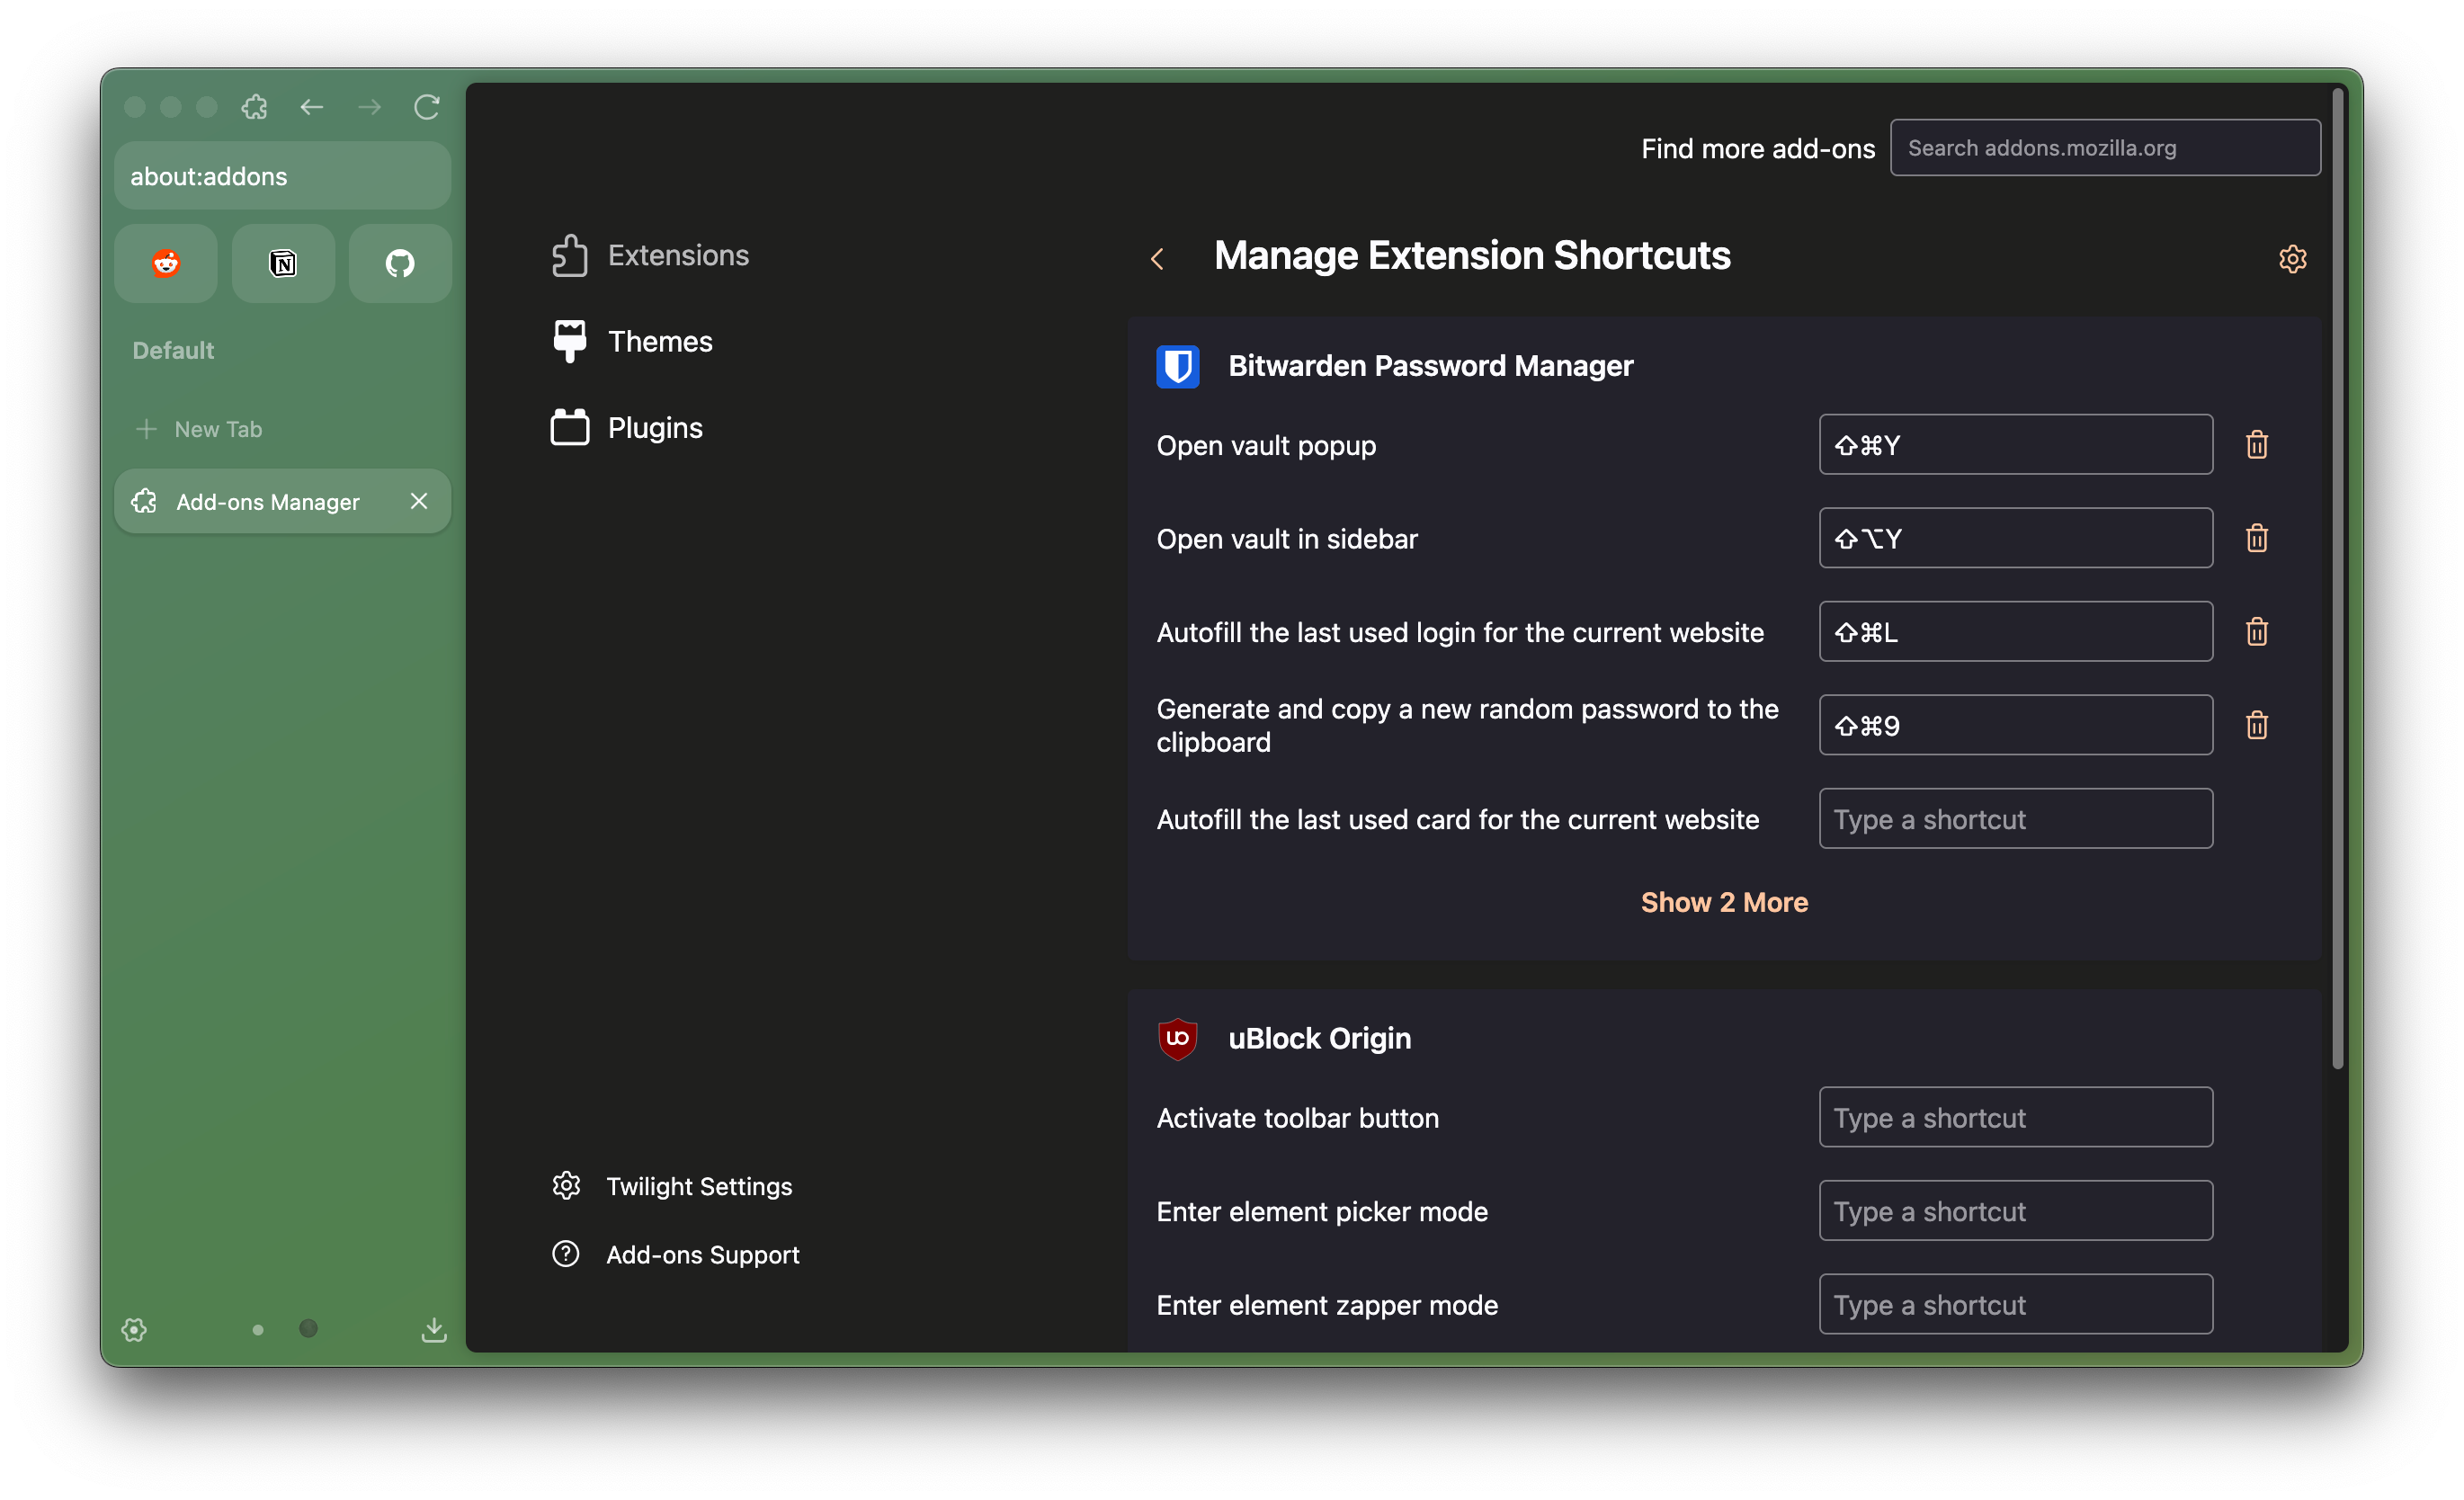
### Manage Extension Shortcuts
You can perform some actions related to extensions faster with keyboard shortcuts. Some extensions already has preconfigured shortcut fields, but you can also set your own custom shortcuts, depend on the extension support itself. You can access it by opening `Add-Ons Manager` > `Extensions` > `open Gear menu` > choose `Manage Extension Shortcuts`.
***
You can read more support articles related to extensions: [Add-ons, extensions, and themes | Support Mozilla](https://support.mozilla.org/en-US/topics/add-ons-extensions-and-themes/firefox)
file: ./content/docs/user-manual/glance.mdx
meta: {
"title": "Glance",
"description": "Preview websites on top of your current tab"
}
import KeyboardShortcut from '@/components/KeyboardShortcut';
Zen's Glance lets you preview websites on top of your current tab, without fully switching to it. By default, you can create a Glance view by holding as trigger key when clicking a link in a regular tab. In Essentials and pinned tabs, Glance will be automatically created when clicking a link outside current website, without having to pressing the trigger key.
{
}
Once Glance appeared, there are three buttons on its top left side:
* Close button to close the view (can also be done by clicking outside the Glance area).
* Expand button to move the website into a new tab.
* Split button to add the website as a split tab.
You can disable/enable Glance and change the trigger method (from to or ) by opening `Settings` > `Look and Feel` > `Glance`.
With Glance, you can take a quick look at websites, move on if you're done with the site, and go back to your previous surfing activities easily.
file: ./content/docs/user-manual/index.mdx
meta: {
"title": "User Manual"
}
import { Callout } from 'fumadocs-ui/components/callout';
This user manual is still in early stages of development and incomplete
Welcome to the Zen Browser User Manual! This guide is designed to provide you with a comprehensive overview of Zen Browser's features, settings, and customization options. This manual will help you navigate the essential aspects of Zen Browser and optimize your browsing experience.
Zen Browser is under active and rapid development. Some content in this manual may become outdated as the browser evolves. Please check the last modification date below the title to confirm you have the most recent information. If you find any outdated sections, please feel free to report them by opening an issue on our [GitHub repository](https://github.com/zen-browser/docs/issues).
Thank you for using Zen Browser, and happy browsing!
file: ./content/docs/user-manual/pip.mdx
meta: {
"title": "Picture-in-Picture",
"description": "Watch videos in a separate window"
}
import KeyboardShortcut from '@/components/KeyboardShortcut';
With **Picture-in-Picture (PiP)** in **Zen**, you can pop videos out of webpages into a clean, always-on-top floating window. Whether you're working, browsing, or just casually scrolling, PiP keeps your video visible without disrupting your flow.
## How to Use Picture-in-Picture
**Stay in flow while watching.**
### 1. On-Screen Video Toggle
When you hover over a supported video, a **Zen PiP toggle** will appear.\
Click it to launch the video in a floating window.\
* Right-click the toggle to move it to the left or right side.
* The toggle is hidden when the video is in full-screen mode.
### 2. Address Bar Icon
On pages with a single video, Zen displays a PiP icon in the **address bar**.\
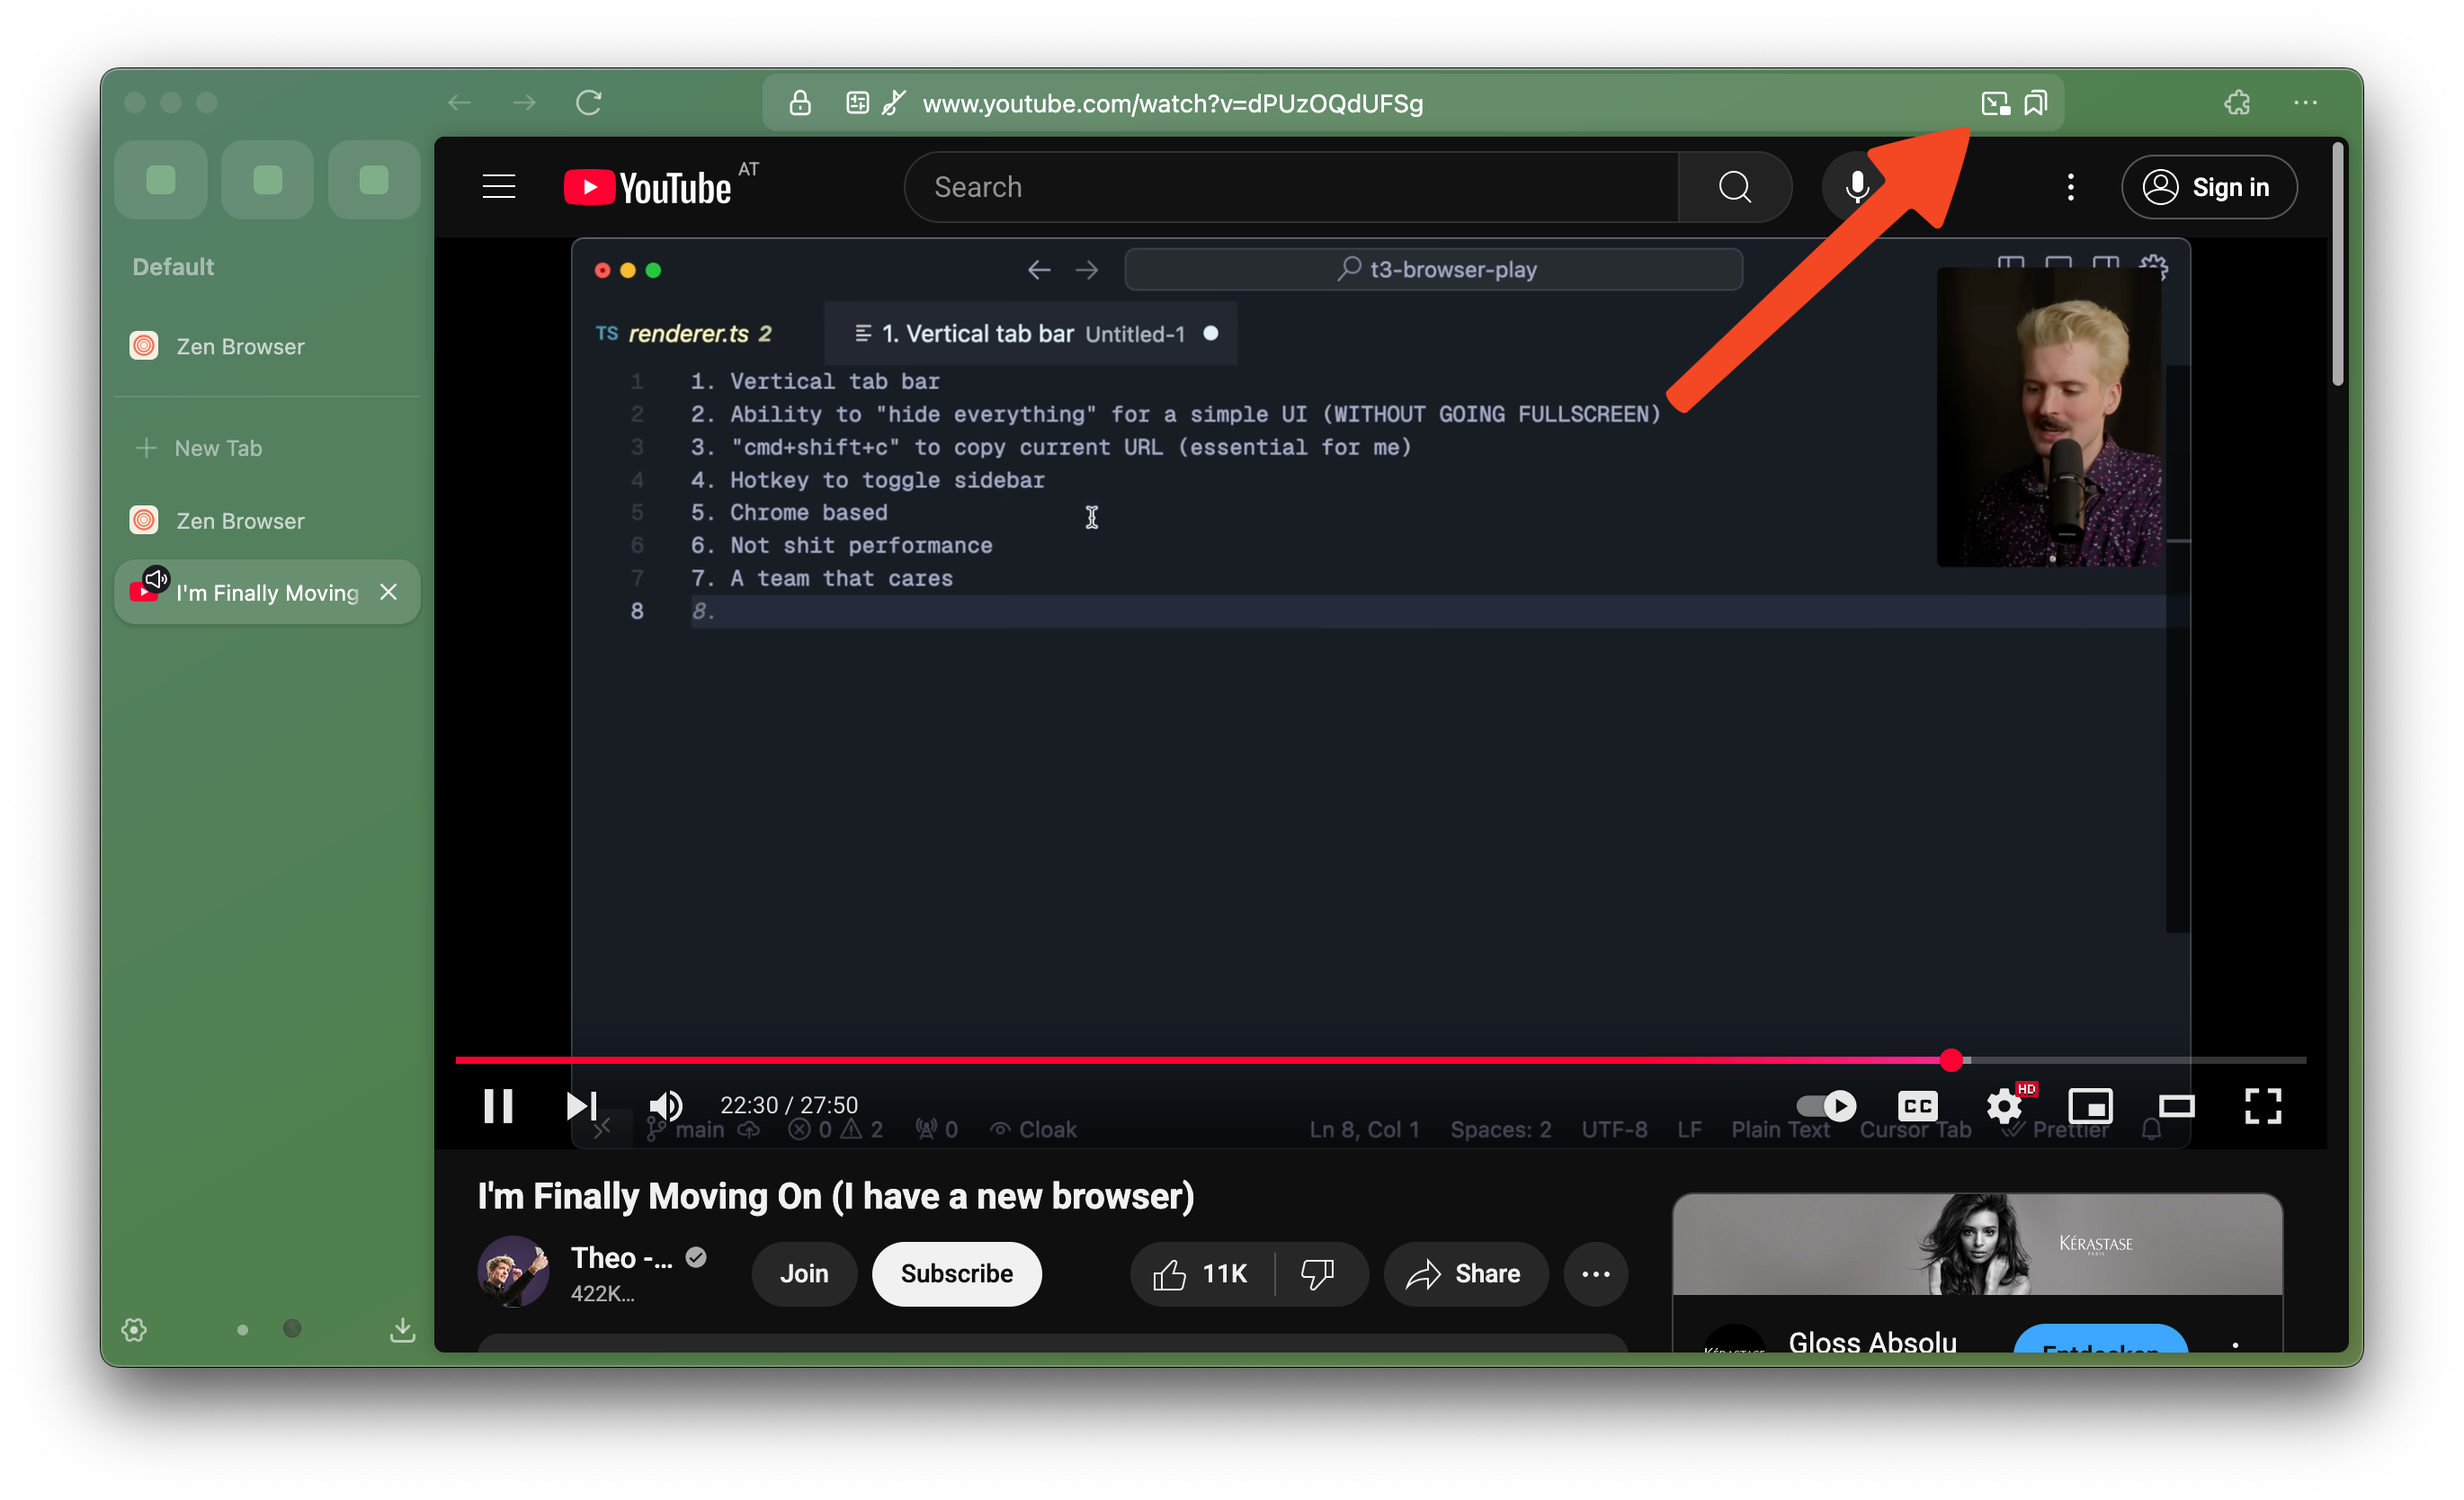
* If there are multiple videos or none, the icon remains hidden.
### 3. Right-Click Menu
You can also launch PiP by **right-clicking** on the video.
* Some platforms like YouTube use custom menus.\
In that case, use or **double right-click** to access Zen’s native menu.
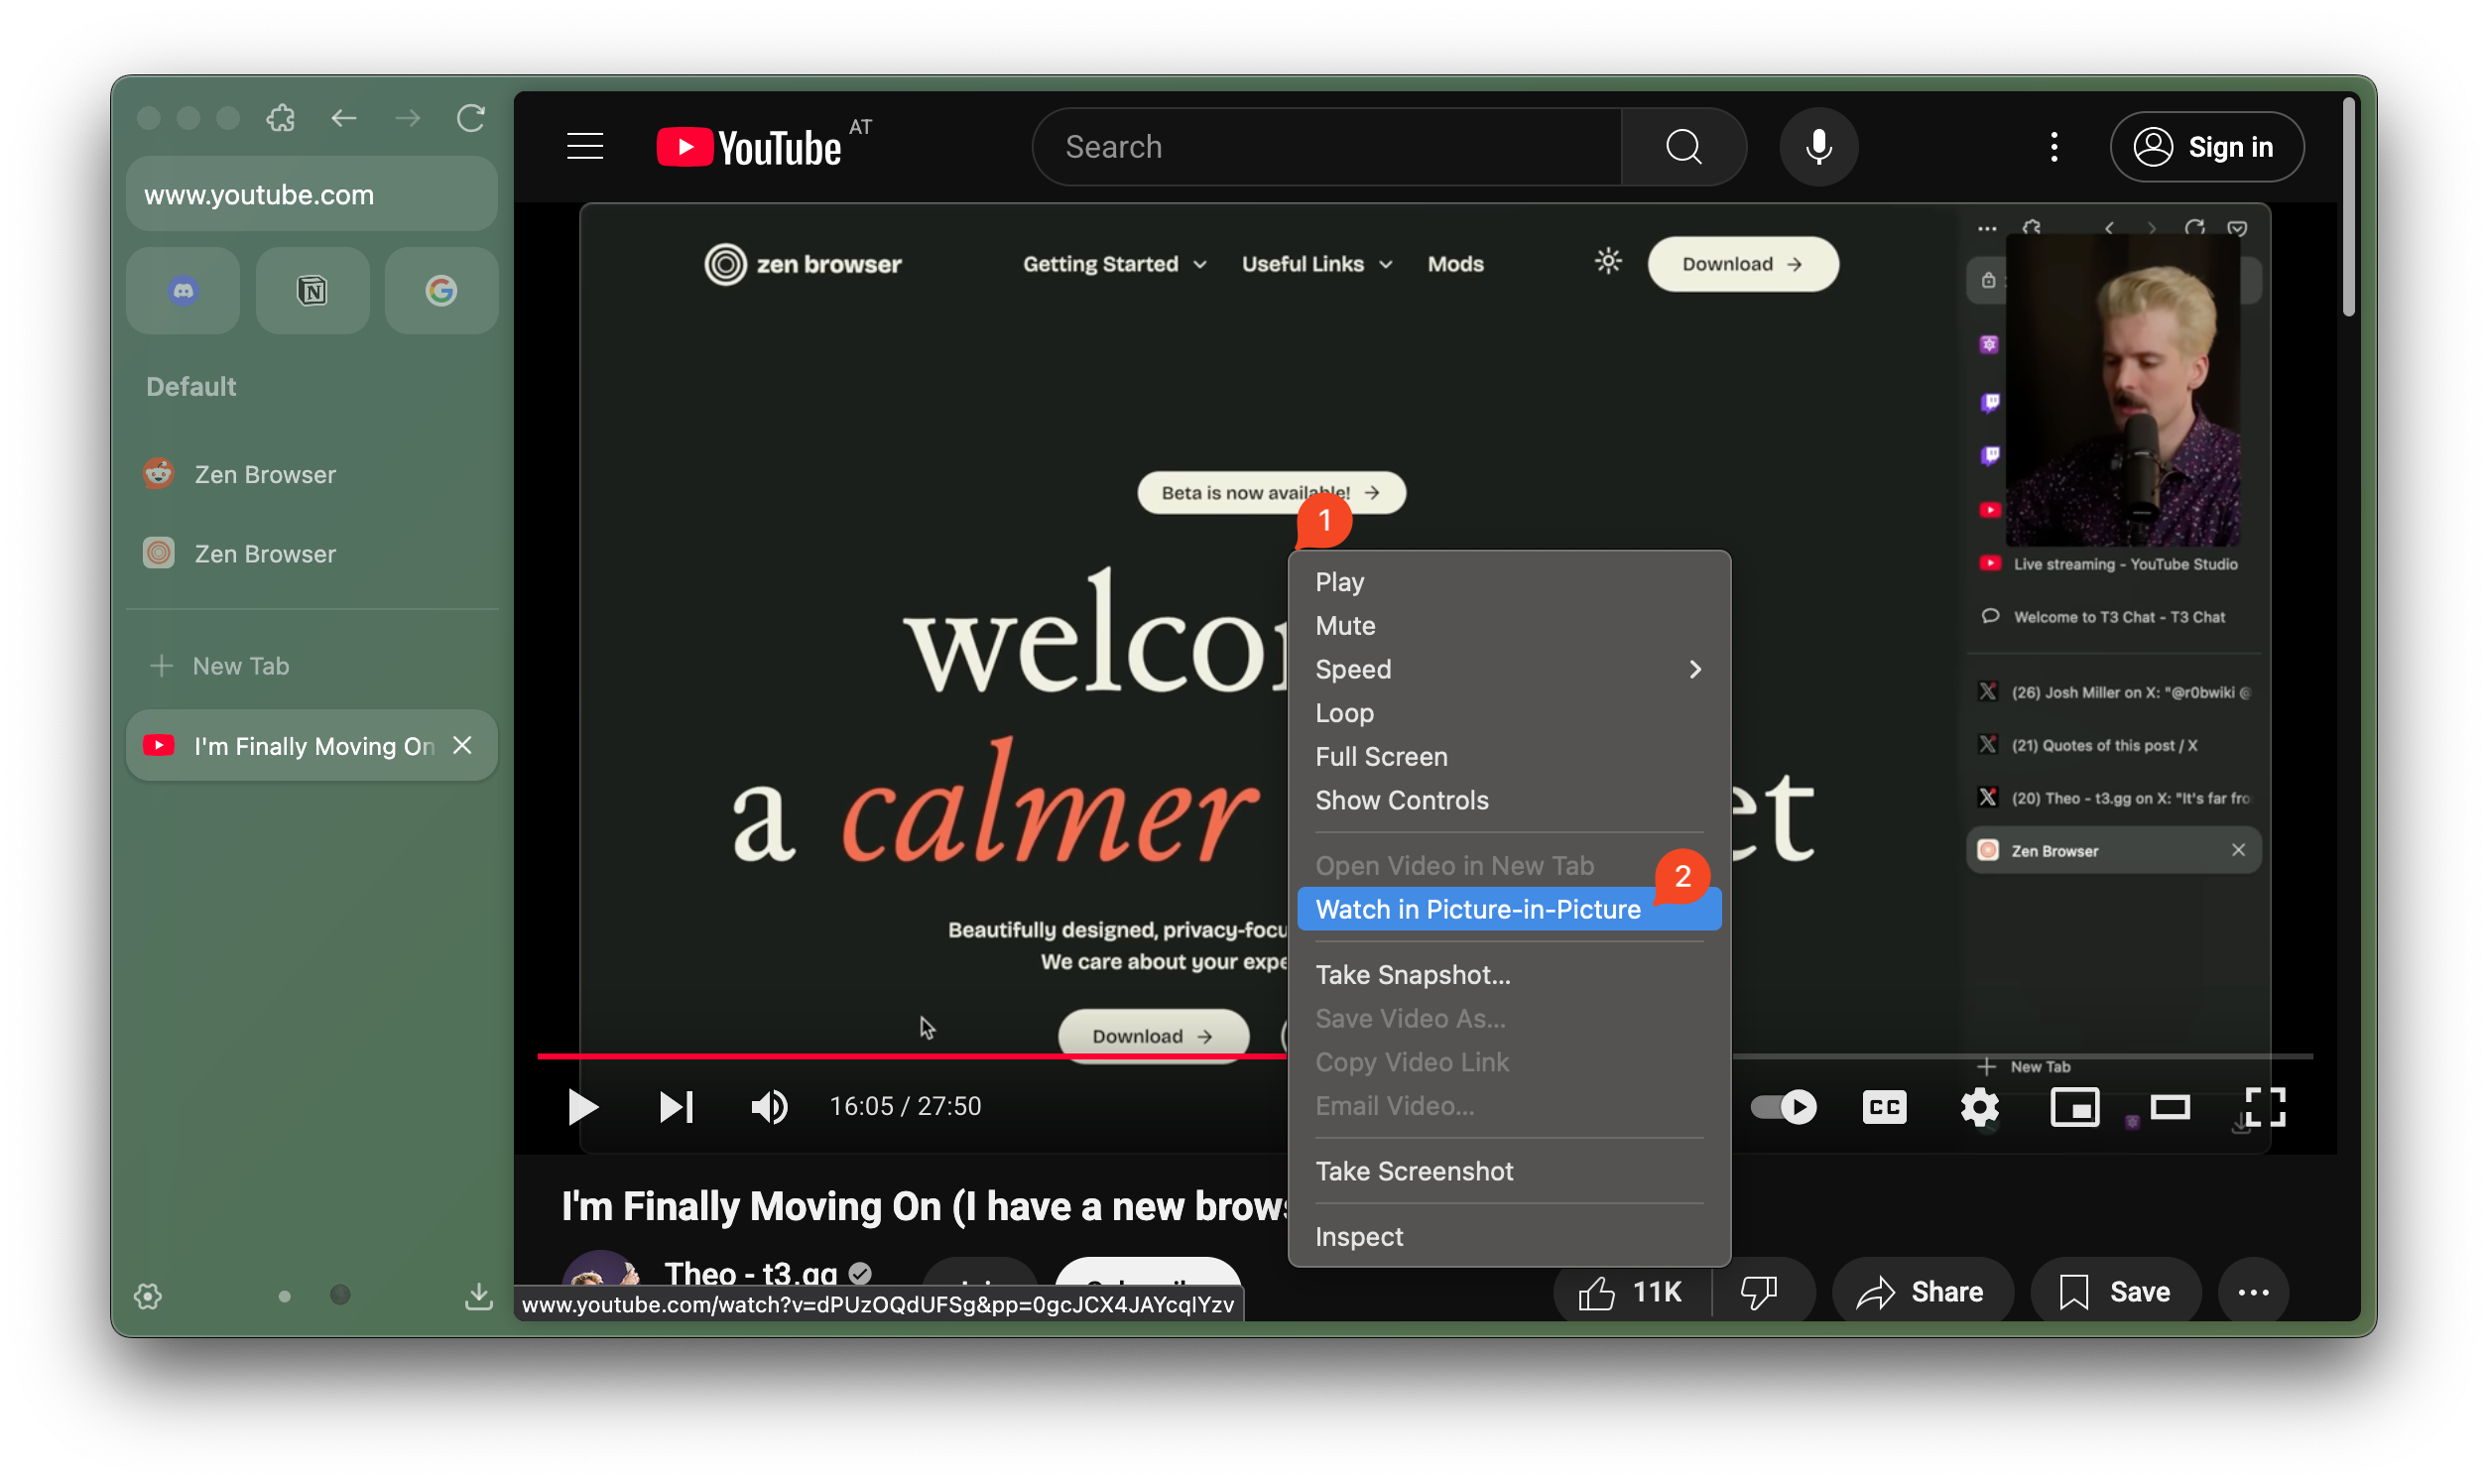
### 4. **Auto-Play in Mini Player**
When you switch tabs while a video is playing, Zen quietly tucks the video into a floating player at the bottom right.
Enable it by setting the property below in about:config to TRUE
`media.videocontrols.picture-in-picture.enable-when-switching-tabs.enabled`
### 5. **Resize**
Hover over any corner of the mini player and drag to adjust its size—just how you like it.
## Keyboard Shortcuts
| Action | Shortcut |
| ----------------------- | ----------------------------------------------------------------------------------- |
| Launch/Close PiP | |
| Mute / Unmute | / |
| Volume Control | / |
| Seek 5s Back / Forward | / |
| Seek 10% Back / Forward | / |
| Jump to Start / End | / |
| Pause / Play | |
| Fullscreen Toggle | or |
| Close PiP Window | |
## How to Disable Picture-in-Picture
### Option 1: From the Player
* Hover over the Picture-in-Picture Player
* Click on the \[x] button
### Option 2: From Zen Settings
* Go to **Settings → General → Browsing**
* Uncheck **"Enable picture-in-picture video controls"**\
You can always re-enable it later.
### Option 3: From the Toggle
* Hover over a video and right-click the PiP toggle.
* Select **"Hide Picture-in-Picture Toggle"**.
### Option 4: From Configuration Page
If you’d like to disable Picture-in-Picture functionality entirely, you can do so via Zen’s advanced configuration page:
1. In the address bar, type `about:config` and press Enter.
2. Accept any warning that appears.
3. Search for the setting: `media.videocontrols.picture-in-picture.enabled`.
4. Set it to **false** to disable Picture-in-Picture across Zen.
You can always re-enable it by returning to this setting and switching it back to **true**.
* The video is shorter than 45 seconds or has no audio.
* It’s in full-screen mode.
* The site may restrict PiP, but Zen gives you the option to override this via **"Enable Anyway"** when available.
## Subtitles & Captions
Turn on captions **before** activating PiP to see them in the floating window.\
Zen supports captions on major platforms including:
* YouTube
* Netflix
* Disney+
* Amazon Prime Video
* Funimation
* Dailymotion
* Khan Academy
* BBC
* Washington Post
* Nebula
* Tubi
* Hotstar
* SonyLIV
* Any site using **WebVTT** (e.g. Coursera, Twitter)
More platforms are being added.
## Media Player
**Audio, always within reach.**
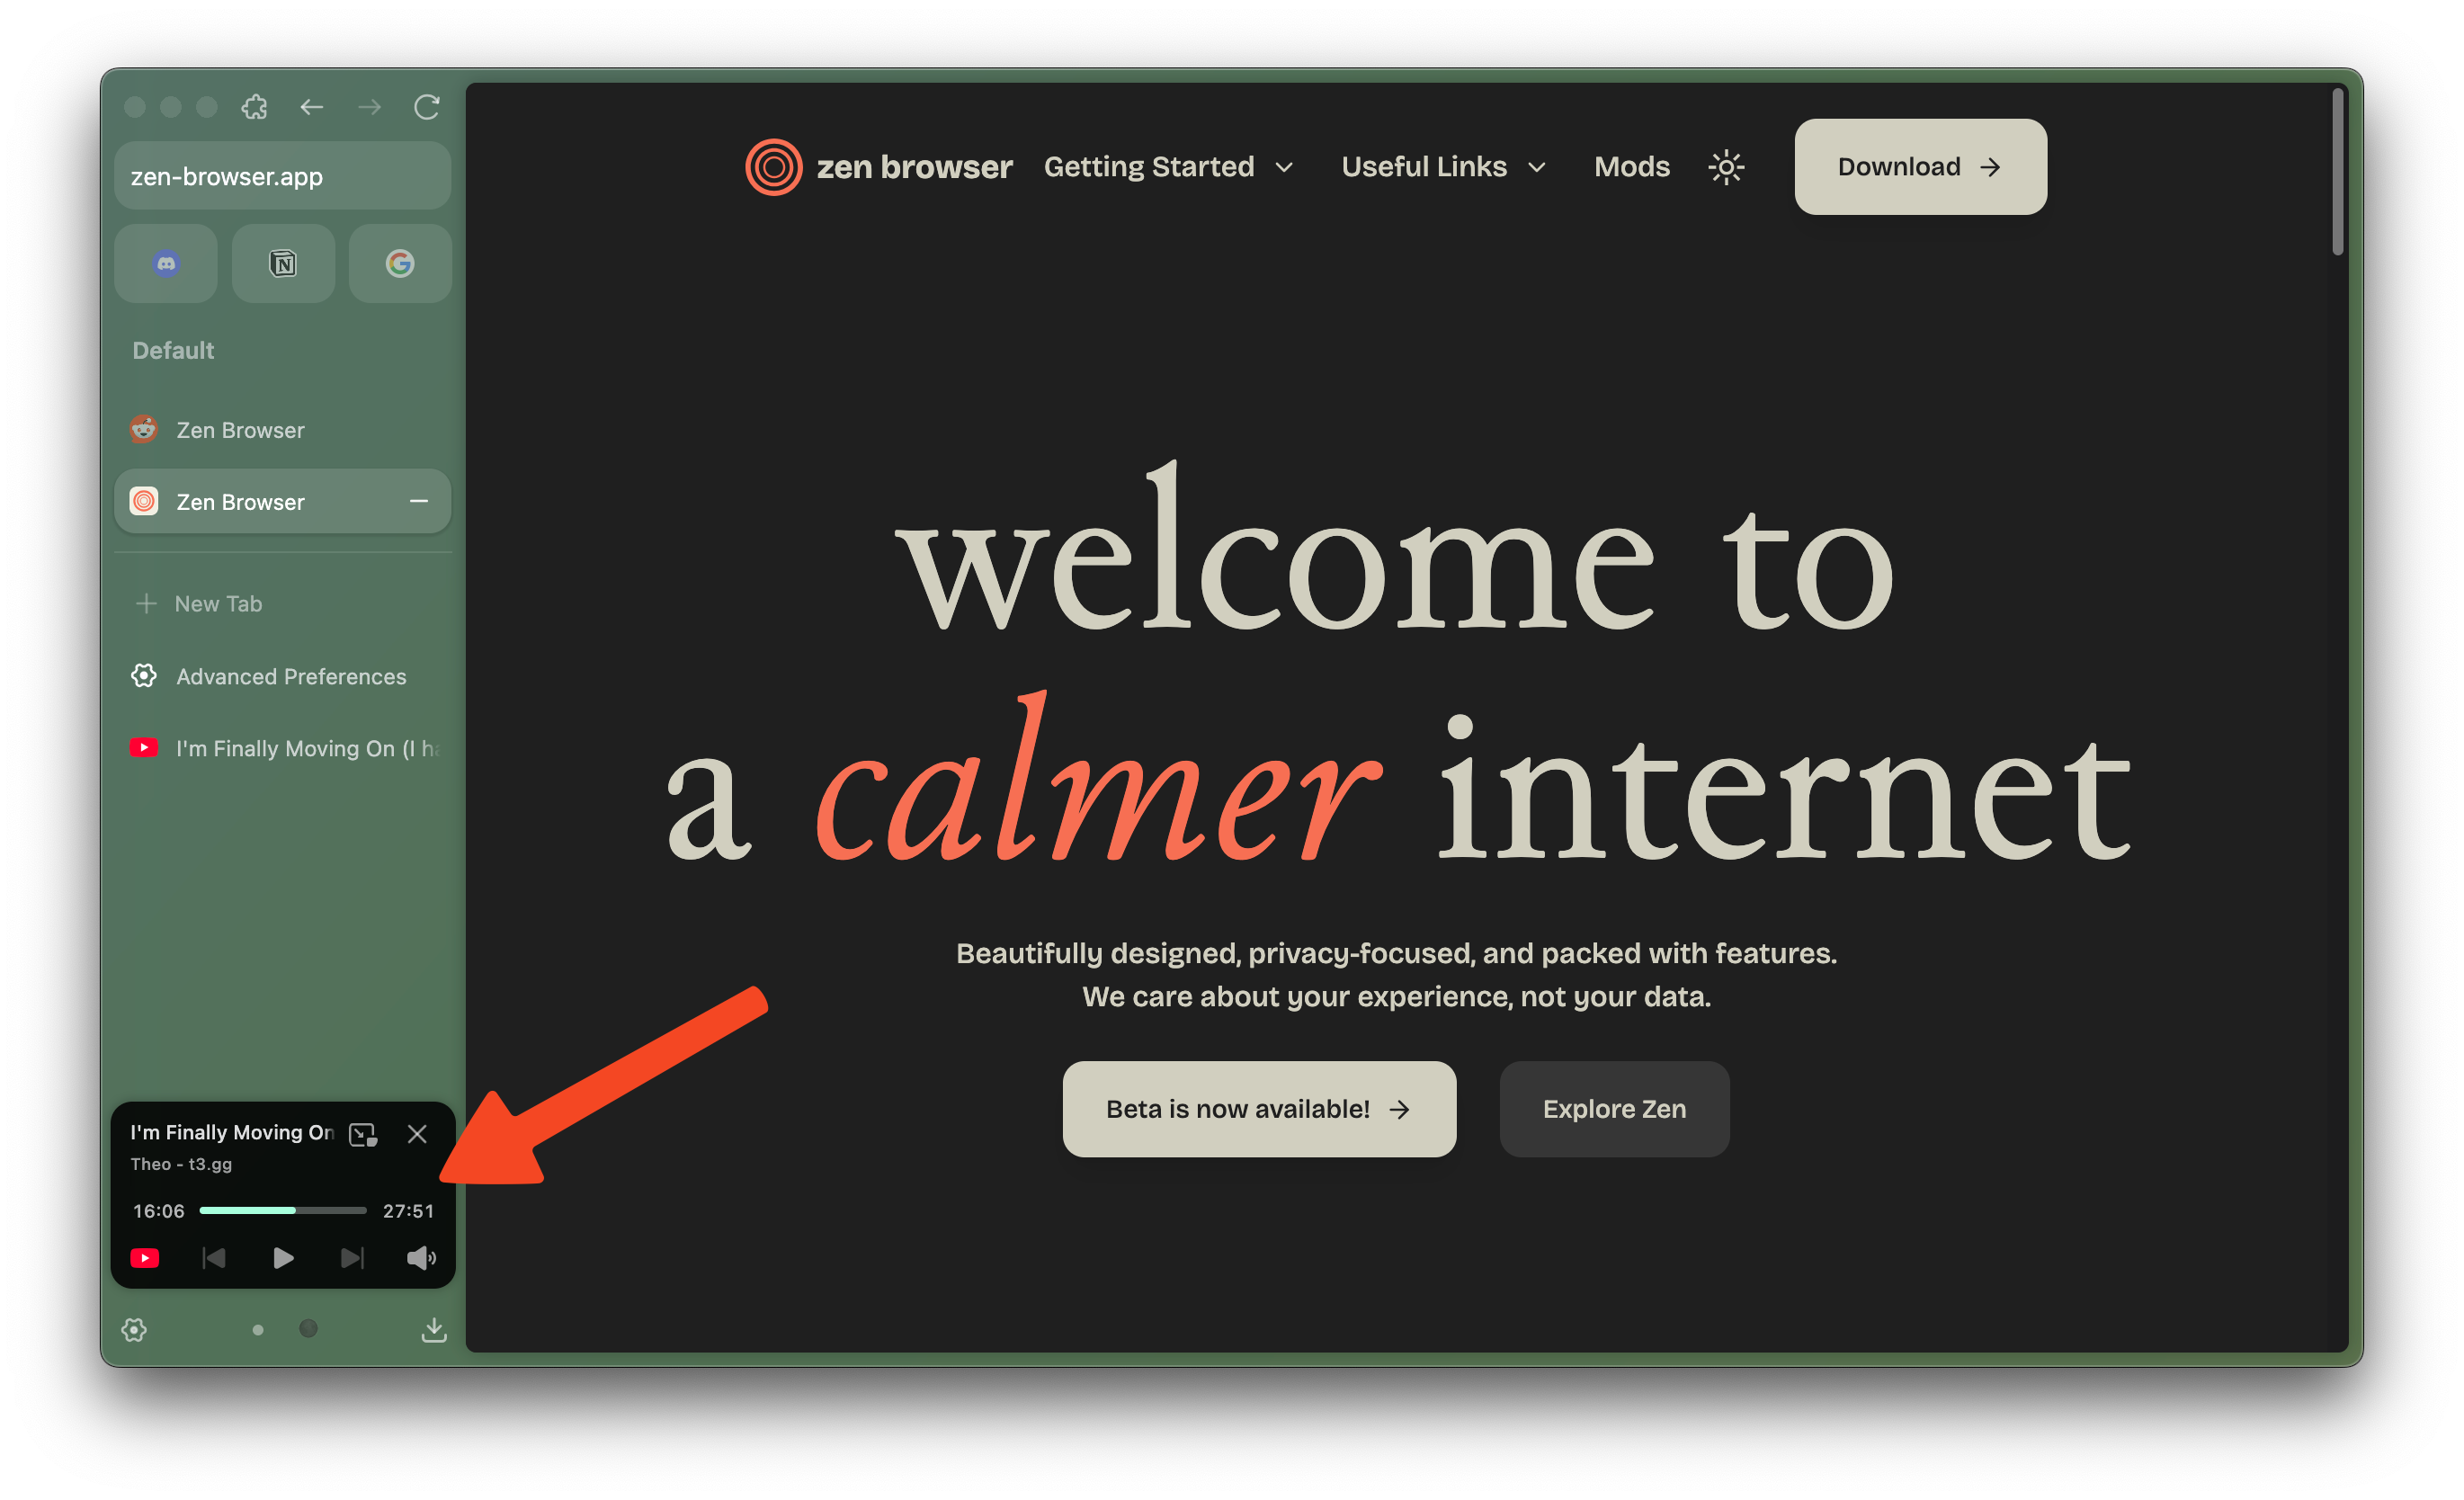
* **Automatic Playback Controls**\
When audio is playing in a background tab, Zen adds a subtle media controller to the bottom of your sidebar.
{/* TODO: enter video */}
* **Simple Dismissal**\
To hide the Media Player, just click the “X” on the controller. Zen will take the hint.
{/* TODO: enter video */}
file: ./content/docs/user-manual/shortcuts.mdx
meta: {
"title": "Keyboard Shortcuts",
"description": "Enhance your Zen experience with customizable keybinds"
}
import KeyboardShortcut from '@/components/KeyboardShortcut';
Zen Browser supported lots of keyboard shortcuts to help you do common tasks quicker. Access `"Settings" > "Keyboard Shortcuts"` and edit the available shortcuts to suit your workflow even more!
### Change or rebind keyboard shortcuts in Zen
* In Keyboard Shortcuts setting page, to change or rebind shortcut of a feature, click the text field beside it, press your shortcuts, and press Esc to save your new shortcut.
* The text field will show a dark green outline quickly when the new shortcut is succesfully assigned and saved.
* The text field will show a red outline if the new shortcut you assign is already taken as default shortcut for other feature in Zen. Below the field, a *Conflict with another shortcut* warning will be shown. If you encounter this, you can try assign another shortcut, or press Backspace to clear the shortcut field. You can also clear the shortcut field of a feature you don't need, before assigning it as a new shortcut for other features.
* Some Zen features might not have conflict when its original shortcut got reassigned for other features, but when the shortcut is called, it will resort to do the original feature. You can check the Keyboard Settings if the shortcut you're assigning is already set for other feature, and try assign other shortcut to make it work.
* Not all features are available in the Keyboard Shortcuts settings, especially alternative shortcuts derived from Firefox ([Check default Firefox shortcut lists](https://support.mozilla.org/en-US/kb/keyboard-shortcuts-perform-firefox-tasks-quickly)). This might result in failure when applying or accessing the feature using a custom shortcut you assigned. If a Firefox shortcut is not available in the Keyboard Shortcuts settings, you won't be able to use it as a custom shortcut yet. Kindly report it to [Zen Github Issues page](https://github.com/zen-browser/desktop/issues) first!
## List of editable keyboard shortcuts in Zen
### Compact Mode
| **Action** | **Shortcut** |
| ----------------------- | ---------------------------------------------- |
| Toggle Floating Toolbar | |
| Toggle Floating Sidebar | |
| Toggle Compact Mode | |
### Workspaces
| **Action** | **Shortcut** |
| -------------------------- | ---------------------------------------------- |
| Backward Workspace | |
| Forward Workspace | |
| Switch to Workspace (1-10) | Not set by default |
You can assign custom keyboard shortcuts to switch into up to 10 workspaces.
### Split View
The "Toggle Split View" shortcuts currently only applicable when selecting multiple tabs in tab sidebar, and doesn't work when used inside a split view.
| **Action** | **Shortcut** |
| ------------------------------ | ---------------------------------------------- |
| Close Split View (Unsplit All) | |
| Toggle Split View Horizontal | |
| Toggle Split View Vertical | |
| Toggle Split View Grid | |
### Window & Tab Management
| **Action** | **Shortcut** |
| ----------------------- | ------------------------------------------------ |
| New Window | |
| New Tab | |
| Close Tab | |
| Close Window | |
| Quit Application | |
| Restore Last Closed Tab | |
| Undo Close Window | |
| Select tab #1 - #8 ^ | |
| Select last tab | |
* By default, you can **switch to next tab** using the shortcut and **switch to previous tab** using the shortcut.
* When you're in Compact Mode and switching tabs using or , you can peek into the tab you're switching in by enabling the **"Briefly make the toolbar popup when switching or opening new tabs in compact mode"** option in `Settings` > `Look and Feel` > `Theme Settings`.
* Pressing when you're in the last tab will switch you to the first available tab (Essentials first, then pinned tabs, and lastly, regular tabs).
* ^ Tab numbers listed for these keyboard shortcuts includes Essentials and pinned tabs. Example: If you have three Essentials, four pinned tabs, and five regular tabs:
* until will switch you to your Essentials,
* until will switch you to your pinned tabs,
* will switch you to your first regular tab,
* will switch you to your last tab (12th).
* Zen can also let you cycle through recently used tabs, instead of cycling through all of your tabs. Enable it by go to `Settings` > `General` > `Tabs` and check the `Ctrl + Tab cycles through tabs in recently used order`. A popup containing up to 7 recently used tabs will show up when you press .
### Navigation
| **Action** | **Shortcut** |
| ------------------------------------ | ------------------------------------------------ |
| Go Back | |
| Go Forward | |
| Navigate Back (Alternative) | |
| Navigate Forward (Alternative) | |
| Go Home | |
| Reload Page | |
| Reload Page (Skip Current Cache) | |
| Go to History (Open History Sidebar) | |
| Open Private Browsing Window | |
### Search & Find
| **Action** | **Shortcut** |
| --------------------------------------- | ------------------------------------------------ |
| Focus Search ^ | |
| Focus Search ^ (Alternative) | |
| Find on Page | |
| Find Again (Jump to Next Result) | |
| Find Previous (Jump to Previous Result) | |
^ Focus Search shortcut will open your URL bar, shift focus and enable Search mode using your default search engine.
### Page Operations
| **Action** | **Shortcut** |
| --------------------------------------- | ------------------------------------------------ |
| Open Location (Current link in URL Bar) | |
| Open Location (Alternative) | |
| Save Page | |
| Print Page | |
| Toggle Reader Mode | |
| Toggle Picture-in-Picture | |
| View Page Source | |
| View Page Info | |
### History & Bookmarks
| **Action** | **Shortcut** |
| -------------------------------- | ------------------------------------------------ |
| Show All History | |
| Bookmark This Page | |
| Bookmark This Page (Alternative) | |
| Show Bookmarks Library | |
### Media & Display
| **Action** | **Shortcut** |
| --------------------- | ------------------------------------------------ |
| Toggle Mute | |
| Zoom Out | |
| Zoom In | |
| Reset Zoom Level | |
| Switch Text Direction | |
| Take Screenshot | |
### Developer Tools
| **Action** | **Shortcut** |
| ----------------------------- | ------------------------------------------------------ |
| Toggle DevTools | |
| Toggle Browser Toolbox | |
| Toggle Browser Console | |
| Toggle Responsive Design Mode | |
| Toggle Inspector | |
| Toggle Web Console | |
| Toggle JavaScript Debugger | |
| Toggle Network Monitor | |
| Toggle Style Editor | |
| Toggle Performance | |
| Toggle Storage | |
| Toggle DOM | |
| Toggle Accessibility | |
### Zen Features
| **Action** | **Shortcut** |
| ------------------------------ | ------------------------------------------------------ |
| Copy Current URL as Markdown | |
| Copy Current URL | |
| Toggle Sidebar Width | |
| Reset Pinned Tab to Pinned URL | Not set by default |
### Other Features
| **Action** | **Shortcut** |
| -------------------------- | ----------------------------------------------------- |
| Open Downloads | |
| Open Add-ons | |
| Open File | |
| Delete Key | |
| Enter Full Screen | |
| Exit Full Screen | |
| About Processes | |
| Show Bookmarks Sidebar | |
| Show Bookmarks Toolbar | |
| Stop Loading | |
| Toggle AI Chatbot Sidebar^ | |
| Toggle Firefox Sidebar | |
| Show All Tabs | |
| Clear Browsing Data | |
| WR Capture Command | |
| Toggle WR Capture Sequence | |
***
Read more about default keyboard shortcuts in Firefox:
[Keyboard shortcuts - Perform common Firefox tasks quickly | Firefox Help](https://support.mozilla.org/en-US/kb/keyboard-shortcuts-perform-firefox-tasks-quickly)
file: ./content/docs/user-manual/split-view.mdx
meta: {
"title": "Split View",
"description": "Open multiple tabs side by side easily"
}
import KeyboardShortcut from '@/components/KeyboardShortcut';
Zen's Split View lets you view up to 4 tabs side by side, so you can compare information or multitask easily.
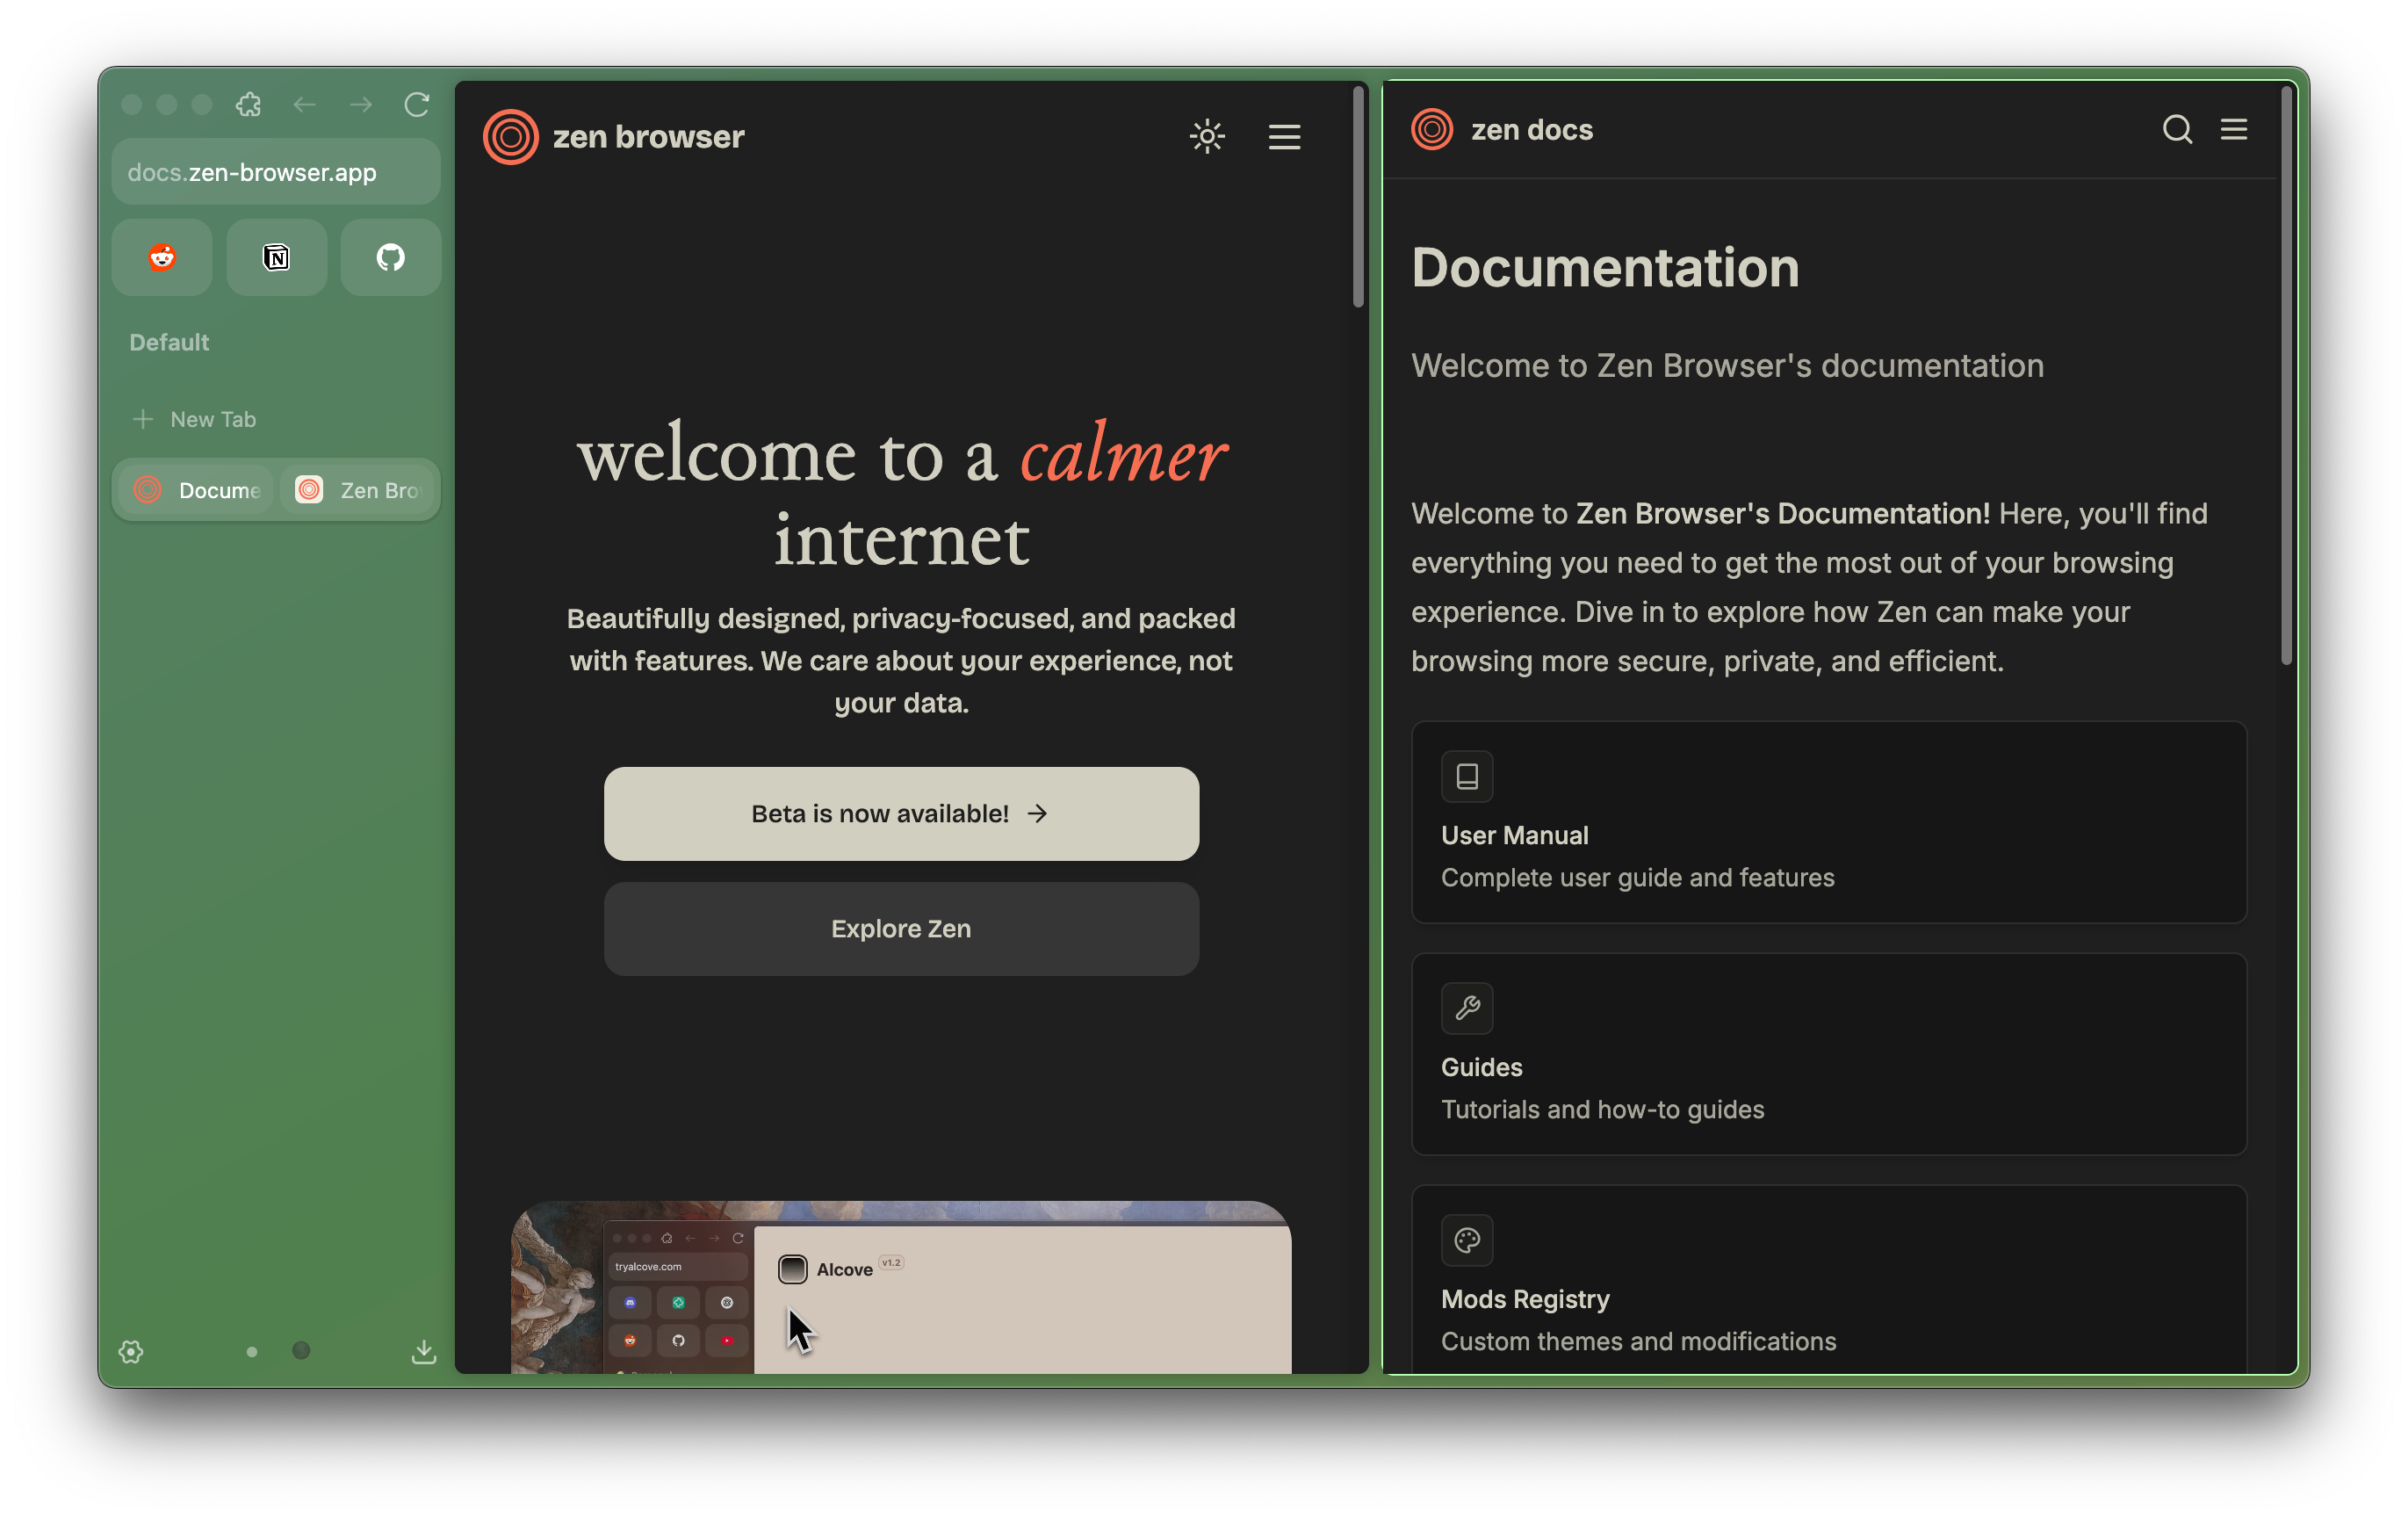
### Creating split view
You can create split view simply by open one tab, drag another tab from sidebar to left or right side of it, and drop once the split indicator placeholder is shown. You can also right click on a link and choose `"Split link in new tab"`.
{ /* TODO: insert video of these sequences:
- dragging a tab to split it with another tab
- click new tab button, insert url, load it, and drag it into the existing split.
- right click a link from one of the tabs > click "split link in new tab"
*/}
### Using split view
When split view is enabled, the active tab will have an overlay on its top side, containing two buttons: **Drag Handle** `:::` button and **Unsplit Tab** `‒` button.
{ /* TODO: `insert gif/video of dragging split tab and then pressing ‒ button to unsplit it` */}
* With **Drag Handle** `:::` button, you can move a split tab to various directions (left, bottom, right, or top side of another tabs).
* Meanwhile, clicking **Unsplit Tab** `‒` button will remove the tab and expand it outside the previous split view.
* Currently, you can **unsplit all tabs within a split view** by pressing shortcut.
### Toggle Split View shortcuts
Zen also provides keyboard shortcuts to help you rearrange the split tabs automatically into a horizontal, vertical, or grid layout.
* **Toggle Split View Horizontal**:
* **Toggle Split View Vertical**:
* **Toggle Split View Grid**:
{ /* TODO: insert gif/video of horizontal, vertical, and grid toggling split view here */}
You can also press one of the Toggle Split View shortcuts to split the current tab with the tab below it.
All shortcuts can be modified via `Settings > Keyboard Shortcuts`.
file: ./content/docs/user-manual/translate.mdx
meta: {
"title": "Translations",
"description": "Translate webpages or text selections directly in Zen"
}
import { Callout } from 'fumadocs-ui/components/callout';
Based on Firefox, Zen also inherit its translation features, allowing you to navigate websites in various language easily. The translation process is done locally on your device, instead of relying on in cloud services. You can translate a whole page, translate a specific text selection, or translated a link text!
### Translating the full page
When you visit a webpage in a supported language, the translation panel will pop up automatically. You can also do it manually by opening **Main Menu** button and selecting **Translate page** option.
You can also use a dedicated Translate button in the right side of the URL bar, which shows up when visiting webpages outside of your preferred language. In Single Toolbar mode, the button will be hidden by default and can be accessed after clicking the URL bar.
Zen detects the page languages manually and will suggest to translate it to your preferred languages. You can use the "**Translate from**" dropdown menu to change page language to detect, and use the "**Translate to**" dropdown menu to change your translation output language. Select "**Translate**" to translate the entire page.
Zen will download the language first if you're using this feature for the first time. After the language is downloaded, translation process will take around 20-60 seconds, depend on the length of contents.
The **Translate button** in URL bar will be updated along with the translation process, and after the translation process gets completed, your preferred language will be shown beside the icon.
To revert the page to the original language, click the Translate button in the URL bar and select "**Show original**".
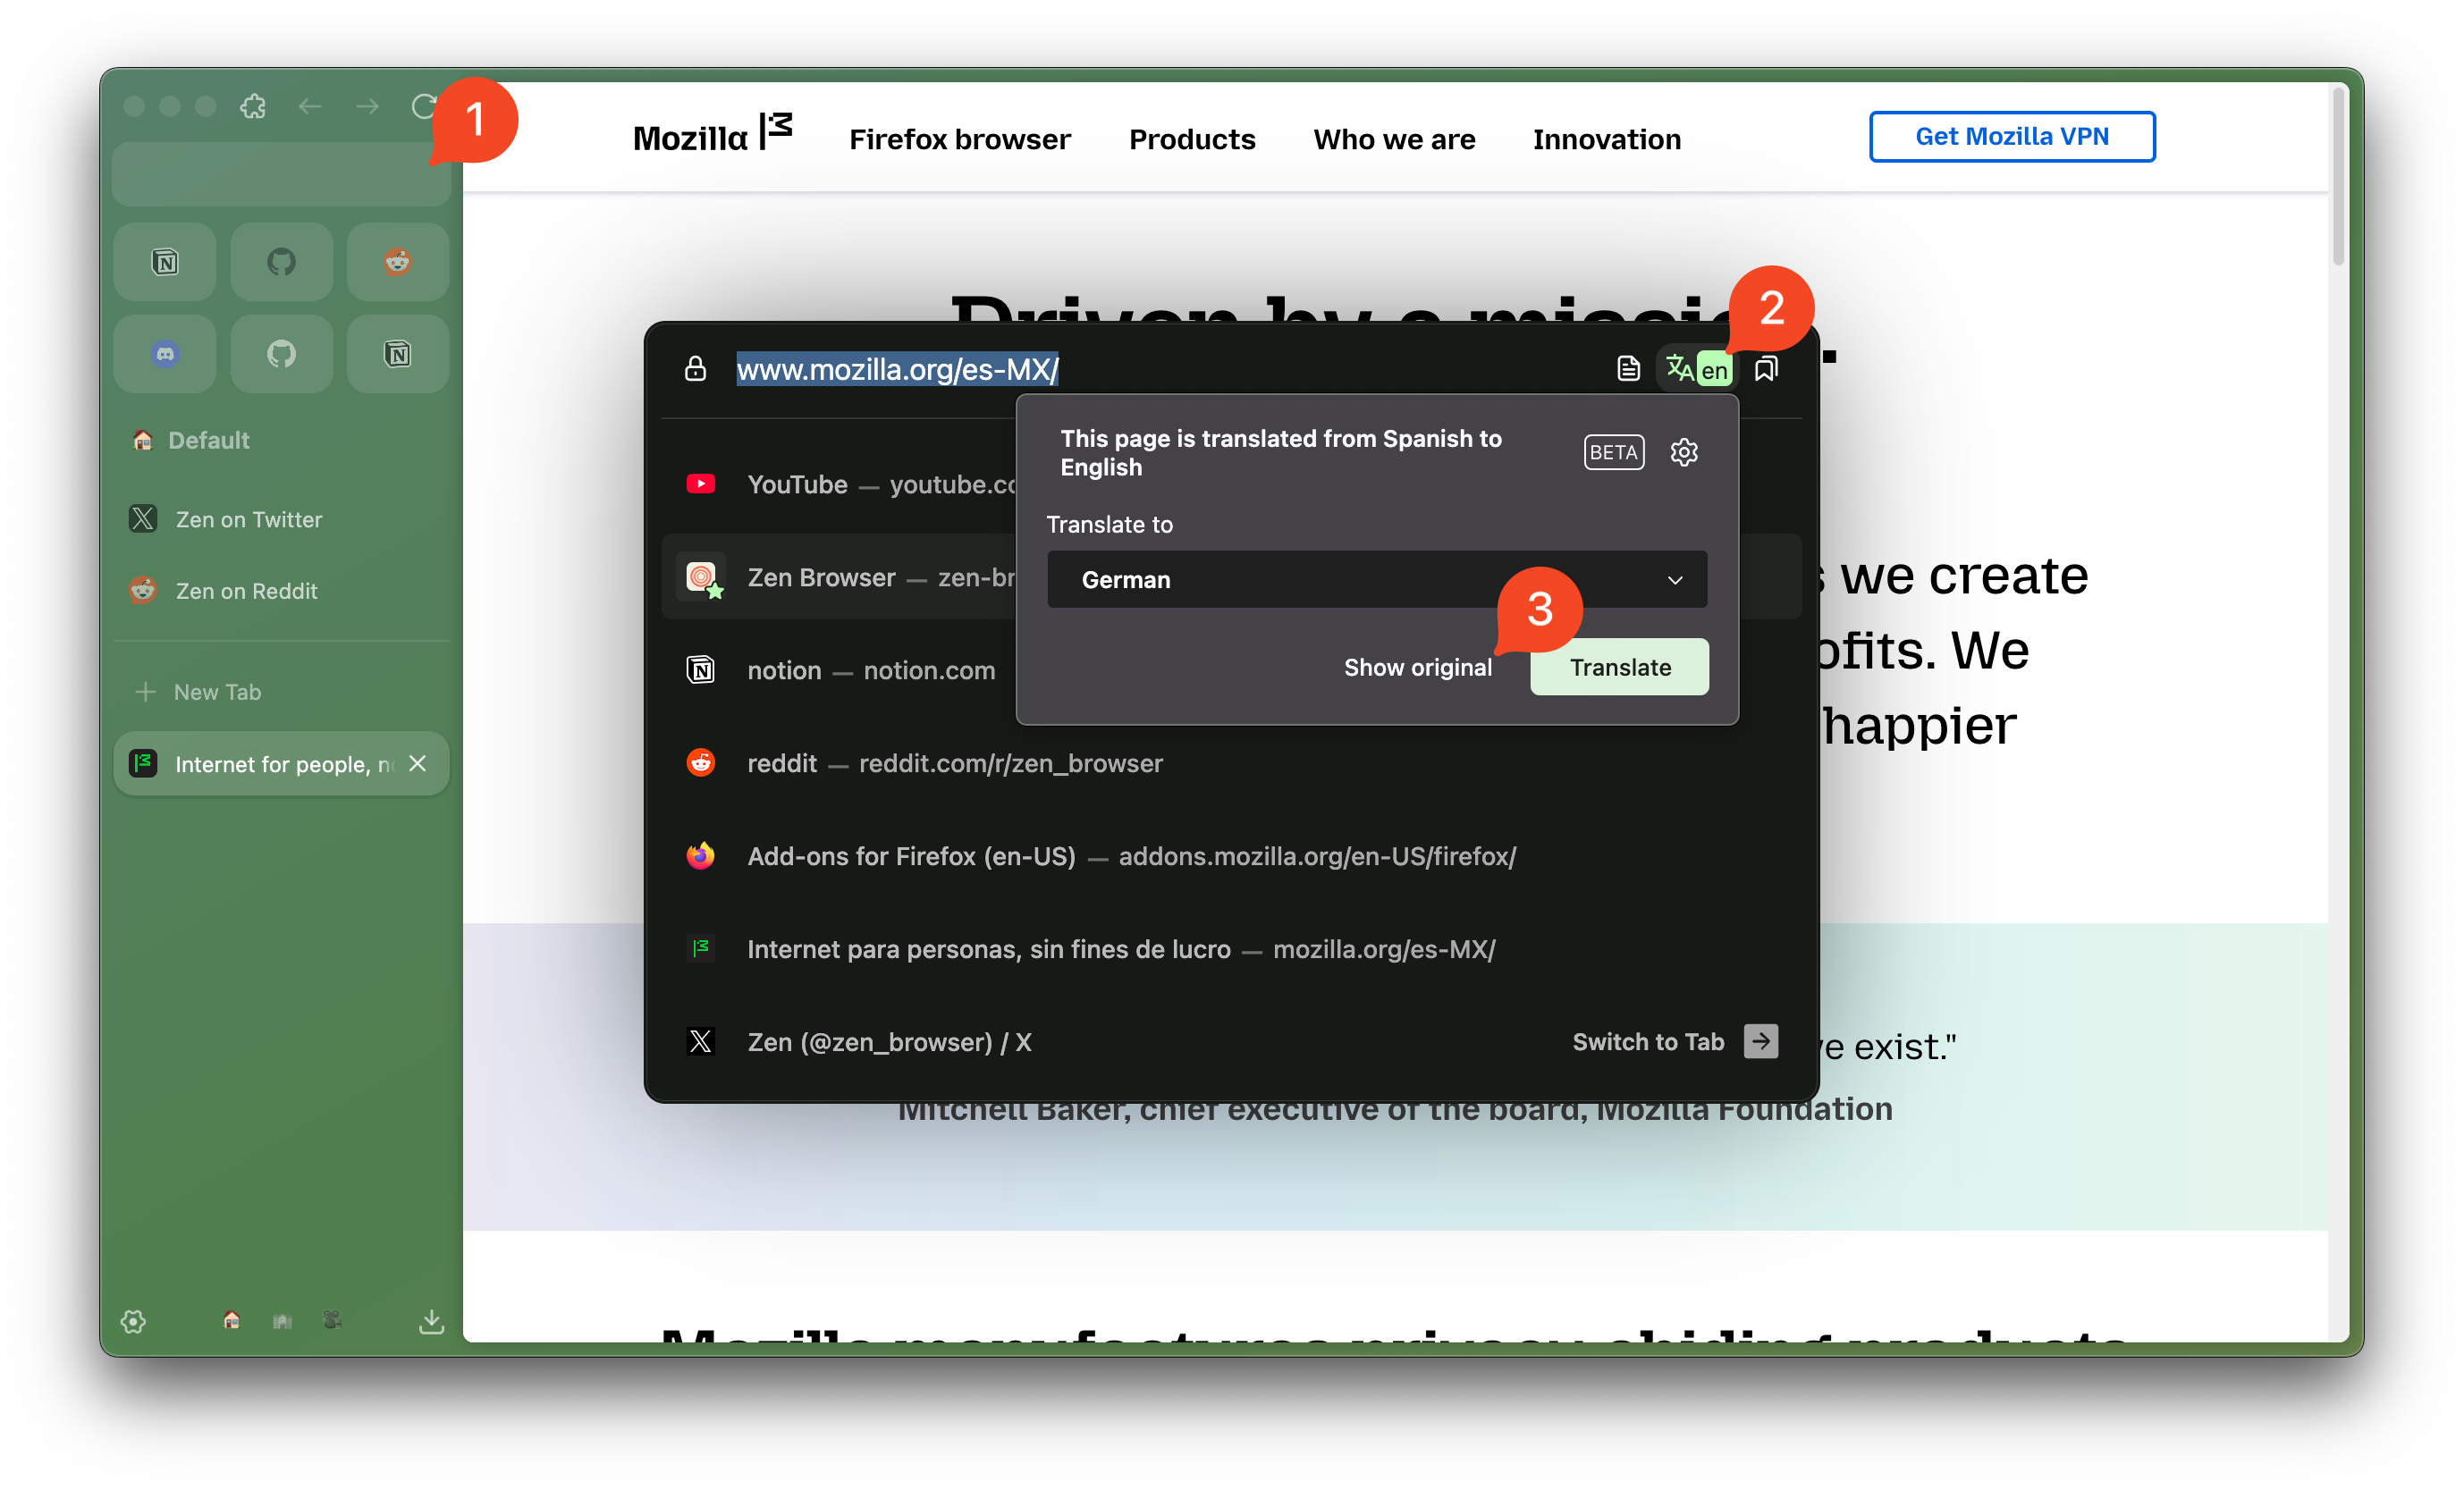
### Translating text selection
You can also translate a specific word or sentence, which will be handy when reading pages or learning in a foreign language. Select the text you want to translate, right click, and select "**Translate Selection to...**" option.
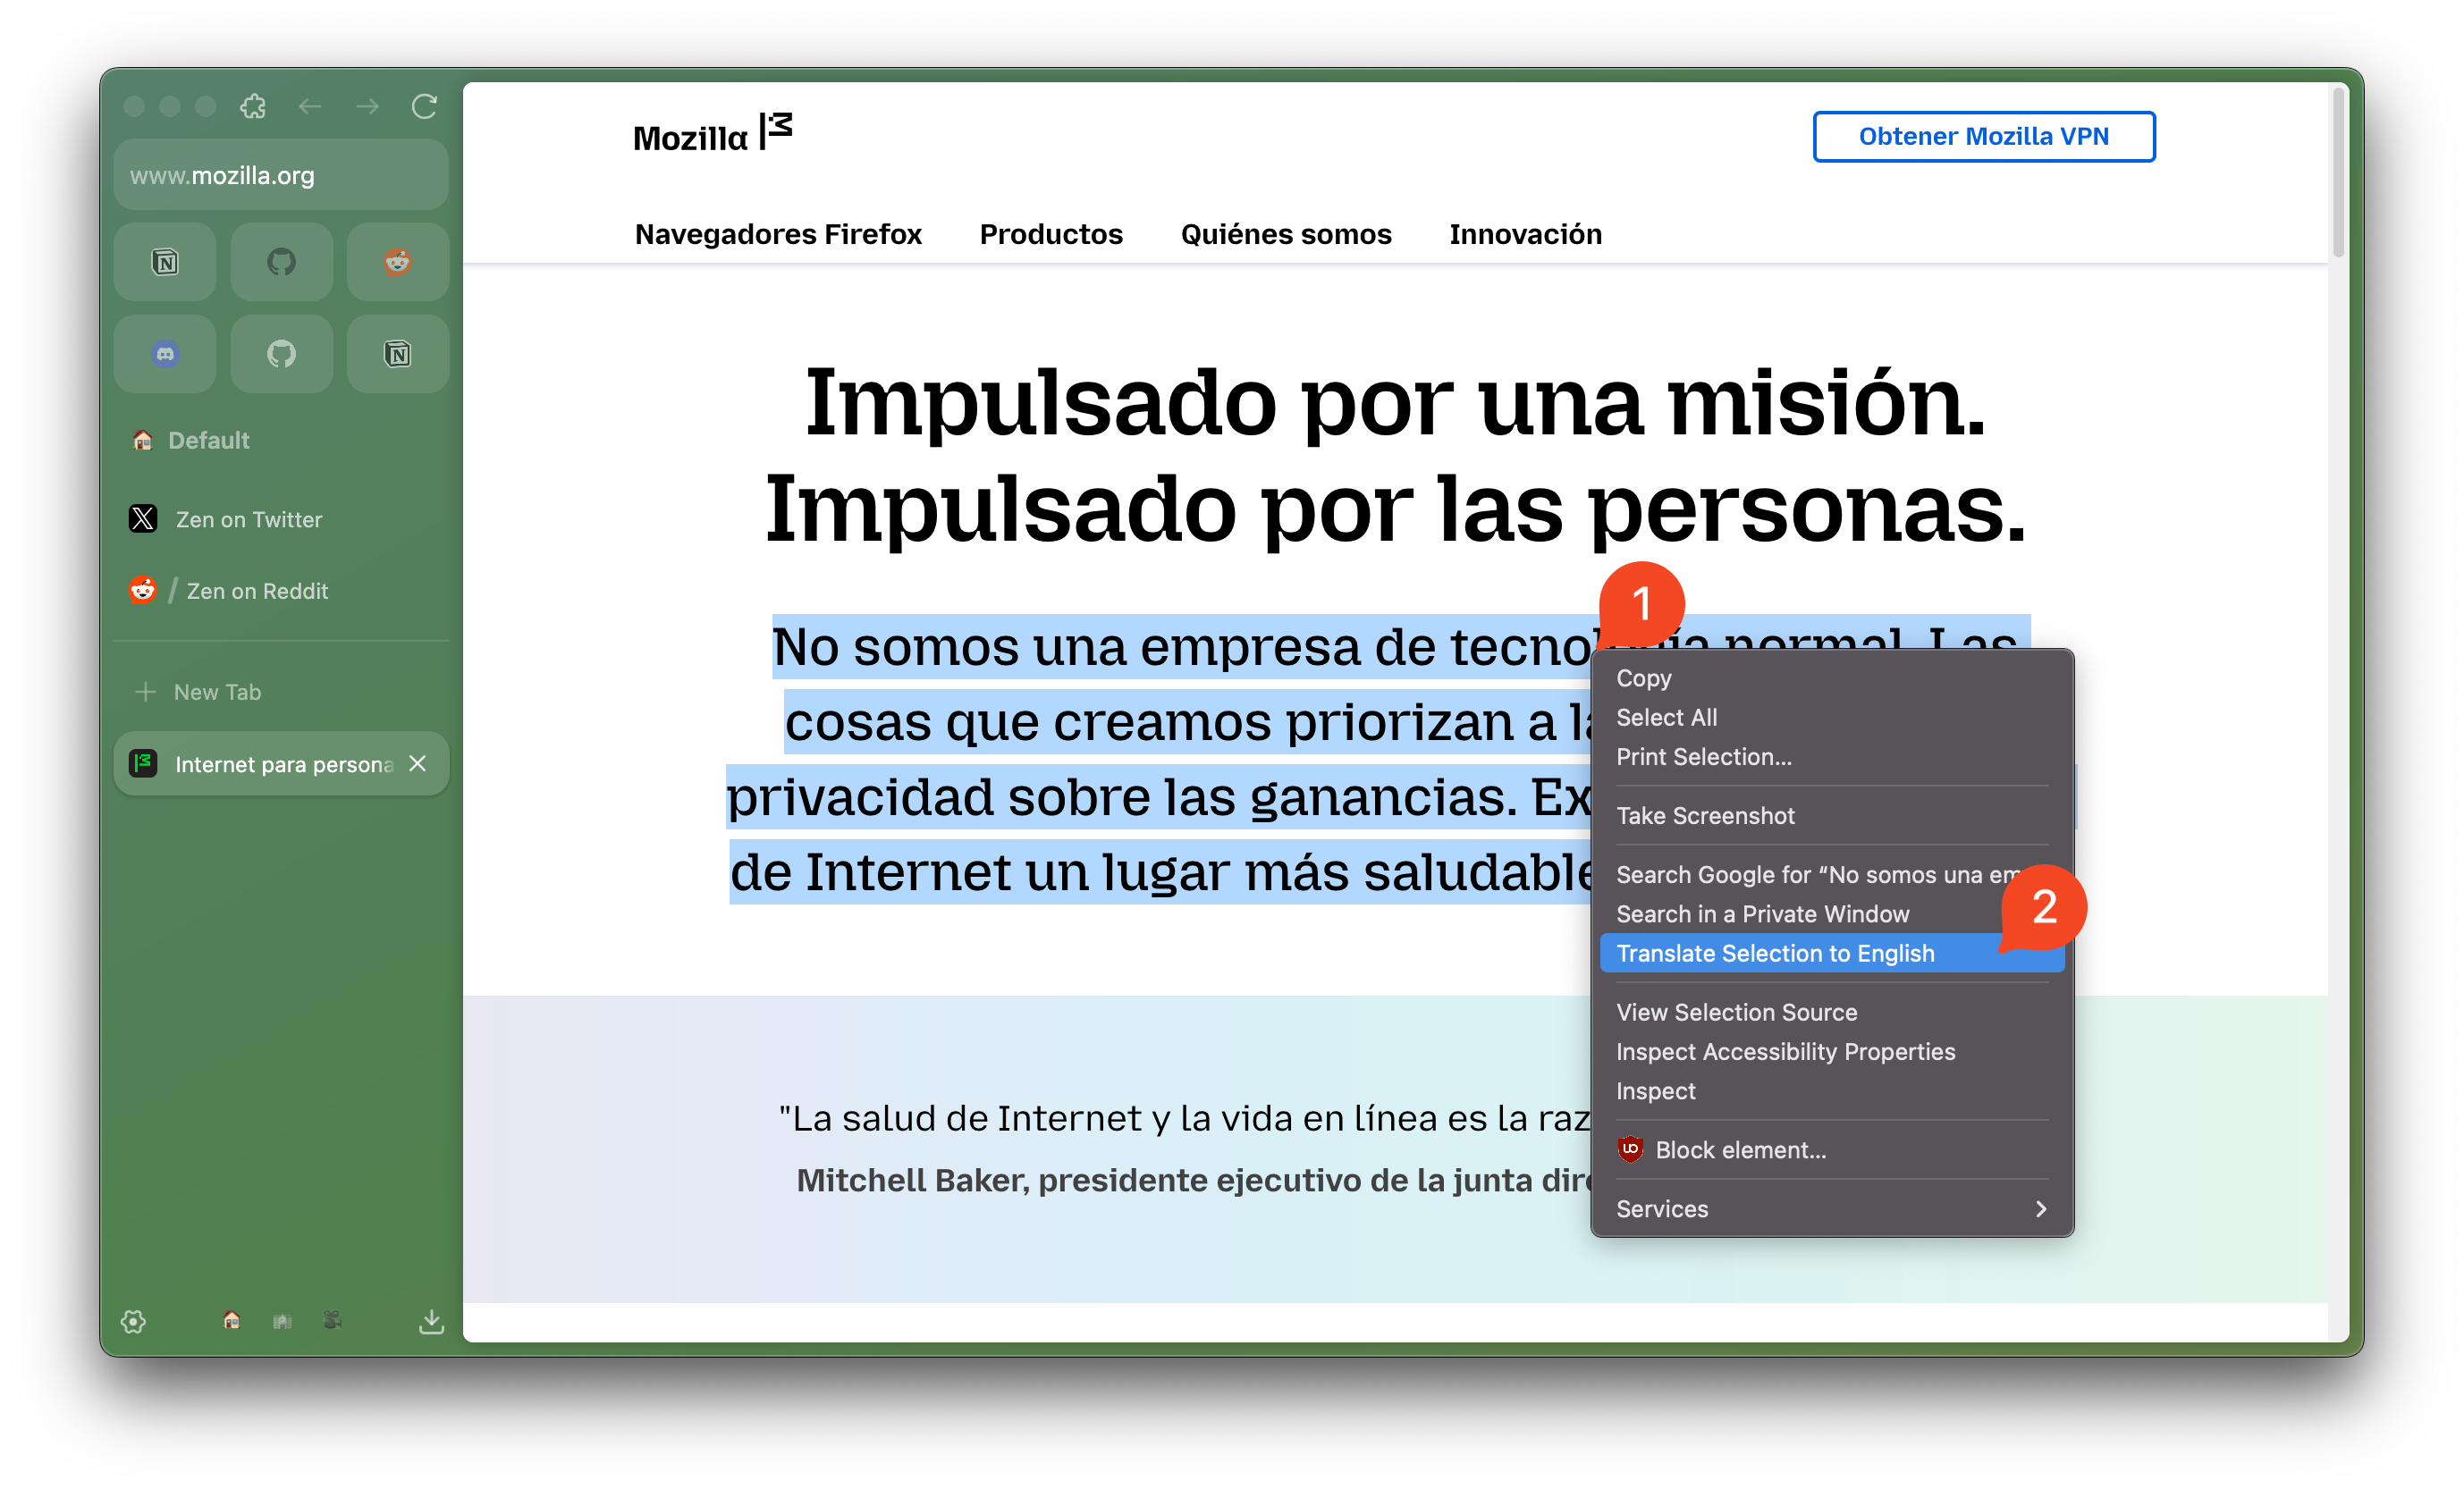
The selected texts will be translated and displayed in a pop-up. Select "**Copy**" to save the whole translation to your clipboard, "**Translate full page**" to translate the entire webpage, or "**Done**" to close the pop-up.
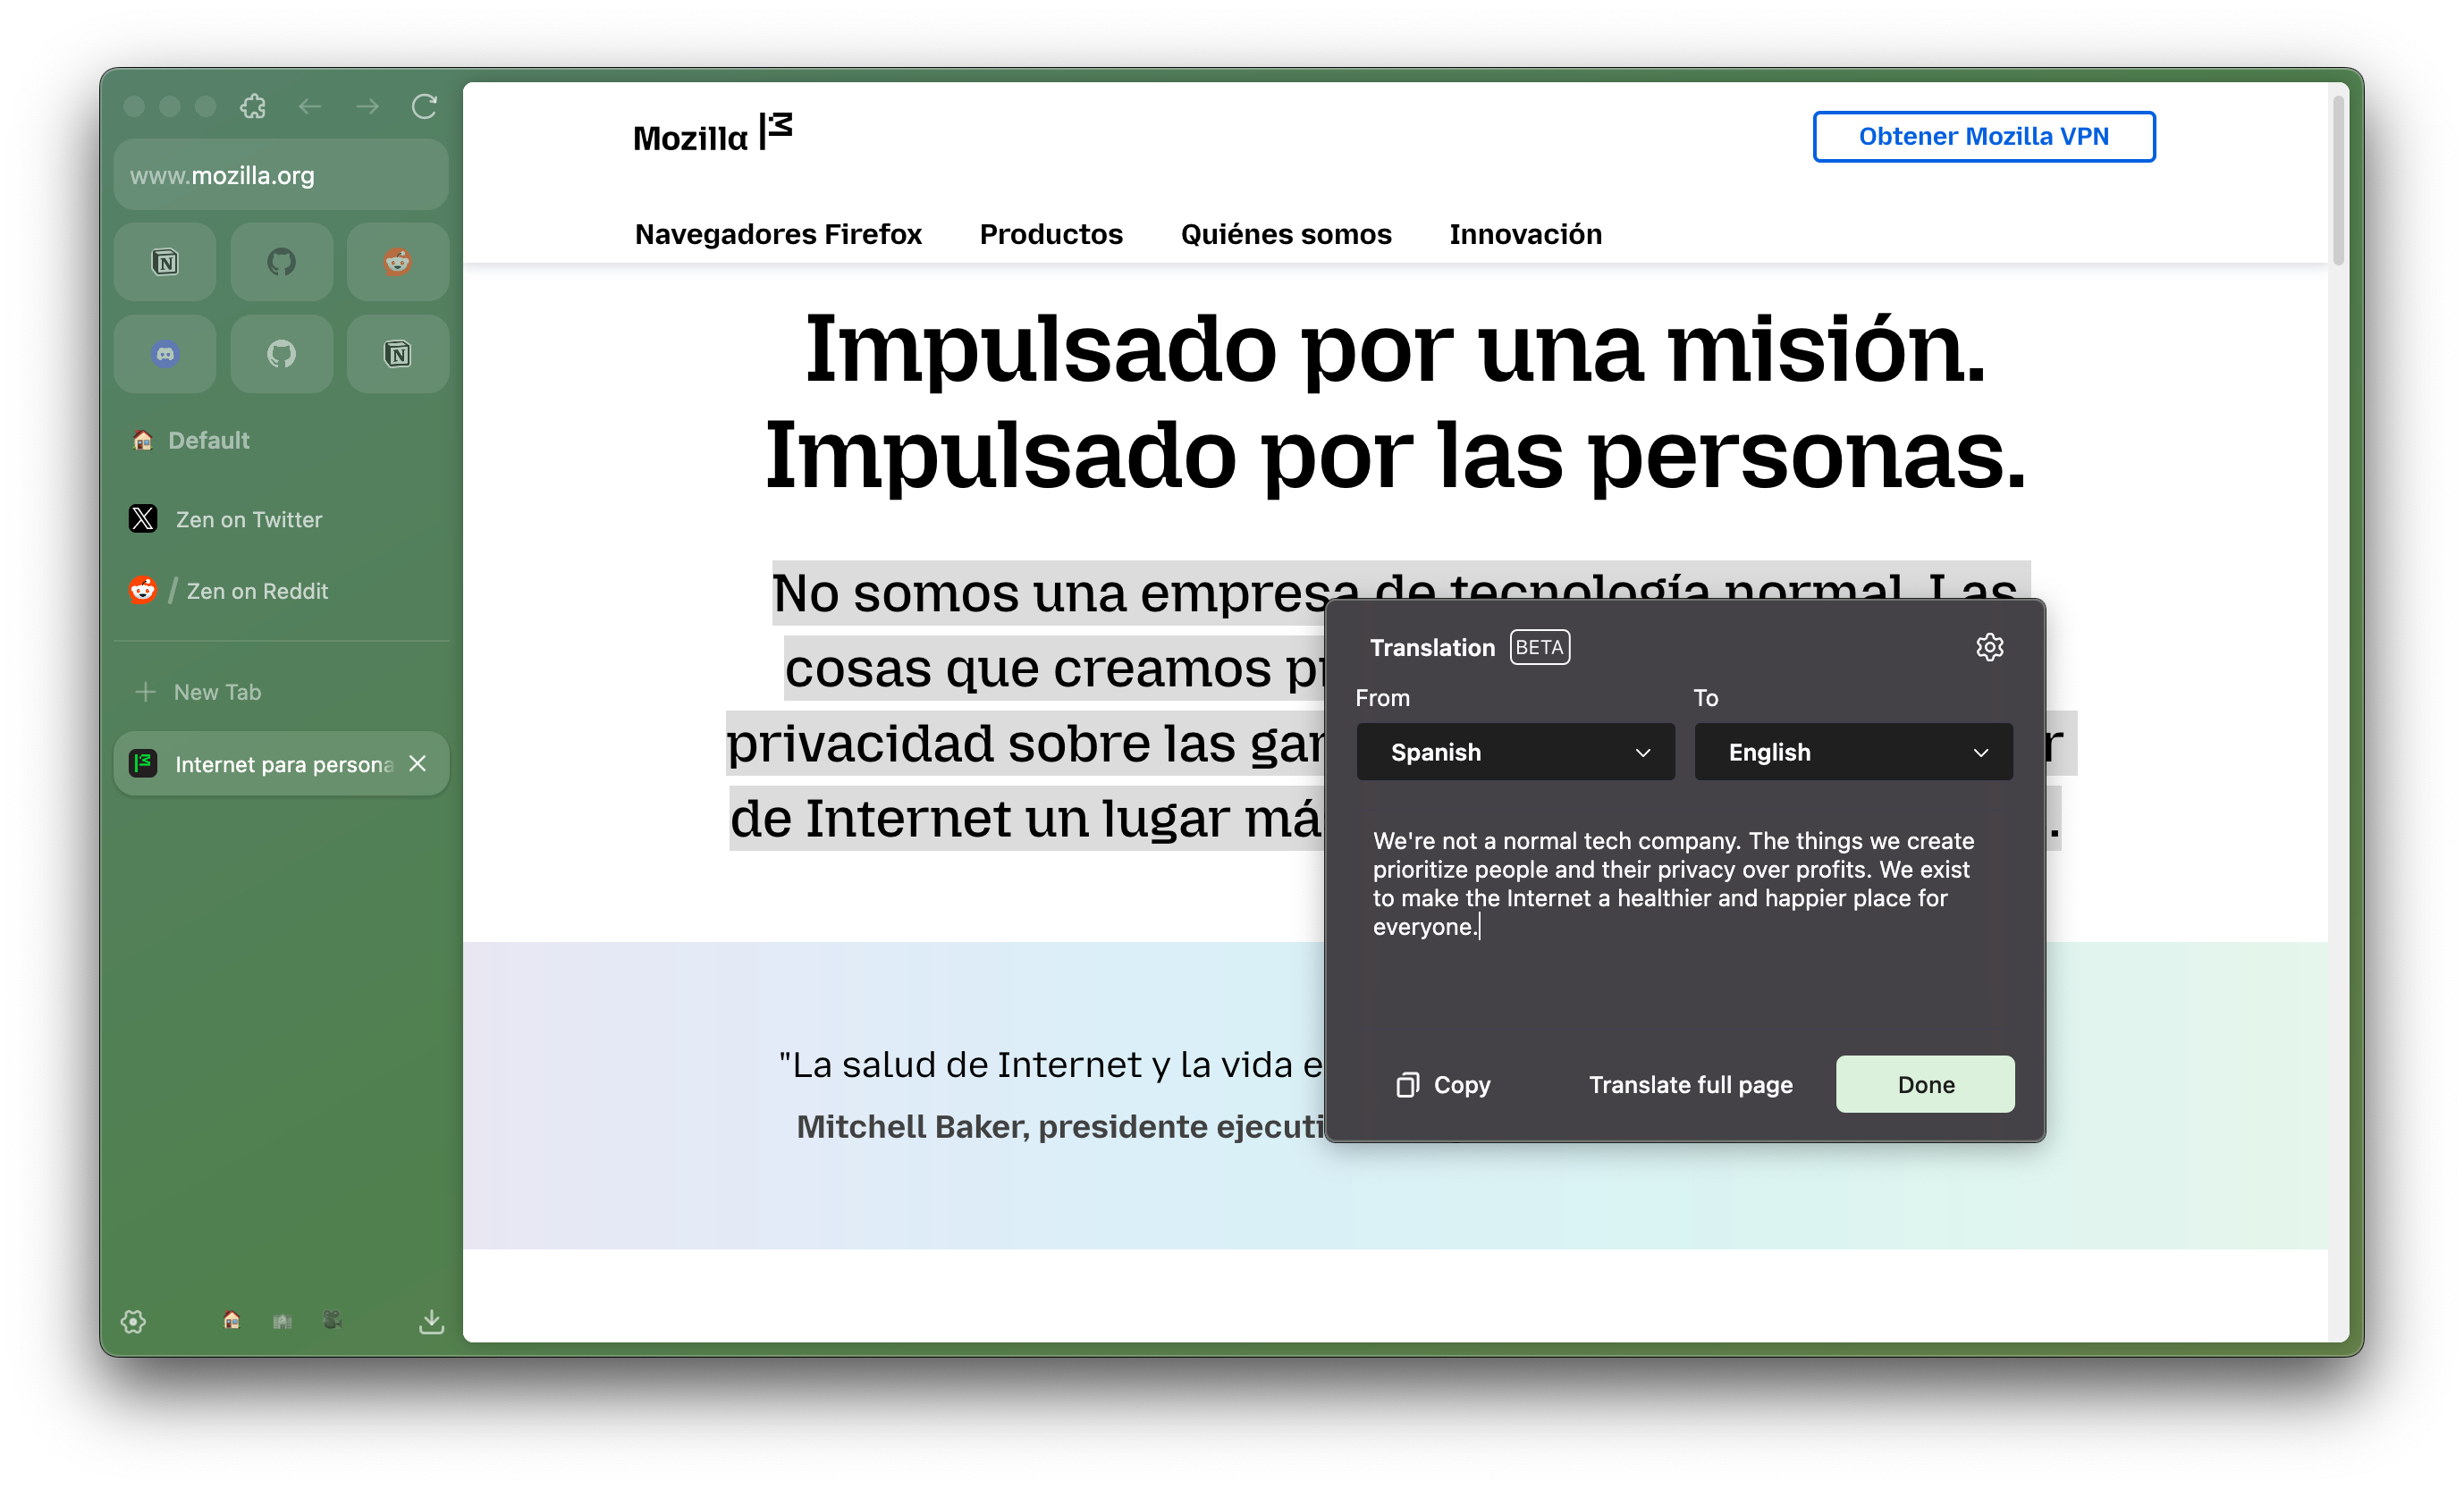
You can also select a text manually to copy only a specific part of your translation, or change the input and output translation language using the "From" and "To" dropdown menu.
You can also right click a hyperlink without selecting any text, and select "**Translate Link Text to...**" to translate the link text.
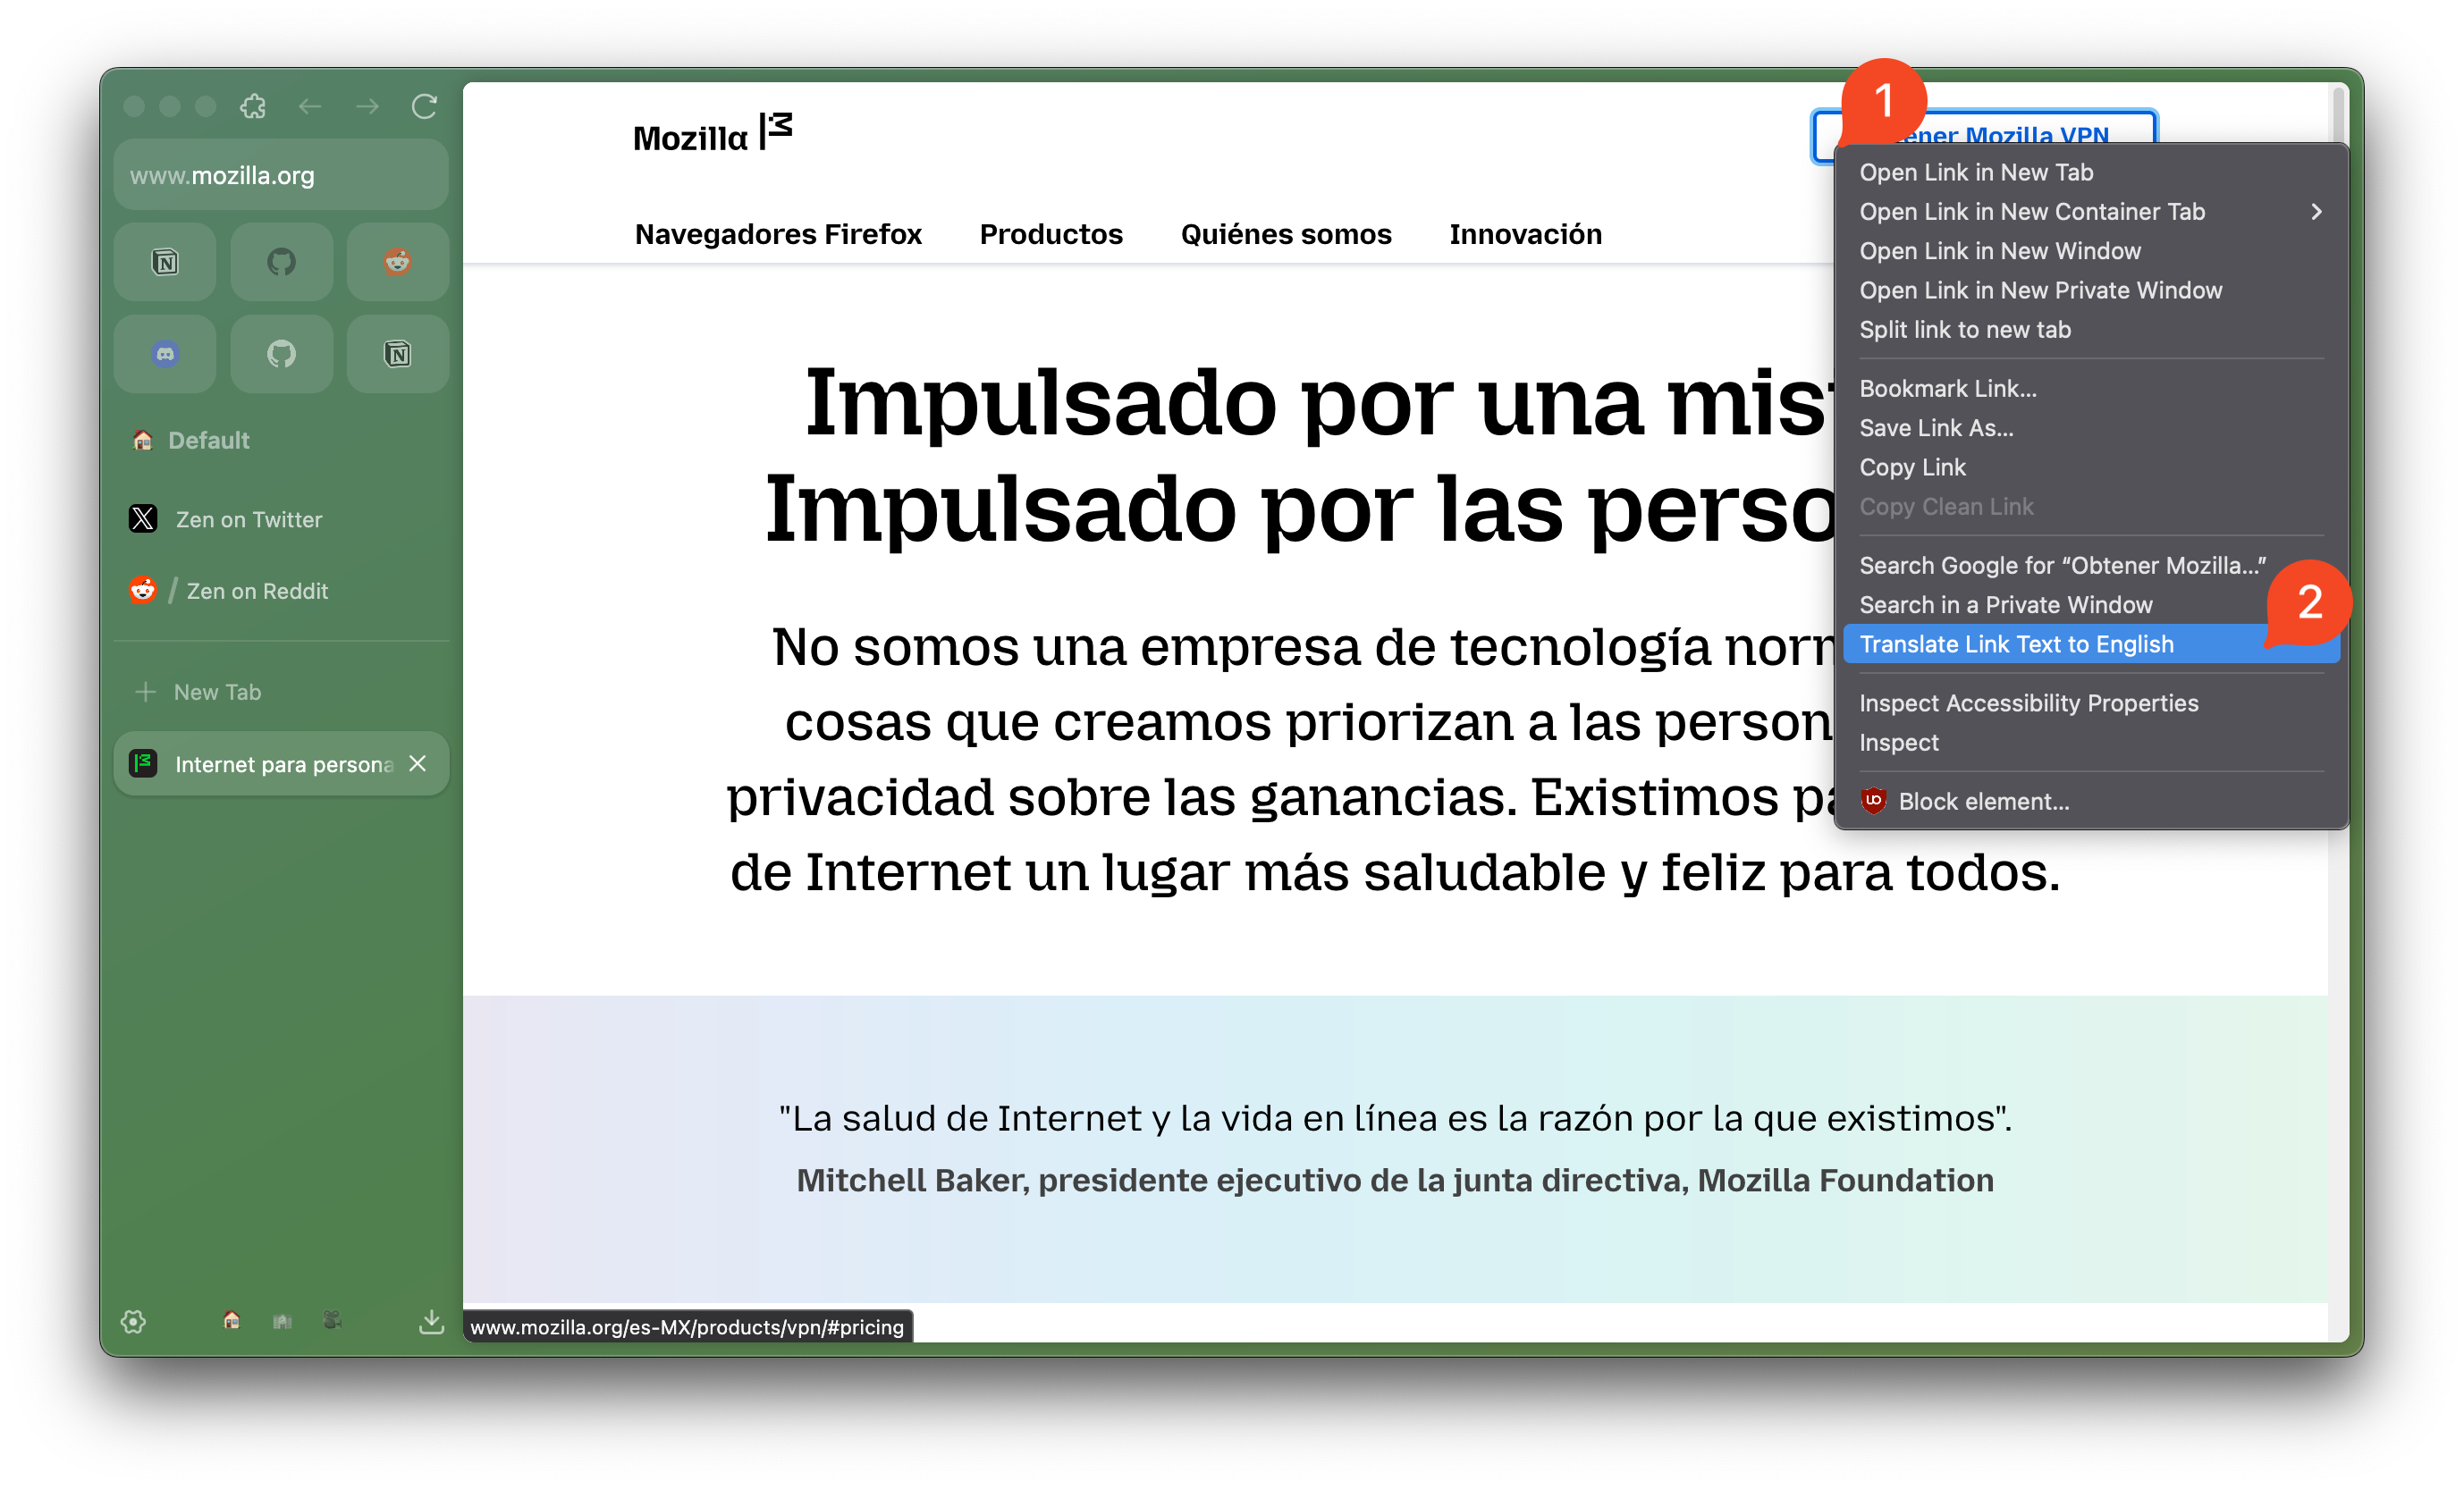
#### What if I encounter a page with mixed languages or contents in multiple languages?
The translation feature primarily focuses on the main language of the webpage, so it might not handle pages with mixed languages or content in multiple languages optimally. You can translate specific part of the webpage that uses one language and do this multiple times for different parts to understand the webpage better.
## Customize Translation Settings
You can tailor your translation experience from two places: the translation panel pop-up and the "**Language & Appearance**" section in Settings.
### Apply settings from translation panel
1. Click the **Translate** button in your URL bar or click `Main Menu` button > "**Translate Page**" option to open the "**Translate this page?**" panel pop-up.
2. Click the gear button on the top side of the panel to reveal translation options.
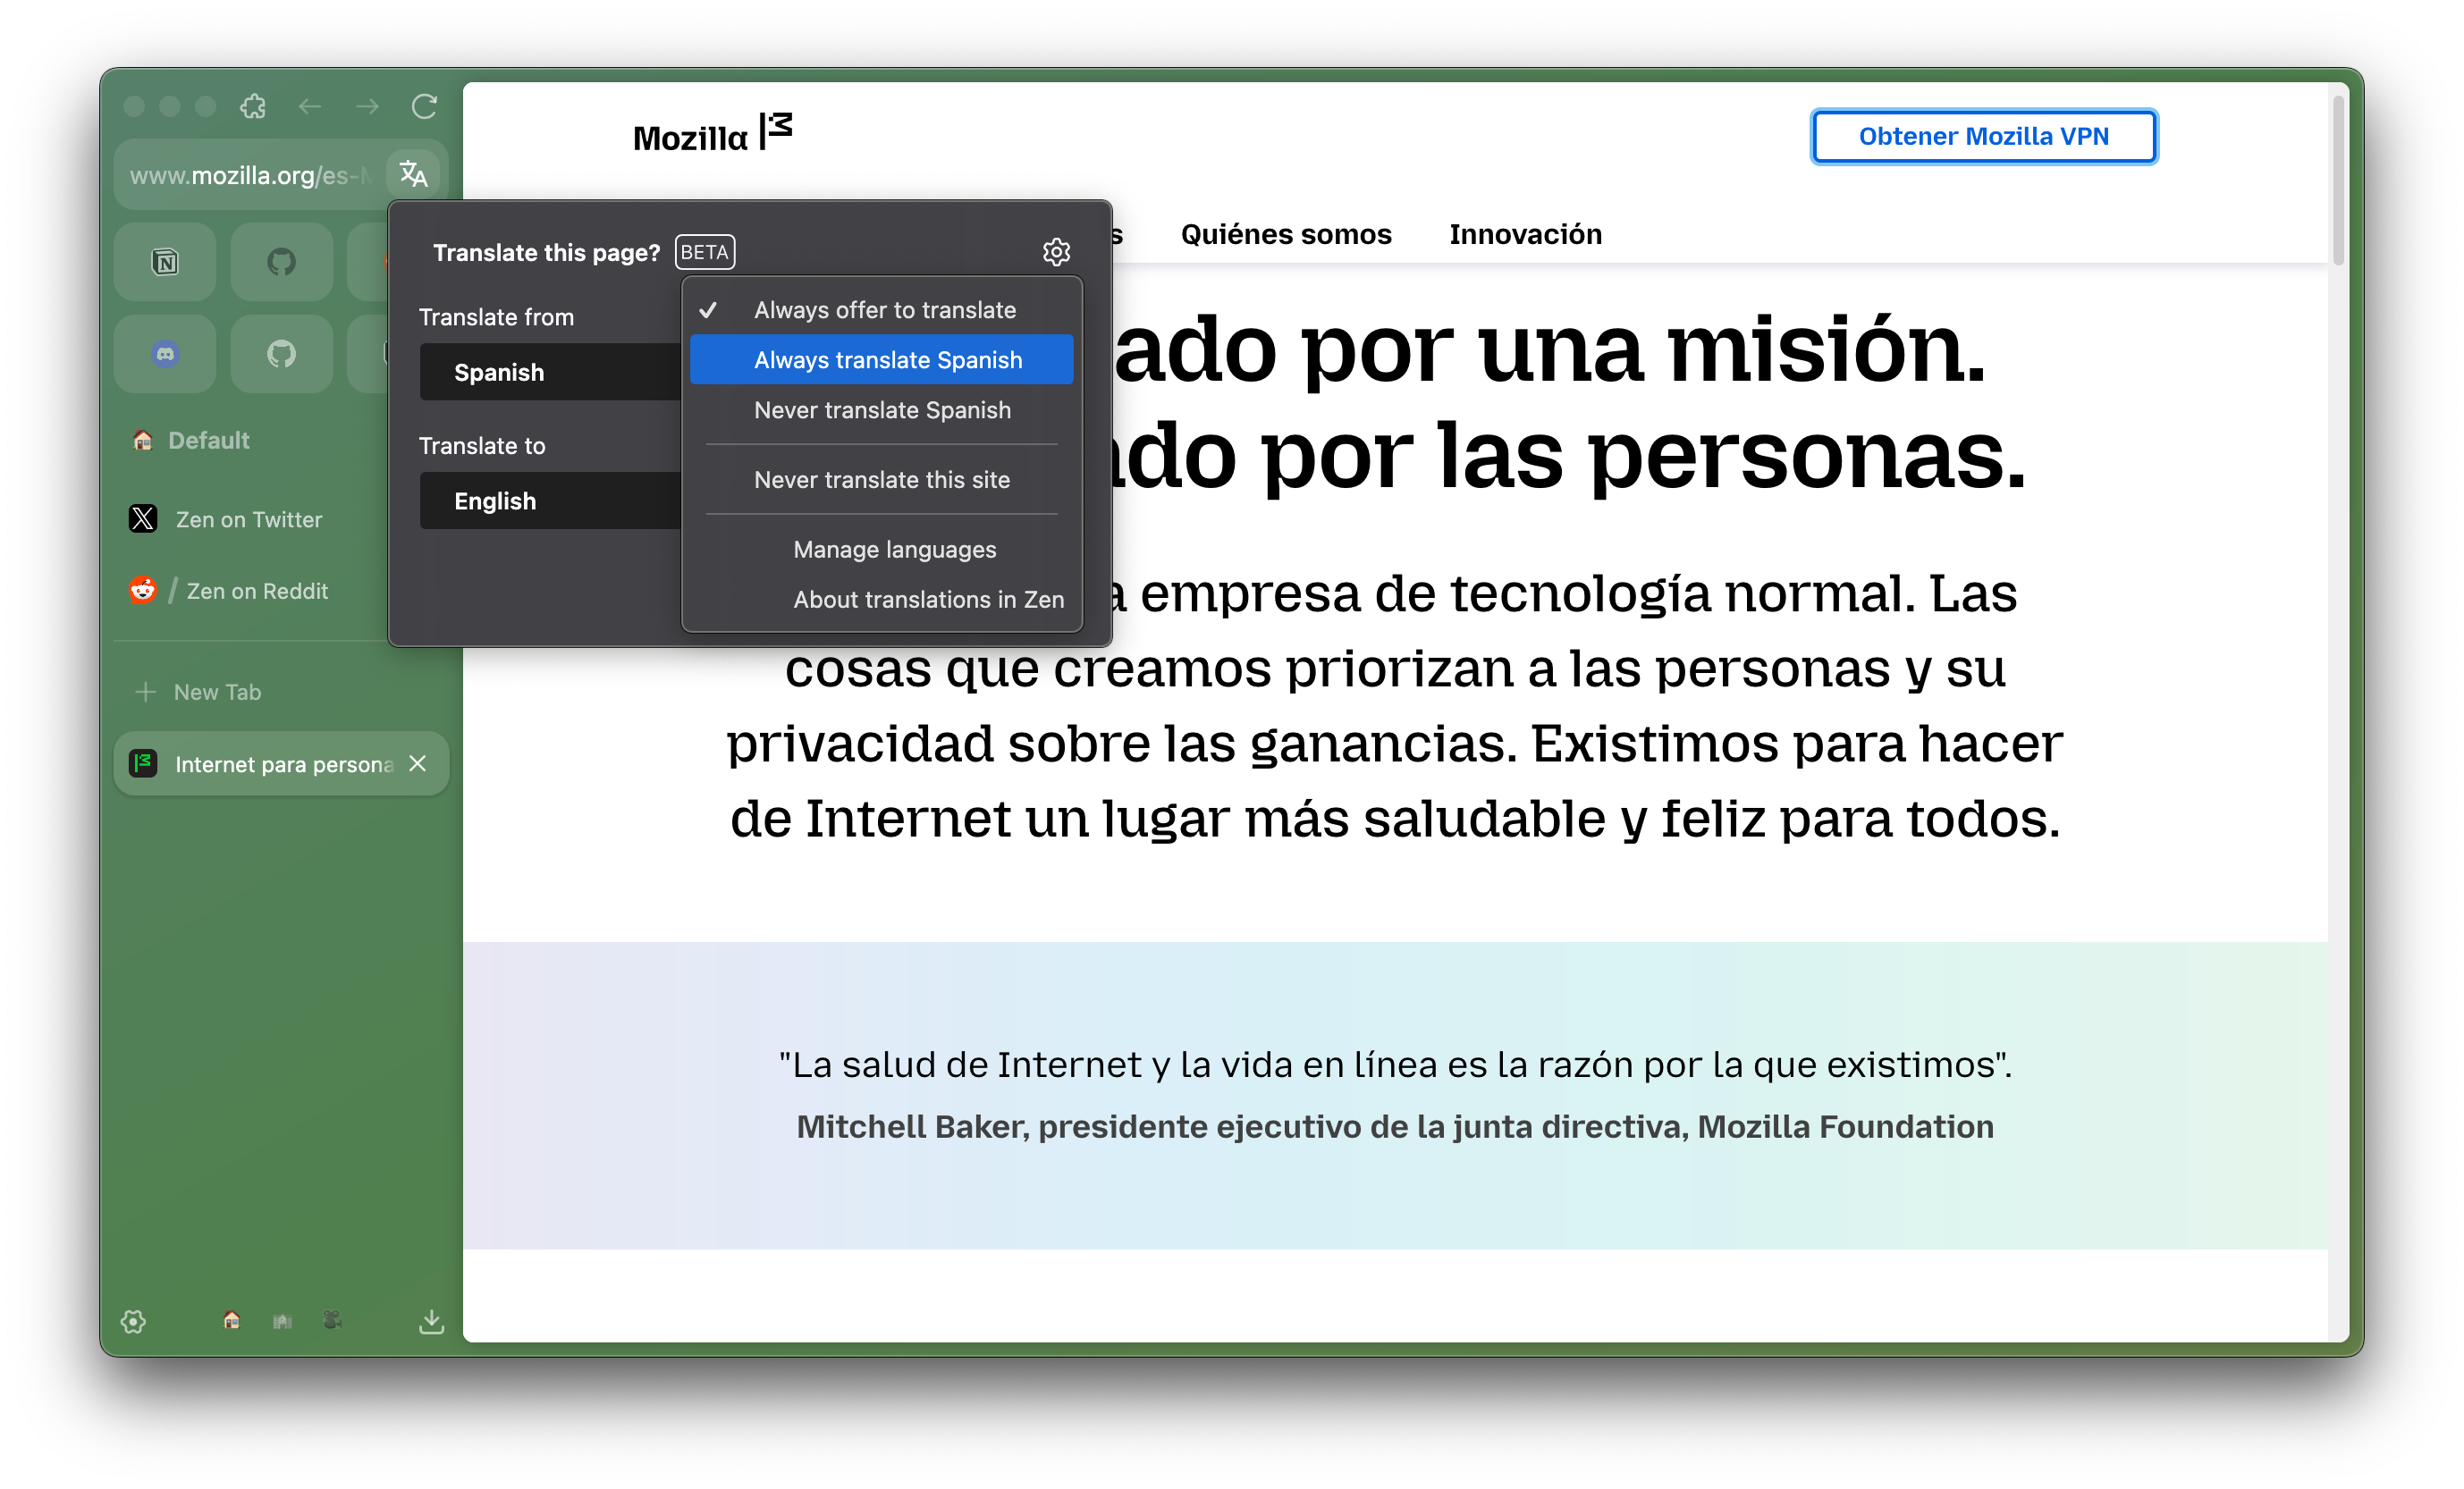
3. "**Always offer to translate**" checkbox will determine whether the translation panel will automatically pop up, and suggest you to translate when visiting sites outside your preferred languages.
4. With "**Always translate...**" and "**Never translate...**" checkboxes, you can choose to automatically translate the whole webpages, or to never translate the webpages at all for a specific language.
5. You can check "**Never translate this site**" so the translation will not be suggested nor processed after a specific website is loaded.
6. To revert a change, simply reselect an option to uncheck it. The checkmark will disappear, indicating that it's disabled.
7. Selecting "**Manage languages**" will open `Settings` > `General` > `Language & Appearance` to reveal more settings regarding languages and translation features.
### Using Webpage Language Settings
Zen lets you set separate languages for displaying user interface (menu, messages, notifications) and webpages, accessible from `Settings` > `General` > `Language & Appearance` > `Language`.
Select "**Choose**" beside the "Choose your preferred language for displaying pages" text to open the Webpage Language Settings.
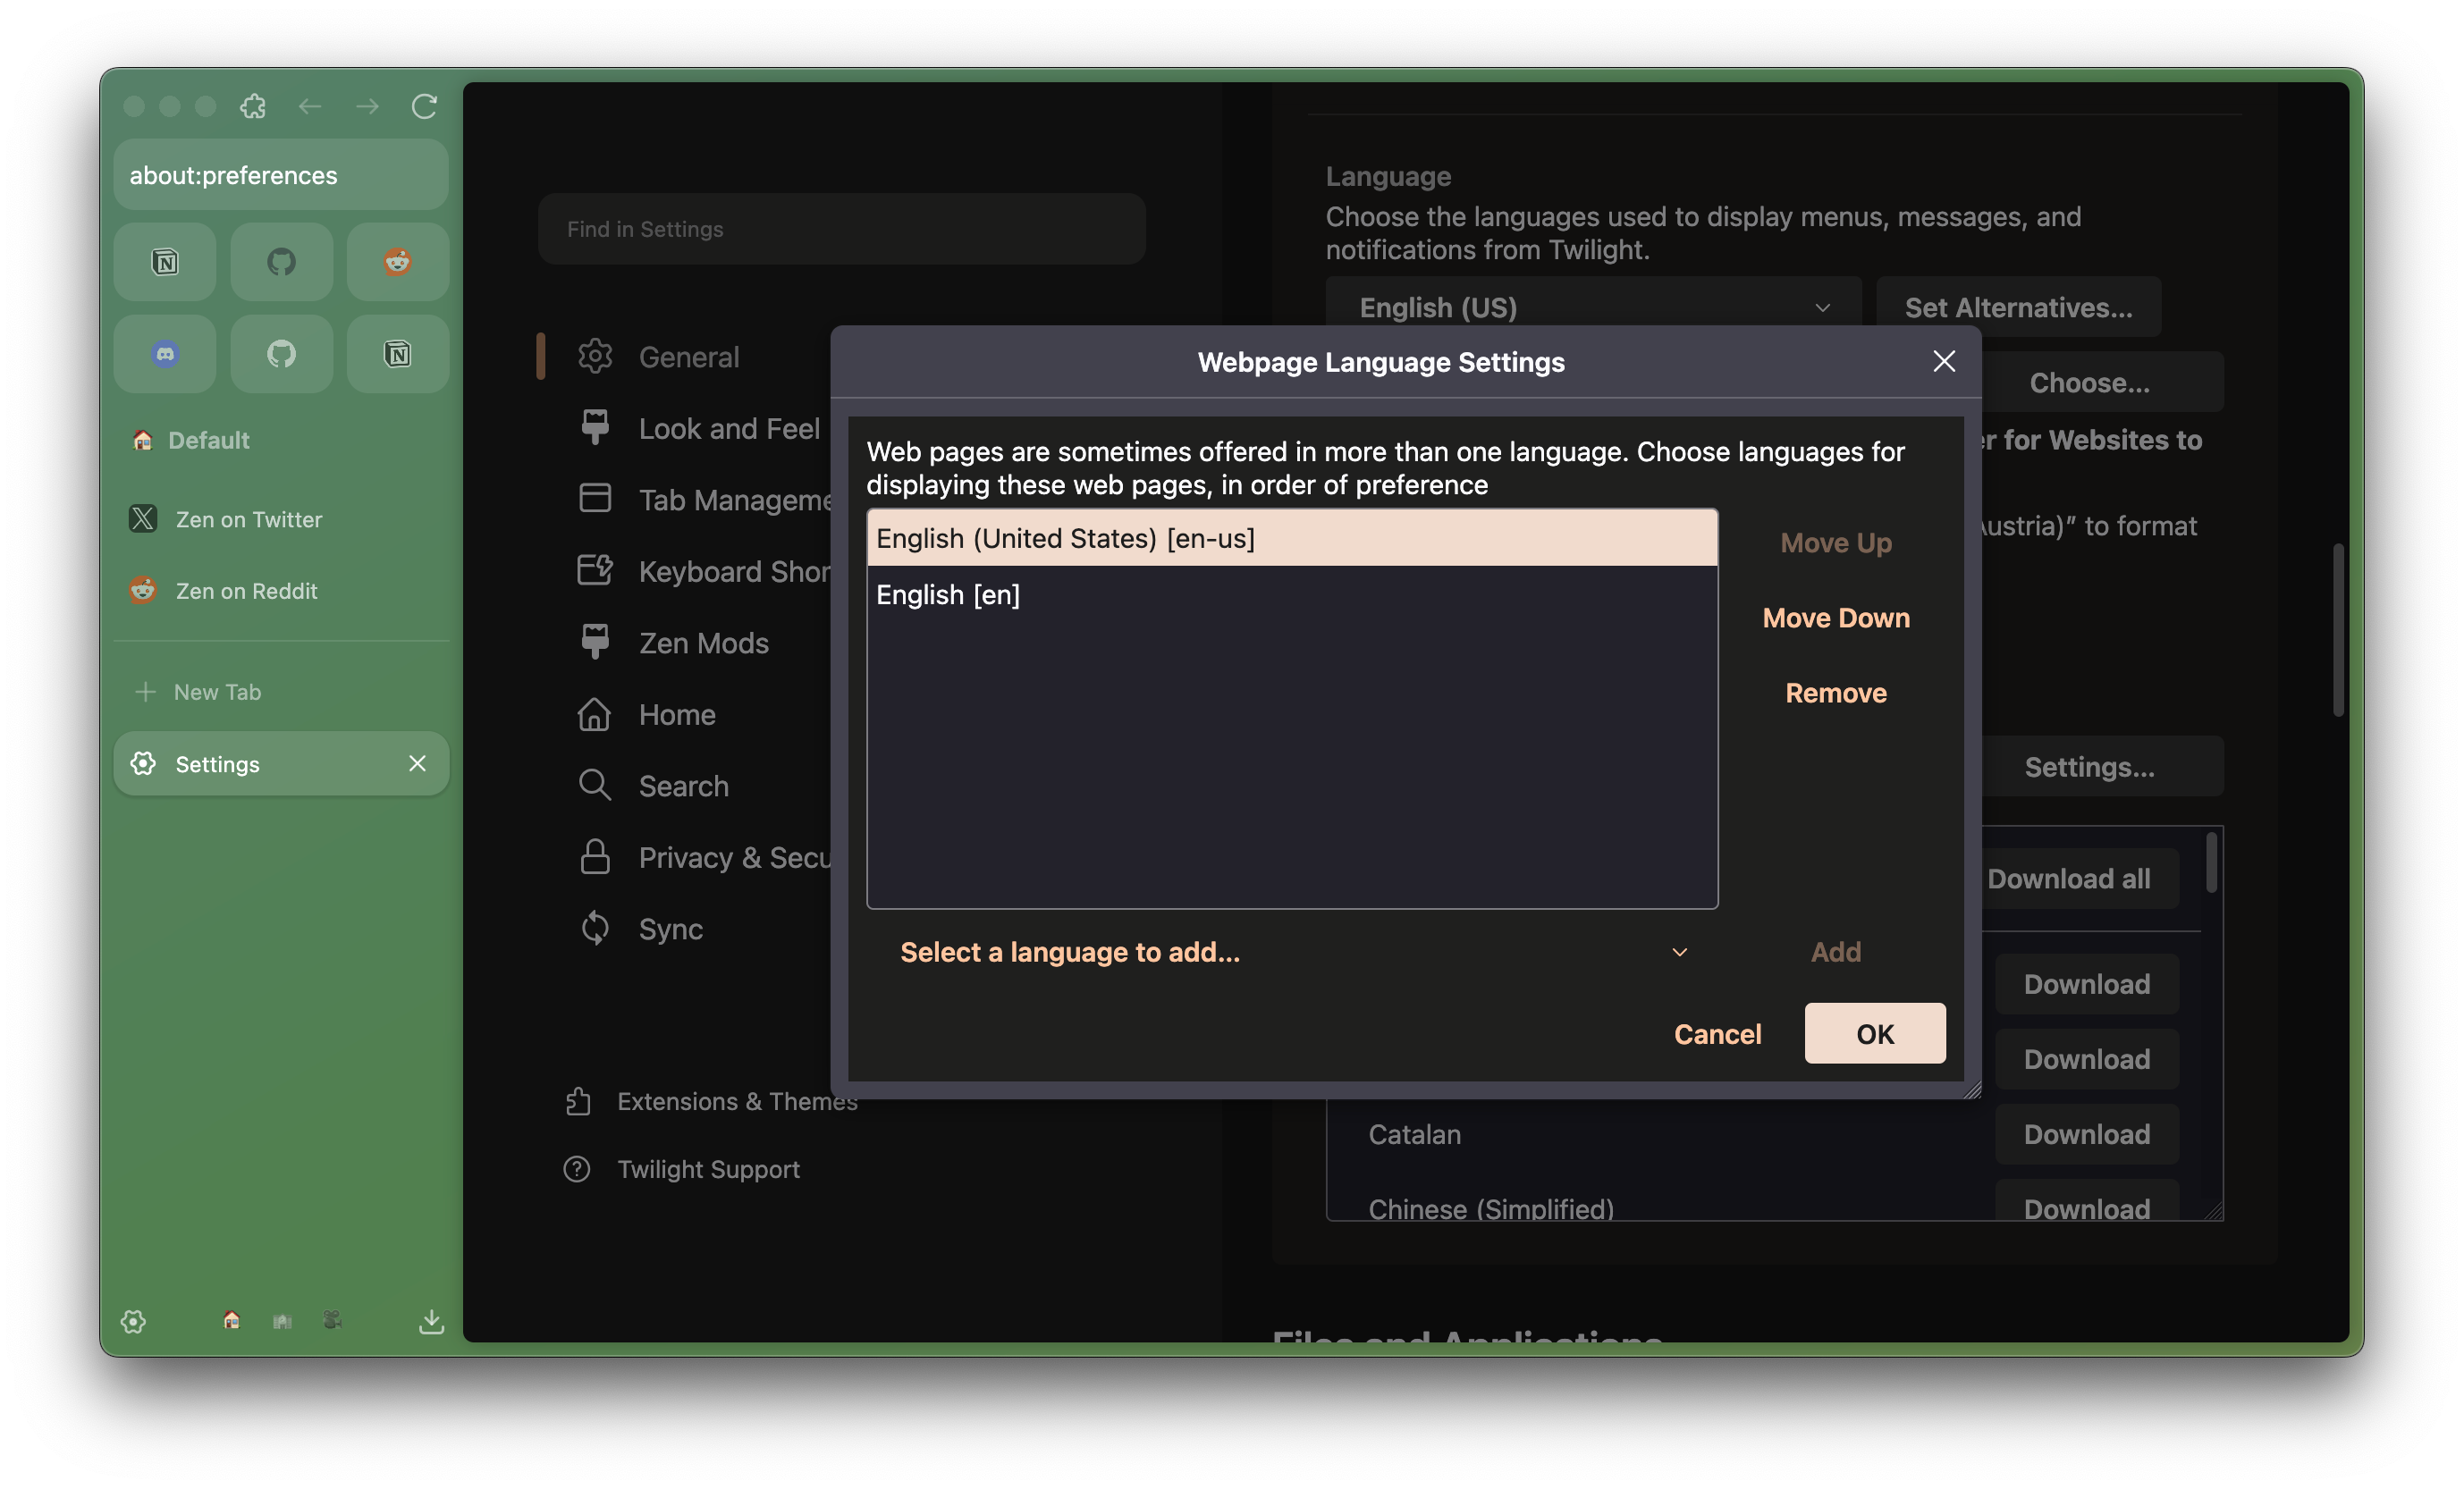
You can click **Select a language to add** to add more language to your preference and click **Add** to put it onto the options. Then, you can choose a language and click **Move Up** to prioritize it, click **Move Down** to deprioritize it, or **Remove** to remove it from your preferred language. Click **OK** to confirm your preference.
### Translations Options
Below the Language section in Settings, the **Translations** section lets you:
* Download languages for offline translations. Translation for all languages will weigh around 1.3 GB, meanwhile individual languages varies from 17-34 MB (for languages using regular Latin characters) to 59-116 MB (for languages that uses its own character set like Arabic, Japanese, Korean, Russian, or Traditional Chinese).
* Add or remove languages on the "Always translate these languages" list to enable the translation process automatically.
* Add or remove languages to the "Never translate these languages" list to prevent the translation process to happen automatically.
* Manage the "Never translate these sites" list. (Websites can be added to the list from the translation panel, as described above)
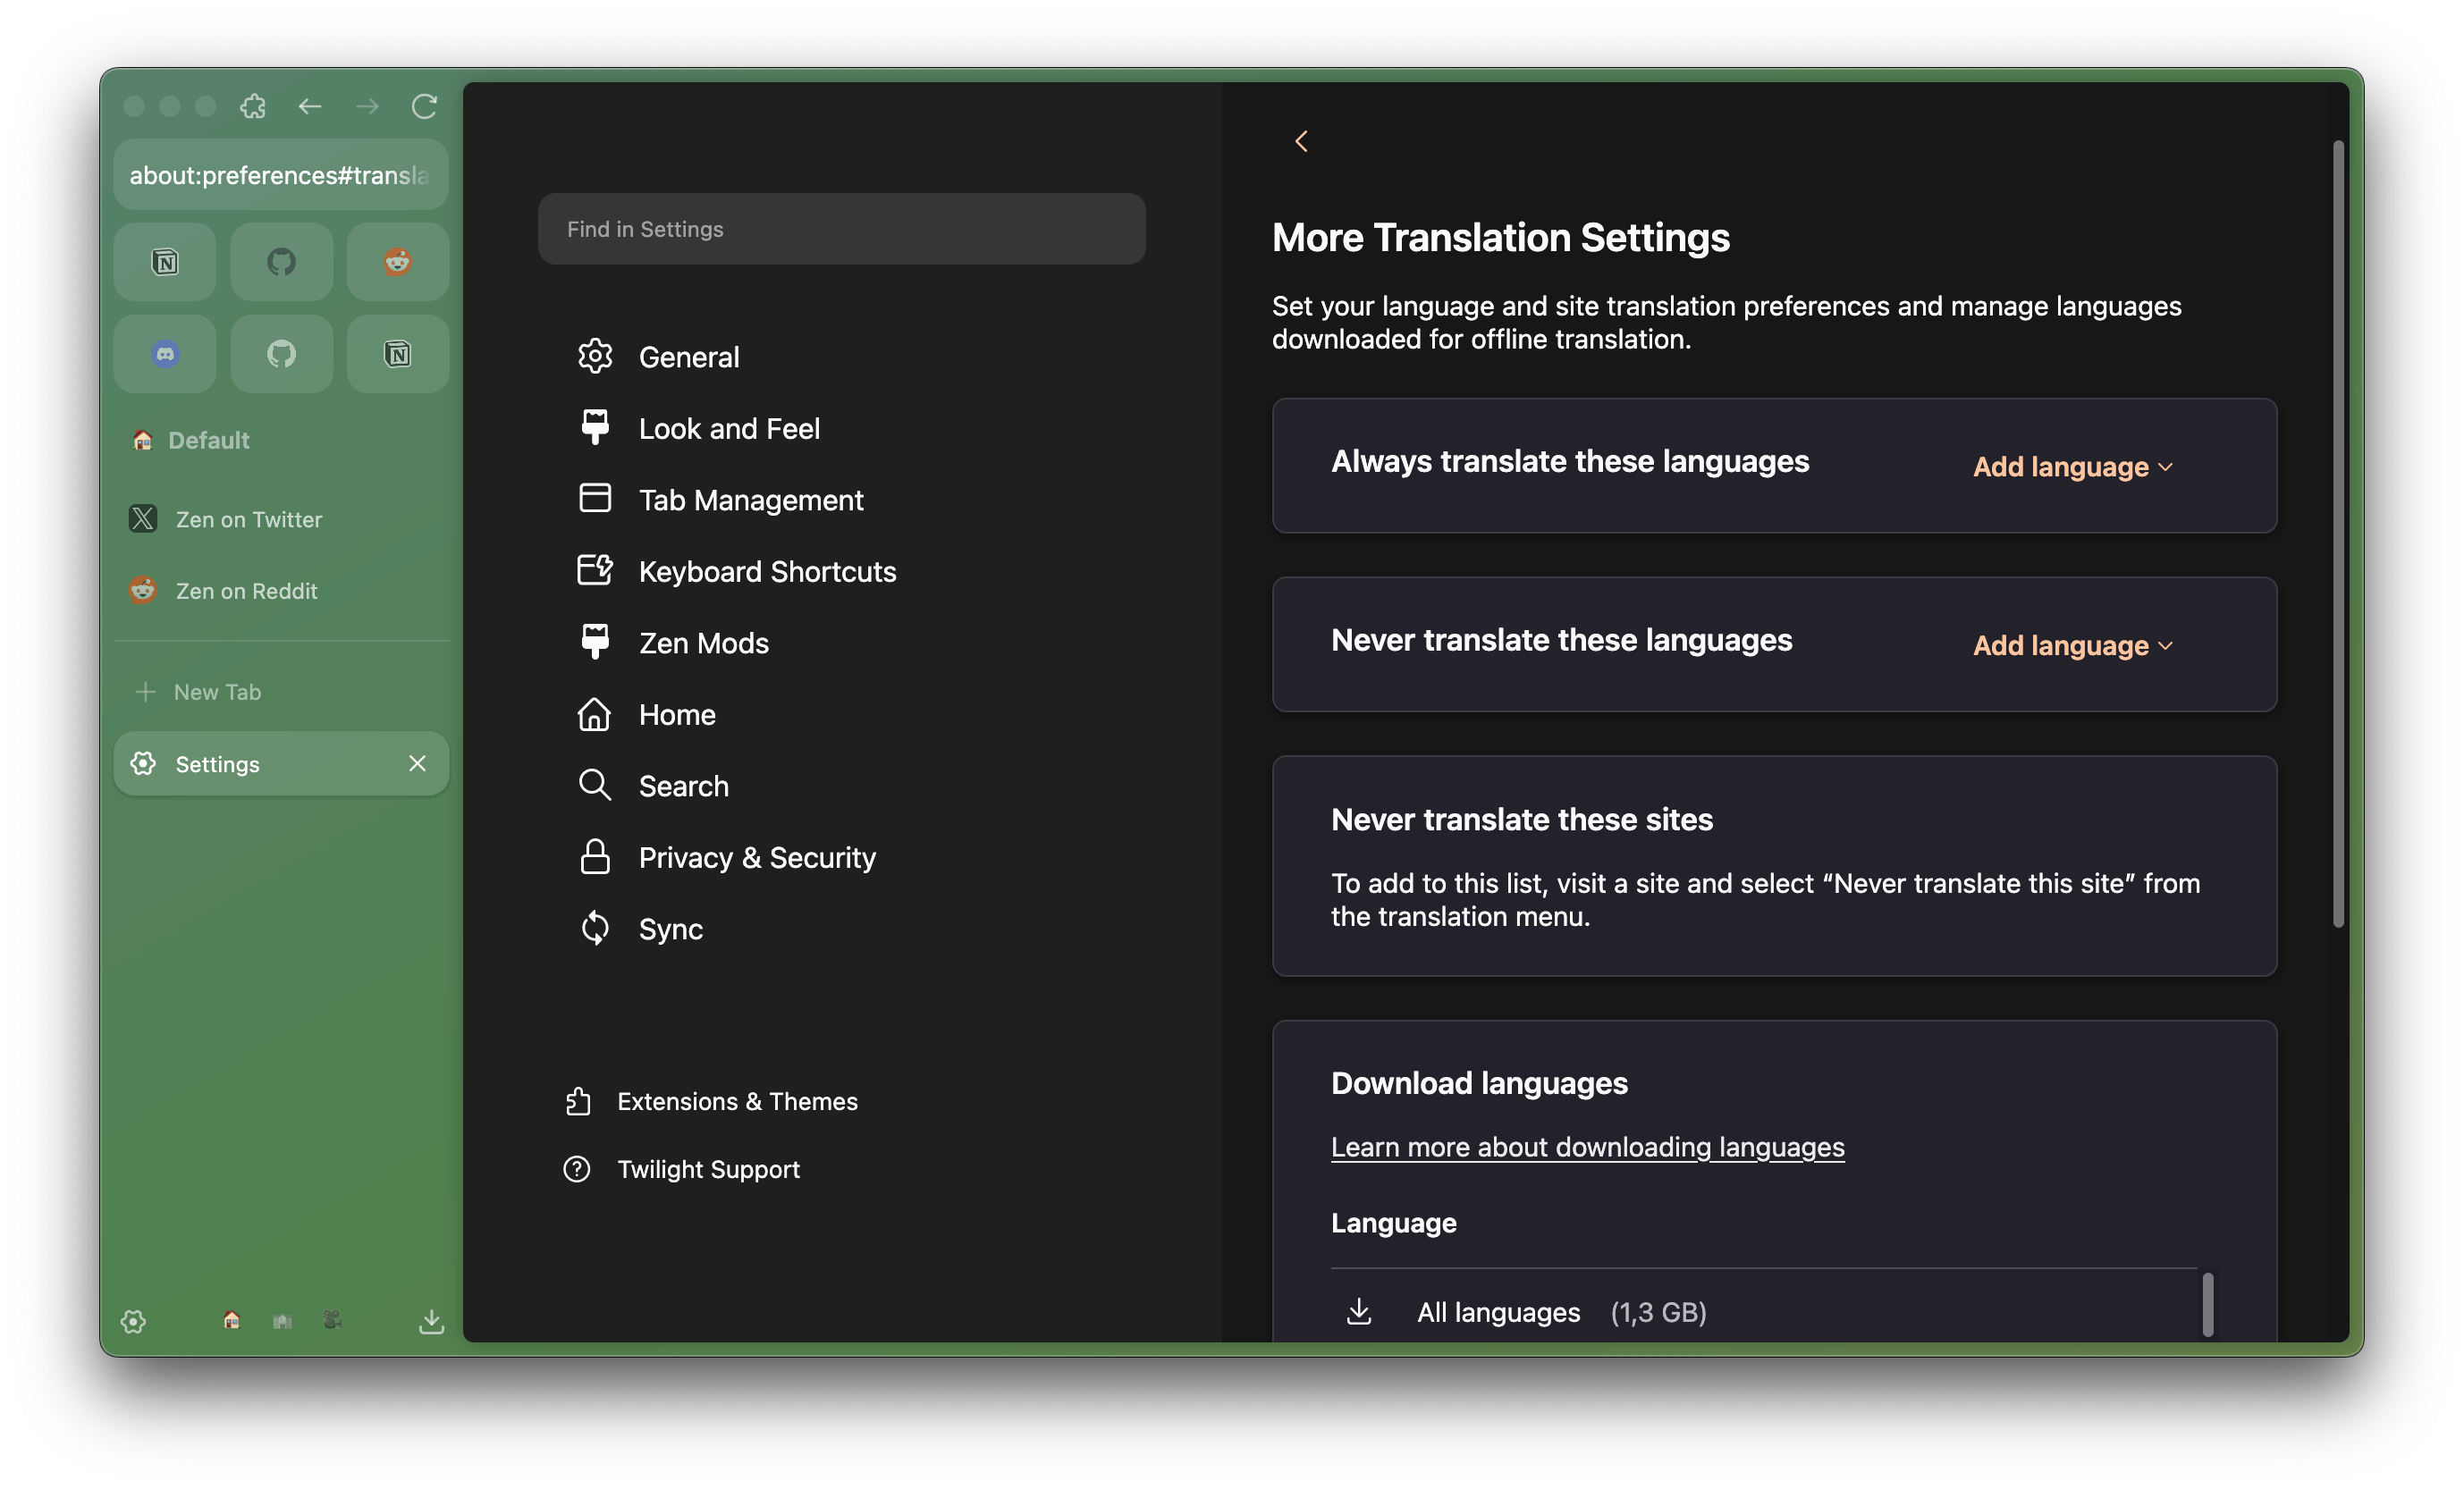
### Supported Languages
Here are the languages that currently supported for translating webpages in Zen:
* Arabic
* Bulgarian
* Chinese (Simplified)
* Catalan
* Croatian
* Czech
* Danish
* Dutch
* Estonian
* Finnish
* French
* German
* Greek
* Hungarian
* Indonesian
* Italian
* Japanese
* Korean
* Latvian
* Lithuanian
* Polish
* Portuguese
* Romanian
* Russian
* Serbian
* Slovak
* Slovenian
* Spanish
* Swedish
* Turkish
* Ukrainian
* Vietnamese
New languages are constantly added over time. You can learn further about the translation development process and language availability in [Mozilla/Translations](https://mozilla.github.io/translations/) website.
#### Report incorrect translations
You can help enhance translations in Zen and Firefox-based browsers by reporting inaccuracies to Mozilla through [this form](https://docs.google.com/forms/d/e/1FAIpQLSdoRWnsHX6vVnGIRyLi4Kl-p0GrmeVIioqWsTz3aVTRfLScng/viewform). Report translation errors by entering the source language, the target language, the original sentence and translated sentence. Optionally, you can also provide a rating of the translation and a correct translation.
***
Read more about translation feature in Firefox: [Firefox Translation | Firefox Help](https://support.mozilla.org/en-US/kb/website-translation)
file: ./content/docs/user-manual/urlbar.mdx
meta: {
"title": "URL Bar & Search Functions",
"description": "Smart navigation with persistent input memory"
}
import KeyboardShortcut from '@/components/KeyboardShortcut';
Different from most browsers, Zen uses the **URL bar** as a quick and efficient way to navigate the web, eliminating the need for a dedicated new tab page.
{
}
When you click the **New Tab** button in Zen, the URL bar will pop up on top of your current tab. Simply type your URL or search query into the bar, and hit Enter to search keywords or visit sites directly in a new tab.
If you close the URL bar after typing a URL or search query, the text will still be saved unless you navigate to a different URL or refresh the page.
### Toggle floating behavior of the URL bar
Zen has several floating behaviors for its URL bar, which can be changed in `Settings` > `Look and Feel` > `Zen URL Bar`:
* **Floating only when typing** (Default) – The URL bar will float in the center when you access it from the New Tab button or the keyboard shortcut. But, if you open the URL bar by clicking, it will stick to its regular position at the top.
* **Always floating** – The URL bar will always float in the center, both from clicking directly, New Tab button, and keyboard shortcuts.
* **Normal** – The position of the opened URL bar will always be attached to the top, whether accessed by clicking directly, using the New Tab button, or via keyboard shortcuts.
### Setting default search engine
By default, Zen provides **Google**, **DuckDuckGo**, and **Wikipedia** (English) as default search engine providers. You can choose between Google, DuckDuckGo and *[Ecosia\*](https://blog.ecosia.org/ecosia-firefox-switch/)* in the onboarding process after installing Zen.
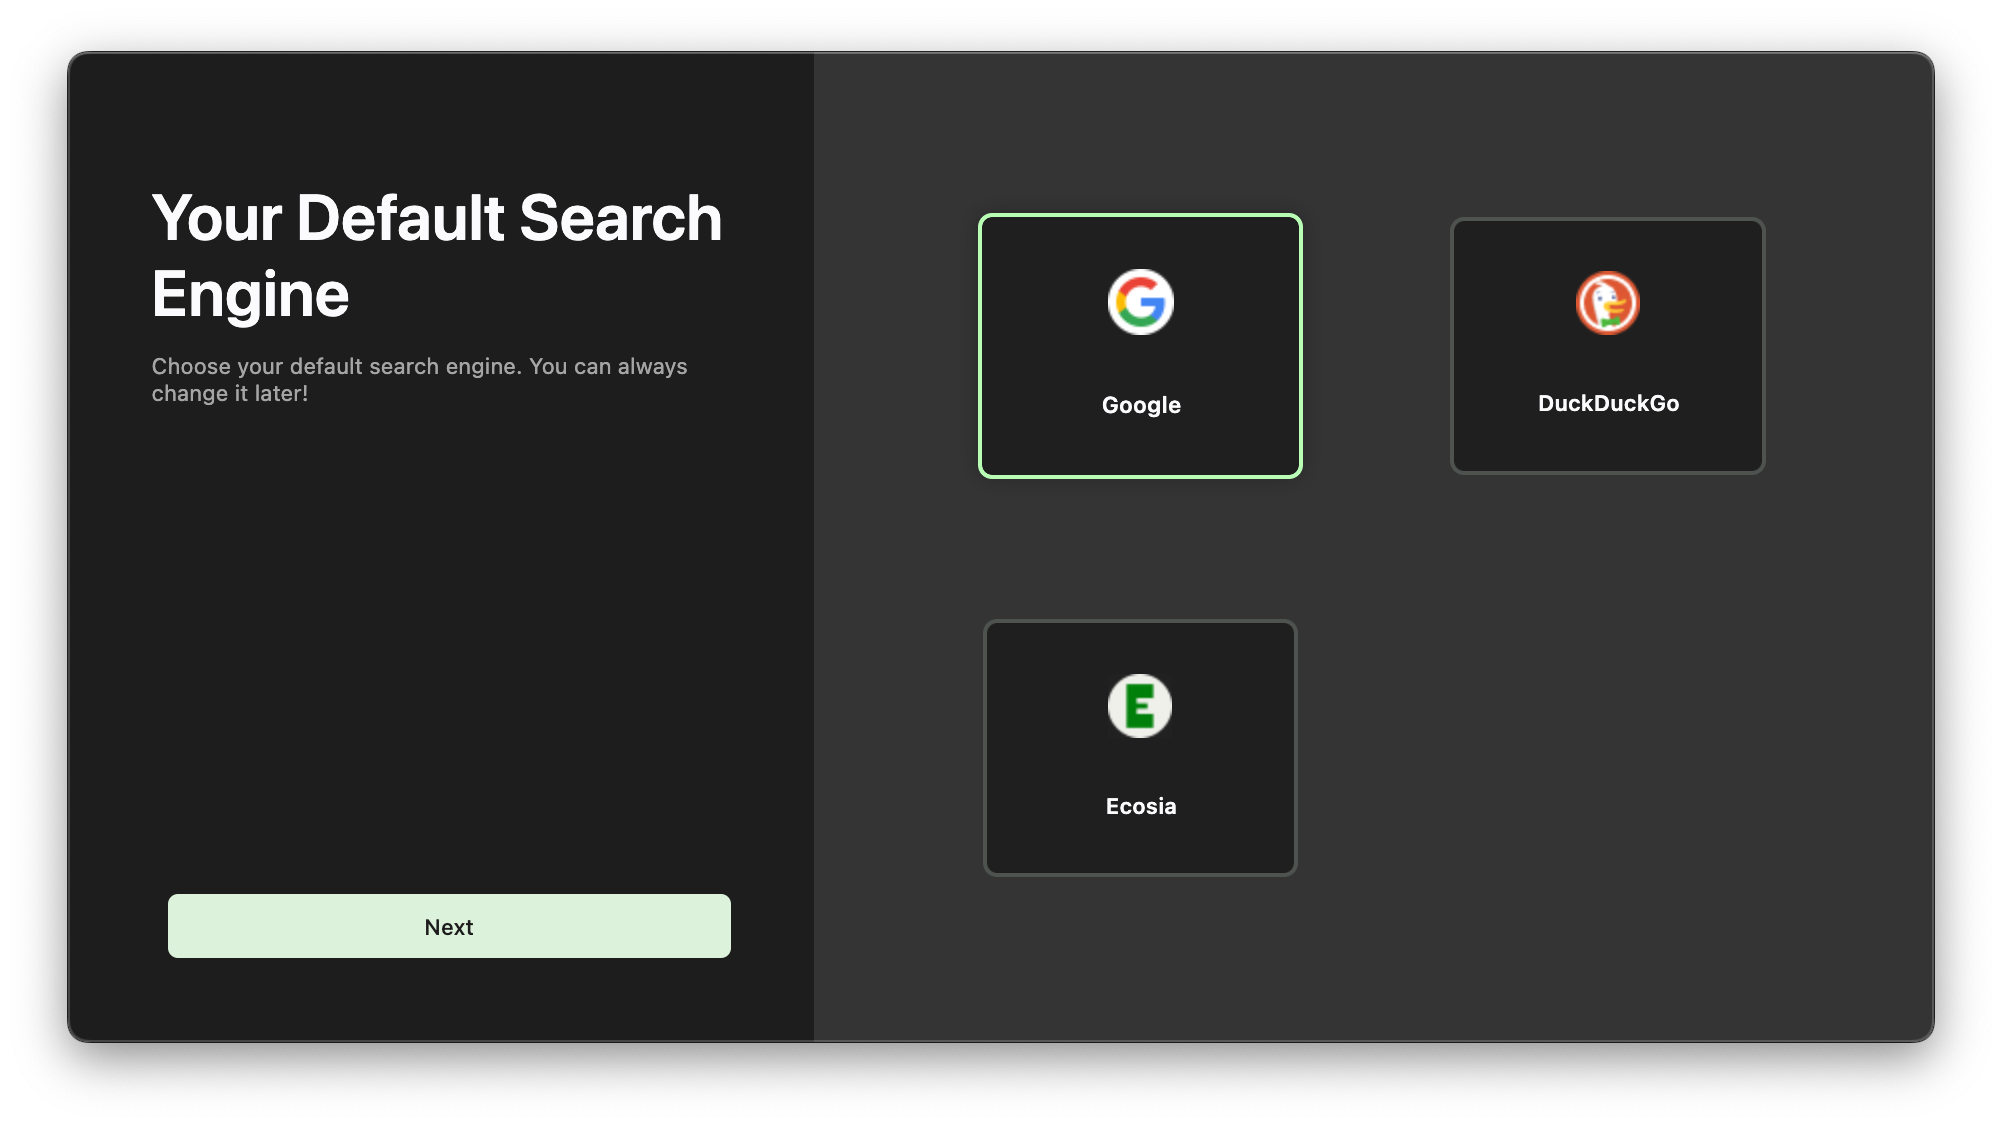
You can also change, edit, and manage search engines by opening `Settings` > `Search`. Some of the available settings include:
* **Set different search engines** to use by default in regular and Private Browsing windows.
* **Show or hide search suggestions** and set its priority towards browsing history when URL bar is opened.
* Show **recent searches** as one of the search suggestions when using the URL bar.
* **Toggle suggestion entries** from Browsing History, Bookmarks, Clipboard, Open Tabs, or Search Engines to appear when using URL bar.
### Add a website as Search Engine
Most search engine sites support the [OpenSearch protocol](https://developer.mozilla.org/docs/Web/OpenSearch), which enables them to be added as search engines easily. This includes sites like YouTube, X, Spotify, YouTube Music, Github, and Amazon.
Just visit the site, and after loading process is finished, if supported, you can see **Add "Website Name"** option in the right click context menu.
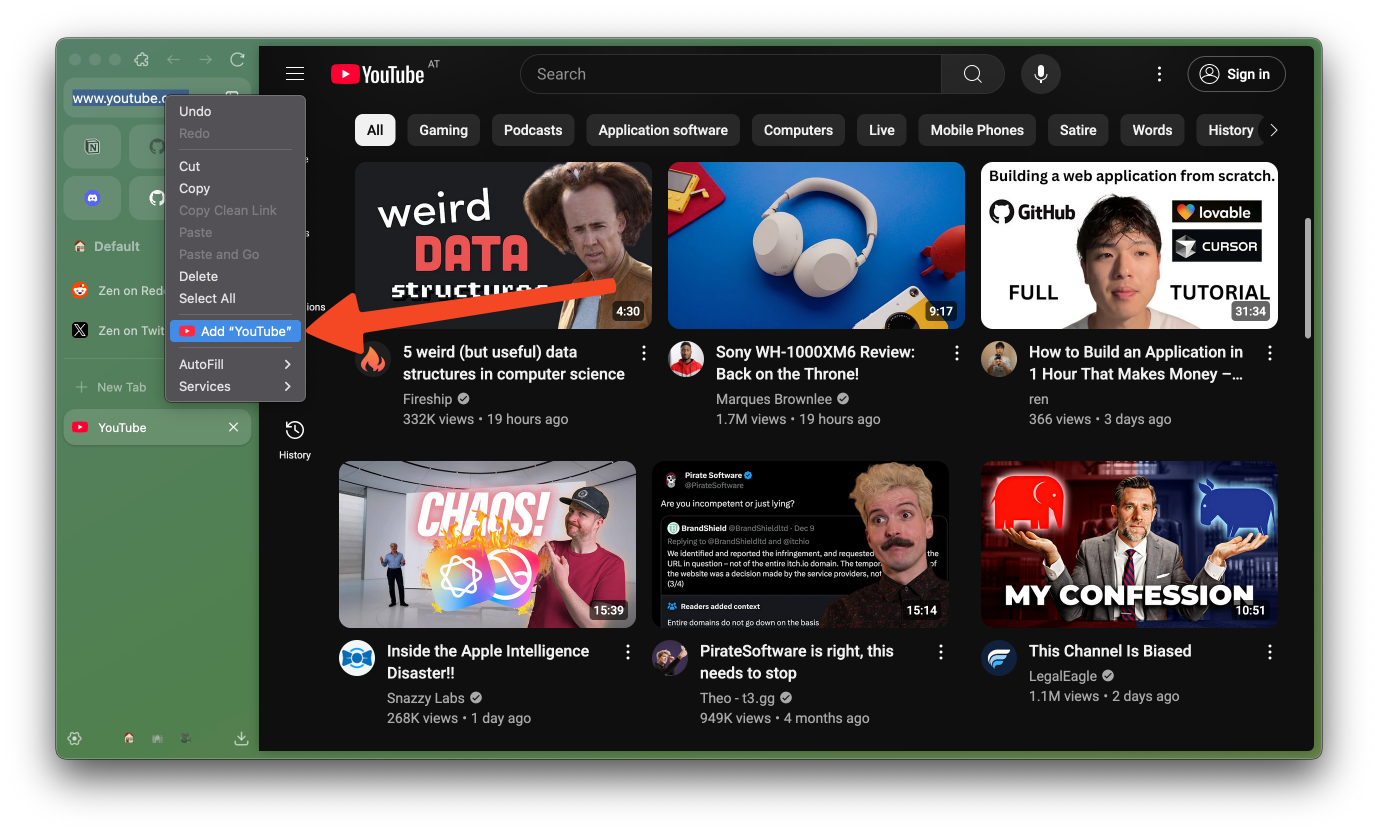
You can also add search engines from the [Mycroft Project site](https://mycroftproject.com/search-engines.html), where they list more than 20,000 search engine plugins for various websites. Once you are on the search engine page for the website you want to add, right-click the URL bar and click the **Add "Website Name"** option.
### Add, manage, and remove Search Engine from Search Shortcuts settings
Open `Settings` > `Search` > `Search Shortcuts` to show the list of available search engines, as well as further configurations.
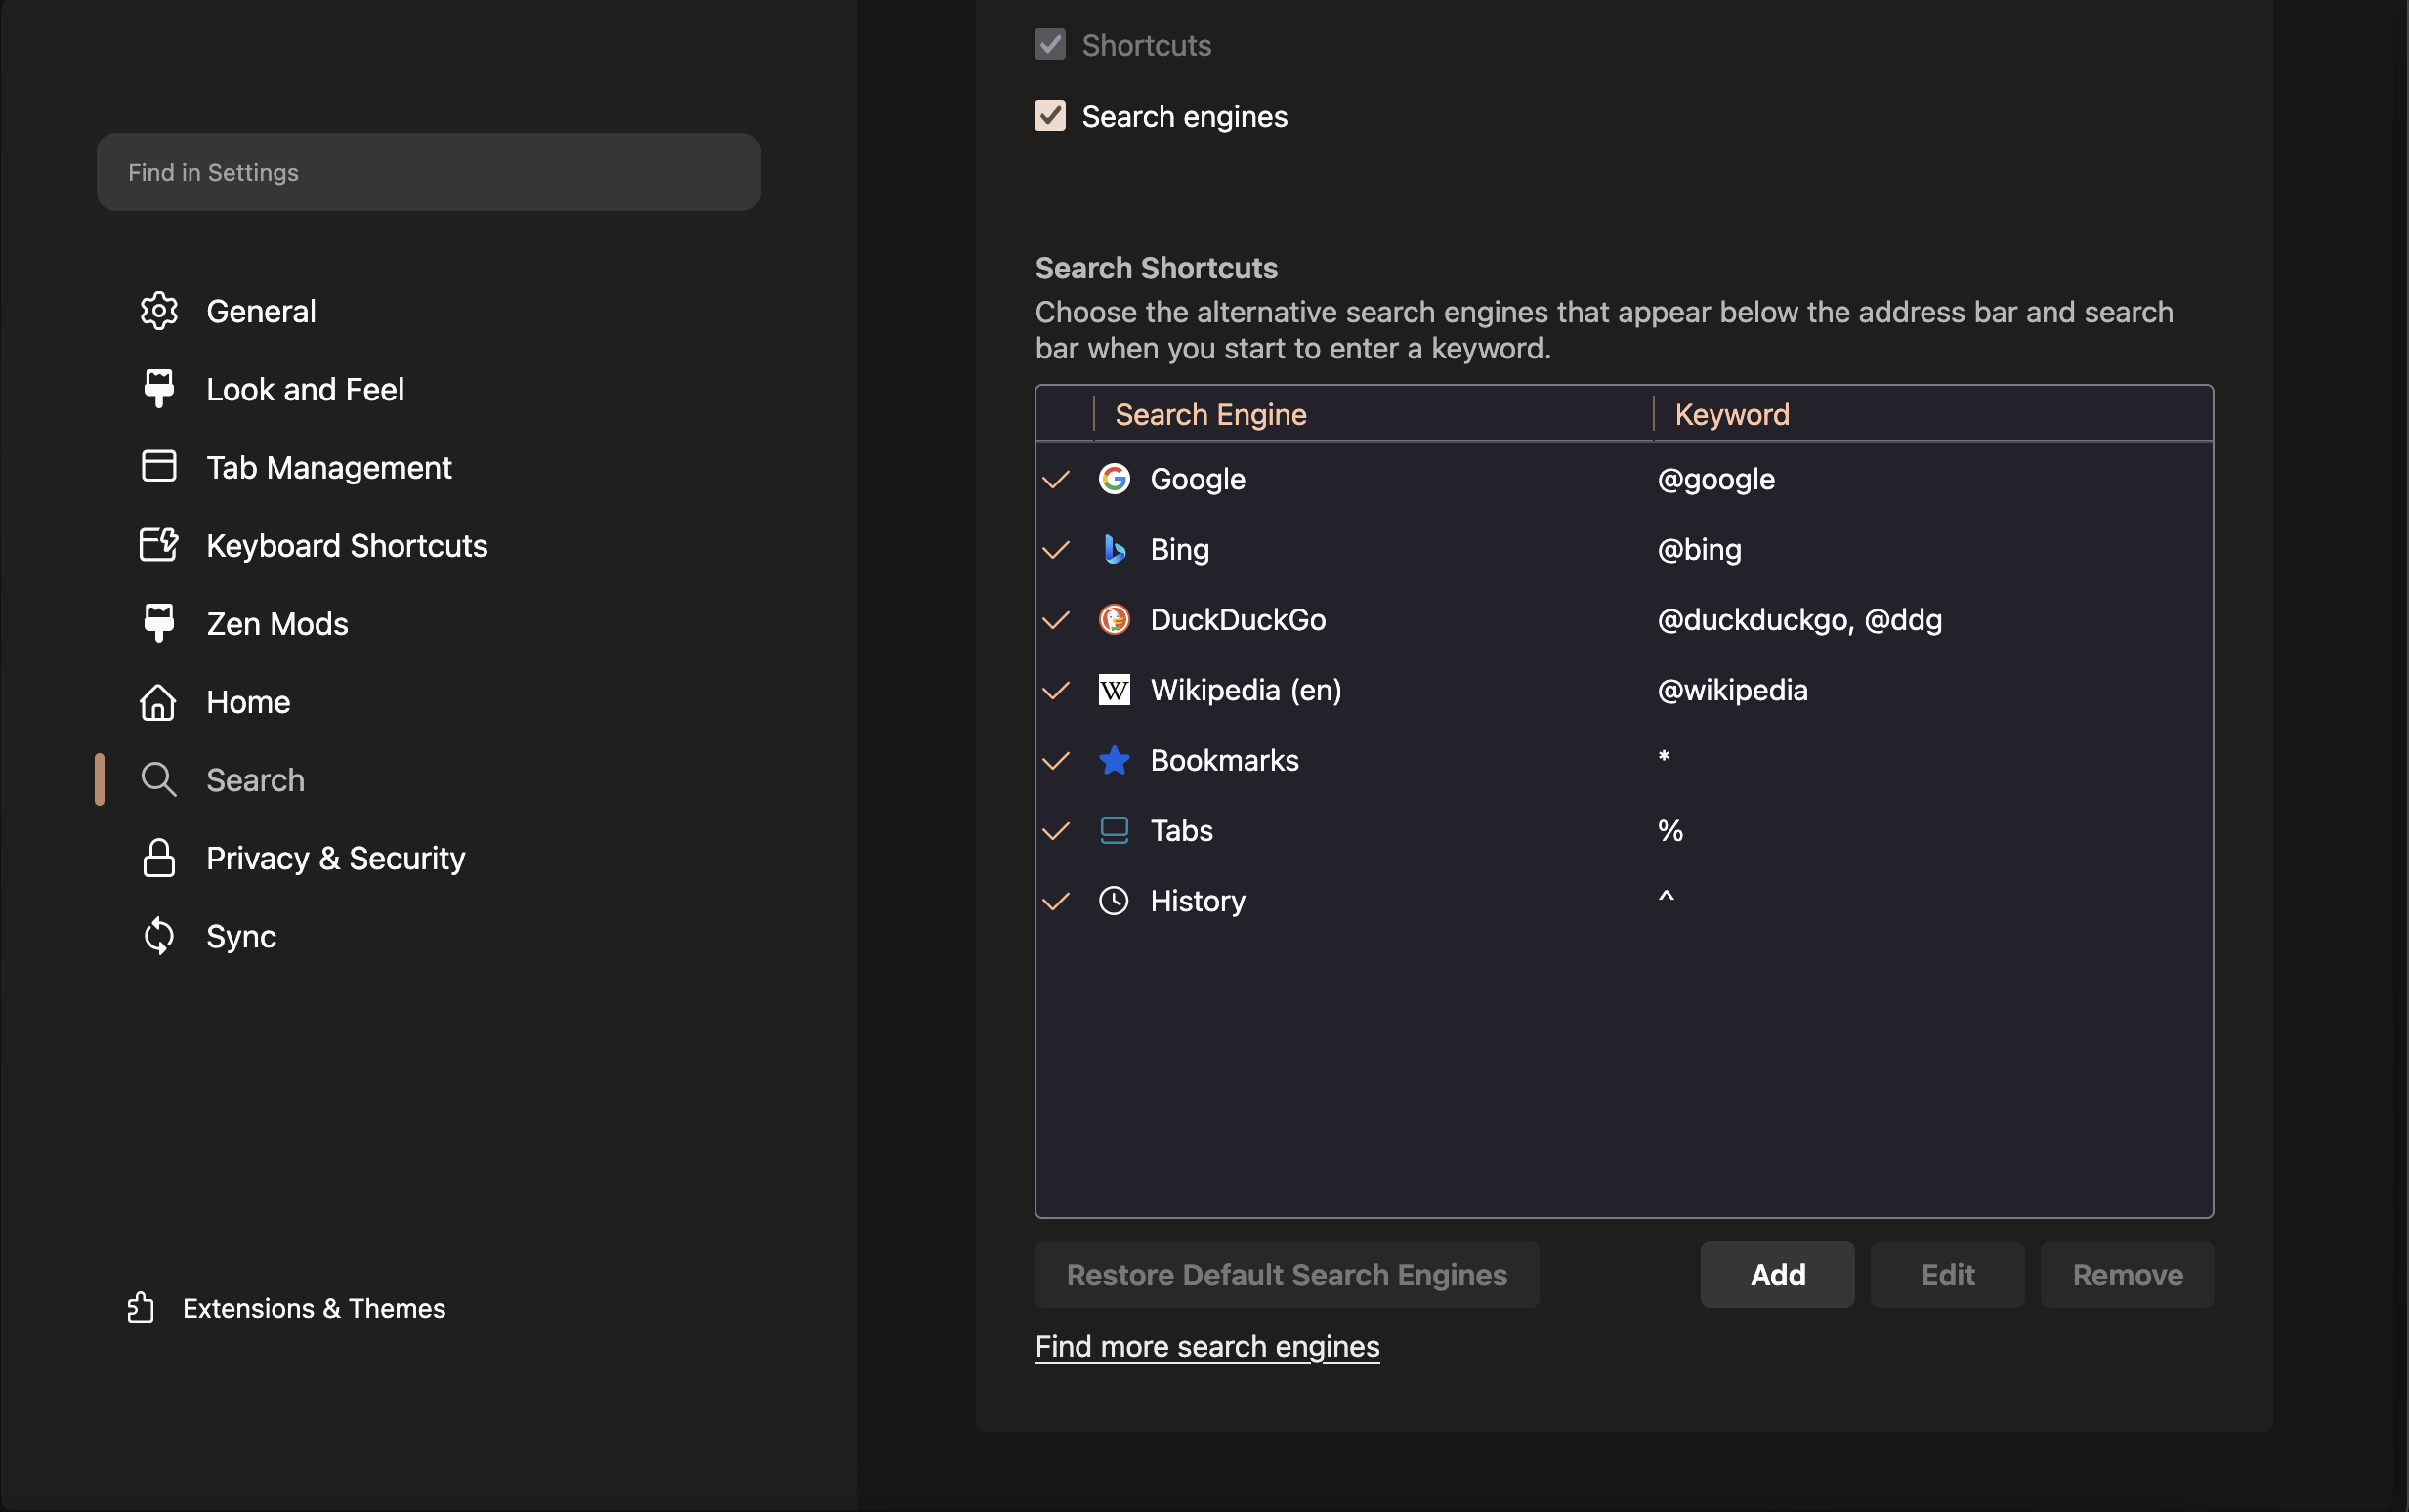
Click the **Add** button to add a new search engine manually, using these text fields:
* **Search engine name** is the display name for your search engine.
* **URL with %s in place of search term** is the search URL template (use %s where the search query should go).
* **Custom keyword (optional)** that you can type in the URL bar to easily switch to the search mode for that specific search engine.
Click **Advanced** to access additional optional fields:
* **POST data with %s in place of search term** should be left empty for GET requests, or specify POST data if the search engine requires it.
* **Suggestions URL with %s in place of search term (optional)** is the URL for search suggestions and autocomplete (you can use the same link as the main URL).
Here is an example of adding Qwant as search engine manually, using the Advanced options:
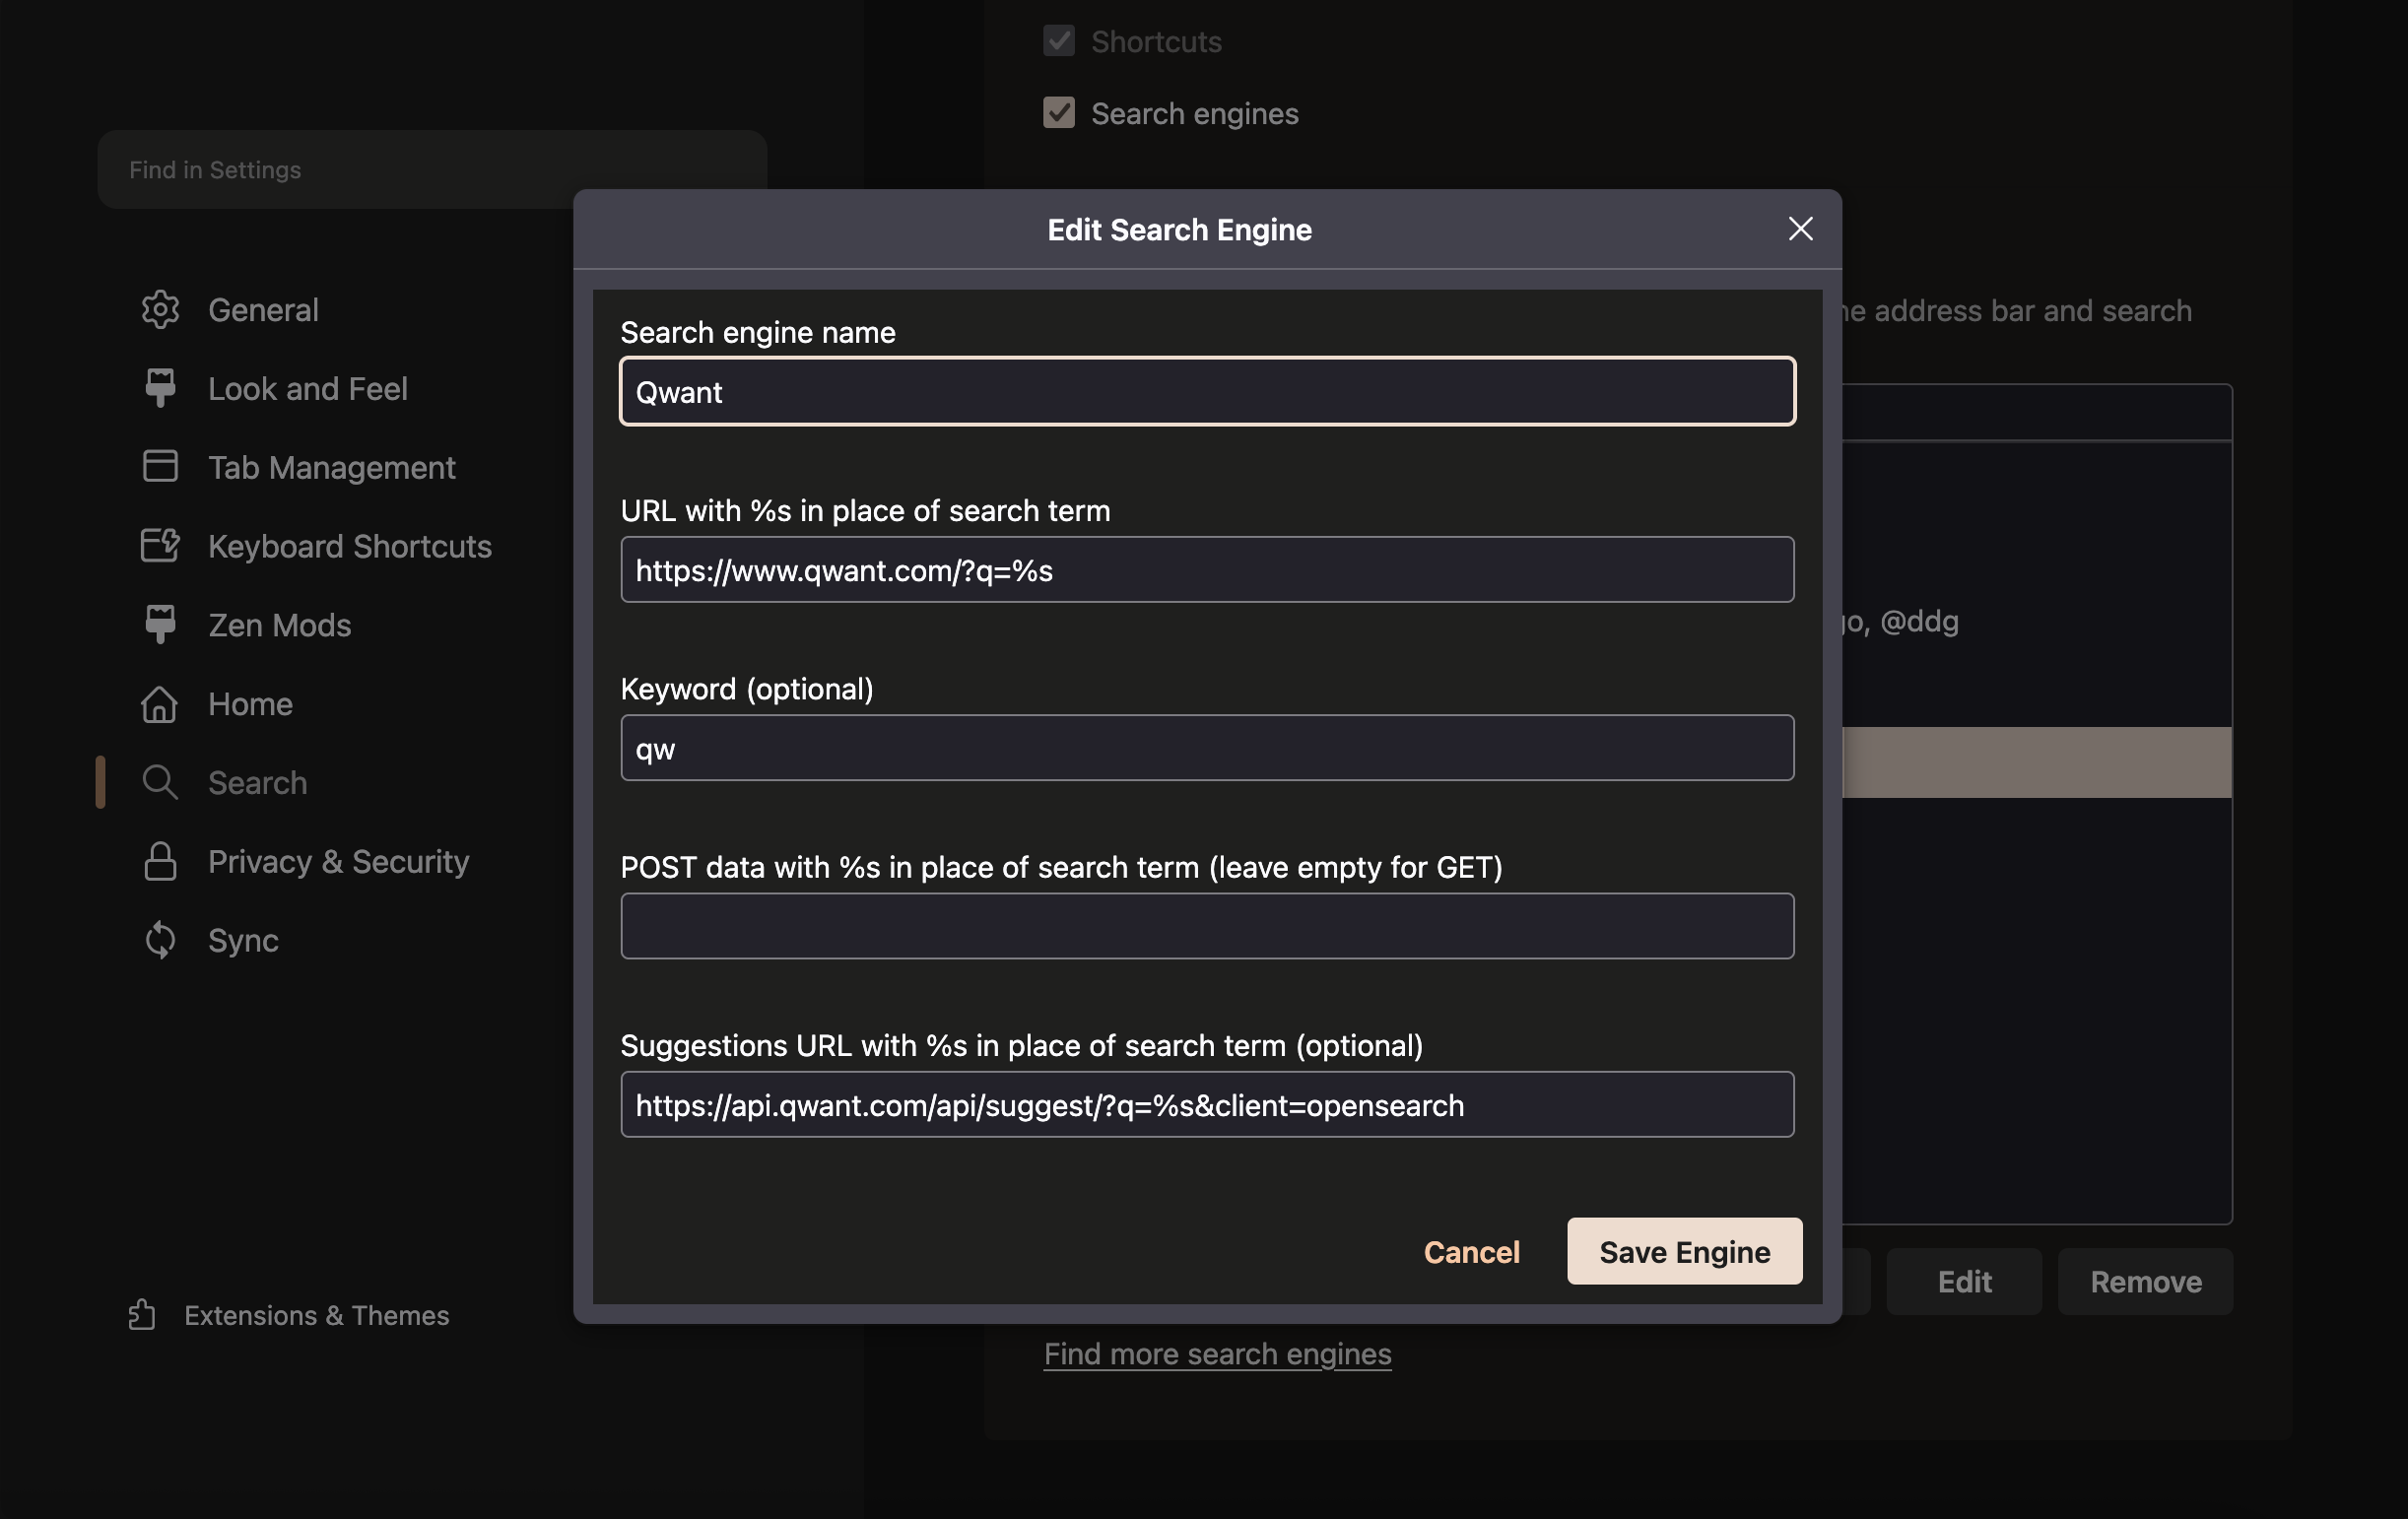
You can also set a **custom keyword** to the search engines you add, by double clicking the Keyword column on the row of a search engine. Type the keyword, and press **Enter** to save it. Use the search engine by clicking the **New Tab** button, type the custom keyword and press **Space** key to activate the search engine. Type your search query, and press **Enter** to show the search results in new tab.
{
}
Some other configurations you can make with search engines:
* You can also drag a search engine up or down to set the order of its appearance when searching in the URL bar.
* Custom search engines that were added manually can be edited by clicking on it (in the Search Shortcuts settings) and click **Edit**.
* To remove a search engine, click the search engine in Search Shortcuts settings and click **Remove**.
* Click **Restore Default Search Engines** if you removed one of the default search engines (Google, DuckDuckGo or Wikipedia) and want to restore them back.
### Enable legacy New Tab mechanism
The legacy new tab page from Firefox can still be accessed by opening `about:newtab`.
But, if you want to revert the New Tab mechanism, you can do it by accessing Advanced Preferences page (`about:config`). Search for `zen.urlbar.replace-newtab`, and toggle it to `false`. Clicking the New Tab button will open the legacy New Tab page.
file: ./content/docs/user-manual/window-sync.mdx
meta: {
"title": "Window Sync & Recovery",
"description": "Your opened windows mirror with each other instantly"
}
import KeyboardShortcut from '@/components/KeyboardShortcut';
Zen now **syncs windows on the same device**, so changes in one window are reflected across the others instantly. Creating new window will automatically start at your existing Space, showing all of your existing tabs.
{
}
Unlike previous implementation where Essentials and pinned tabs were duplicated during new window creation, Zen now just mirror the tabs state. Enabling 4 windows of Zen will keep single process of each tabs, despite displaying the same list on different windows. If you open two windows and select the same tab, the inactive window will show dimmed preview of the website.
## Improve Your Flows with Window Sync
* After opening new Zen window, **create new Space** to start fresh while keeping easy access to Essential tabs. The Space will persist upon restarts.
* **Use multiple Spaces** to separate tabs for specific browsing tasks. Freely create or delete them based on your needs.
* If you use multiple windows regularly, use **Quit** option from main menu or shortcut to quit the browser. Zen will save the state of all your open windows and restore them properly upon reopening.
Alternatively, use **New blank window** option from the main menu or . *(Click to toggle details)*
* The window will inherit container and cookies from your original Space, with a **Move to..** button to easily move the tabs back to one of your existing Spaces.
* Tabs in blank windows are temporary and won't be restored upon restarts.
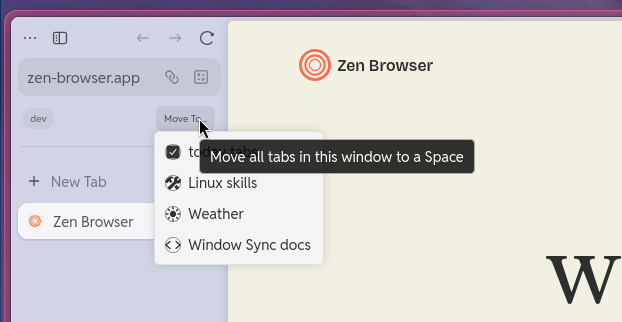
## Recovering Lost Window Sessions
Look up directory of your current Zen profile: *(Click to toggle details)*
* Open `about:support` in Zen, navigate to **Applications Basics** section, find **Profile Directory**, and click **Open Directory** button.
* For Flatpak version of Zen, the profile root directory will be located at `~/.var/app/app.zen_browser.zen/.zen` and titled `.Default (release)`.
### Updating from Zen v1.17.15 or older
* Open your current Zen profile directory.
* **Make sure Zen is fully closed**.
* In the profile directory, rename `zen-sessions.jsonlz4` to **zen-sessions.jsonlz4.bak**.
* If there is `sessionstore.jsonlz4` in the directory, rename it to **sessionstore.jsonlz4.bak** too.
Open the `sessionstore-backups` folder. You will see multiple backup files in .jsonlz4 format. *(Click to open image)*
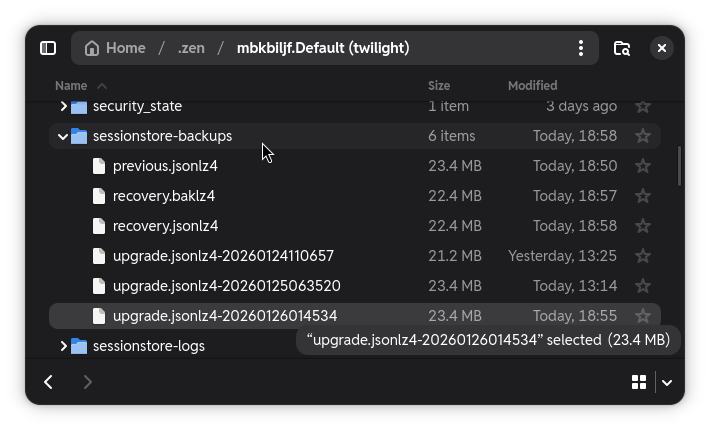
* **Duplicate the latest file**. This could be `recovery.jsonlz4` or one of the `upgrade.jsonlz4-`.
* Rename it to **sessionstore.jsonlz4**.
* Copy the **sessionstore.jsonlz4** file to your profile directory (one folder above `sessionstore-backups`).
* Open Zen and tabs from the session backup should be restored.
* If failed, close Zen and retry the steps with another backup files from `sessionstore-backups` folder.
### Session backup system on Zen v1.18 onwards
Alongside Window Sync, Zen provides new session backup system that regularly saved tab state of all synced windows, including changes to their status (essentials, pinning, split view). This significantly improves the accuracy of session restoration by Zen and facilitates manual restoration if tabs are lost. Follow these steps to restore:
* Open your current Zen profile directory. Open `about:support` and find `Profile Directory` -> Click on `Open directory`
* **Make sure Zen is fully closed.**
Open the `zen-sessions-backup` folder. You will see multiple backup files in .jsonlz4 format: *(Click to open image)*

* Duplicate the latest `zen-sessions-.jsonlz4` file, rename it to **zen-sessions.jsonlz4**.
* Copy **zen-sessions.jsonlz4** to your profile directory (one folder above `zen-sessions-backup`).
* Open Zen and tabs from the session backup should be restored.
The current window sync only works on the same device, but multi-device sync support is planned. For now, you can use the **Send to Device** option to send tabs between devices that logged in to the same Mozilla account.
file: ./content/docs/user-manual/workspaces.mdx
meta: {
"title": "Workspaces",
"description": "Organize tabs by projects with custom containers"
}
Zen Browser’s **workspaces** feature is your go-to tool for organizing tabs seamlessly by tasks, projects, or themes. Think of each workspace as a focused area where you can group related tabs and quickly switch between sets—ideal for juggling work, personal tasks, or study sessions without cluttering your tab bar.
### Adding a new workspace
In order to add a new workspace on a fresh install of Zen, you need to click on "Default" on your side bar and click on the + icon. Once you've set up your workspaces, you'll see their icons at the bottom of the sidebar.
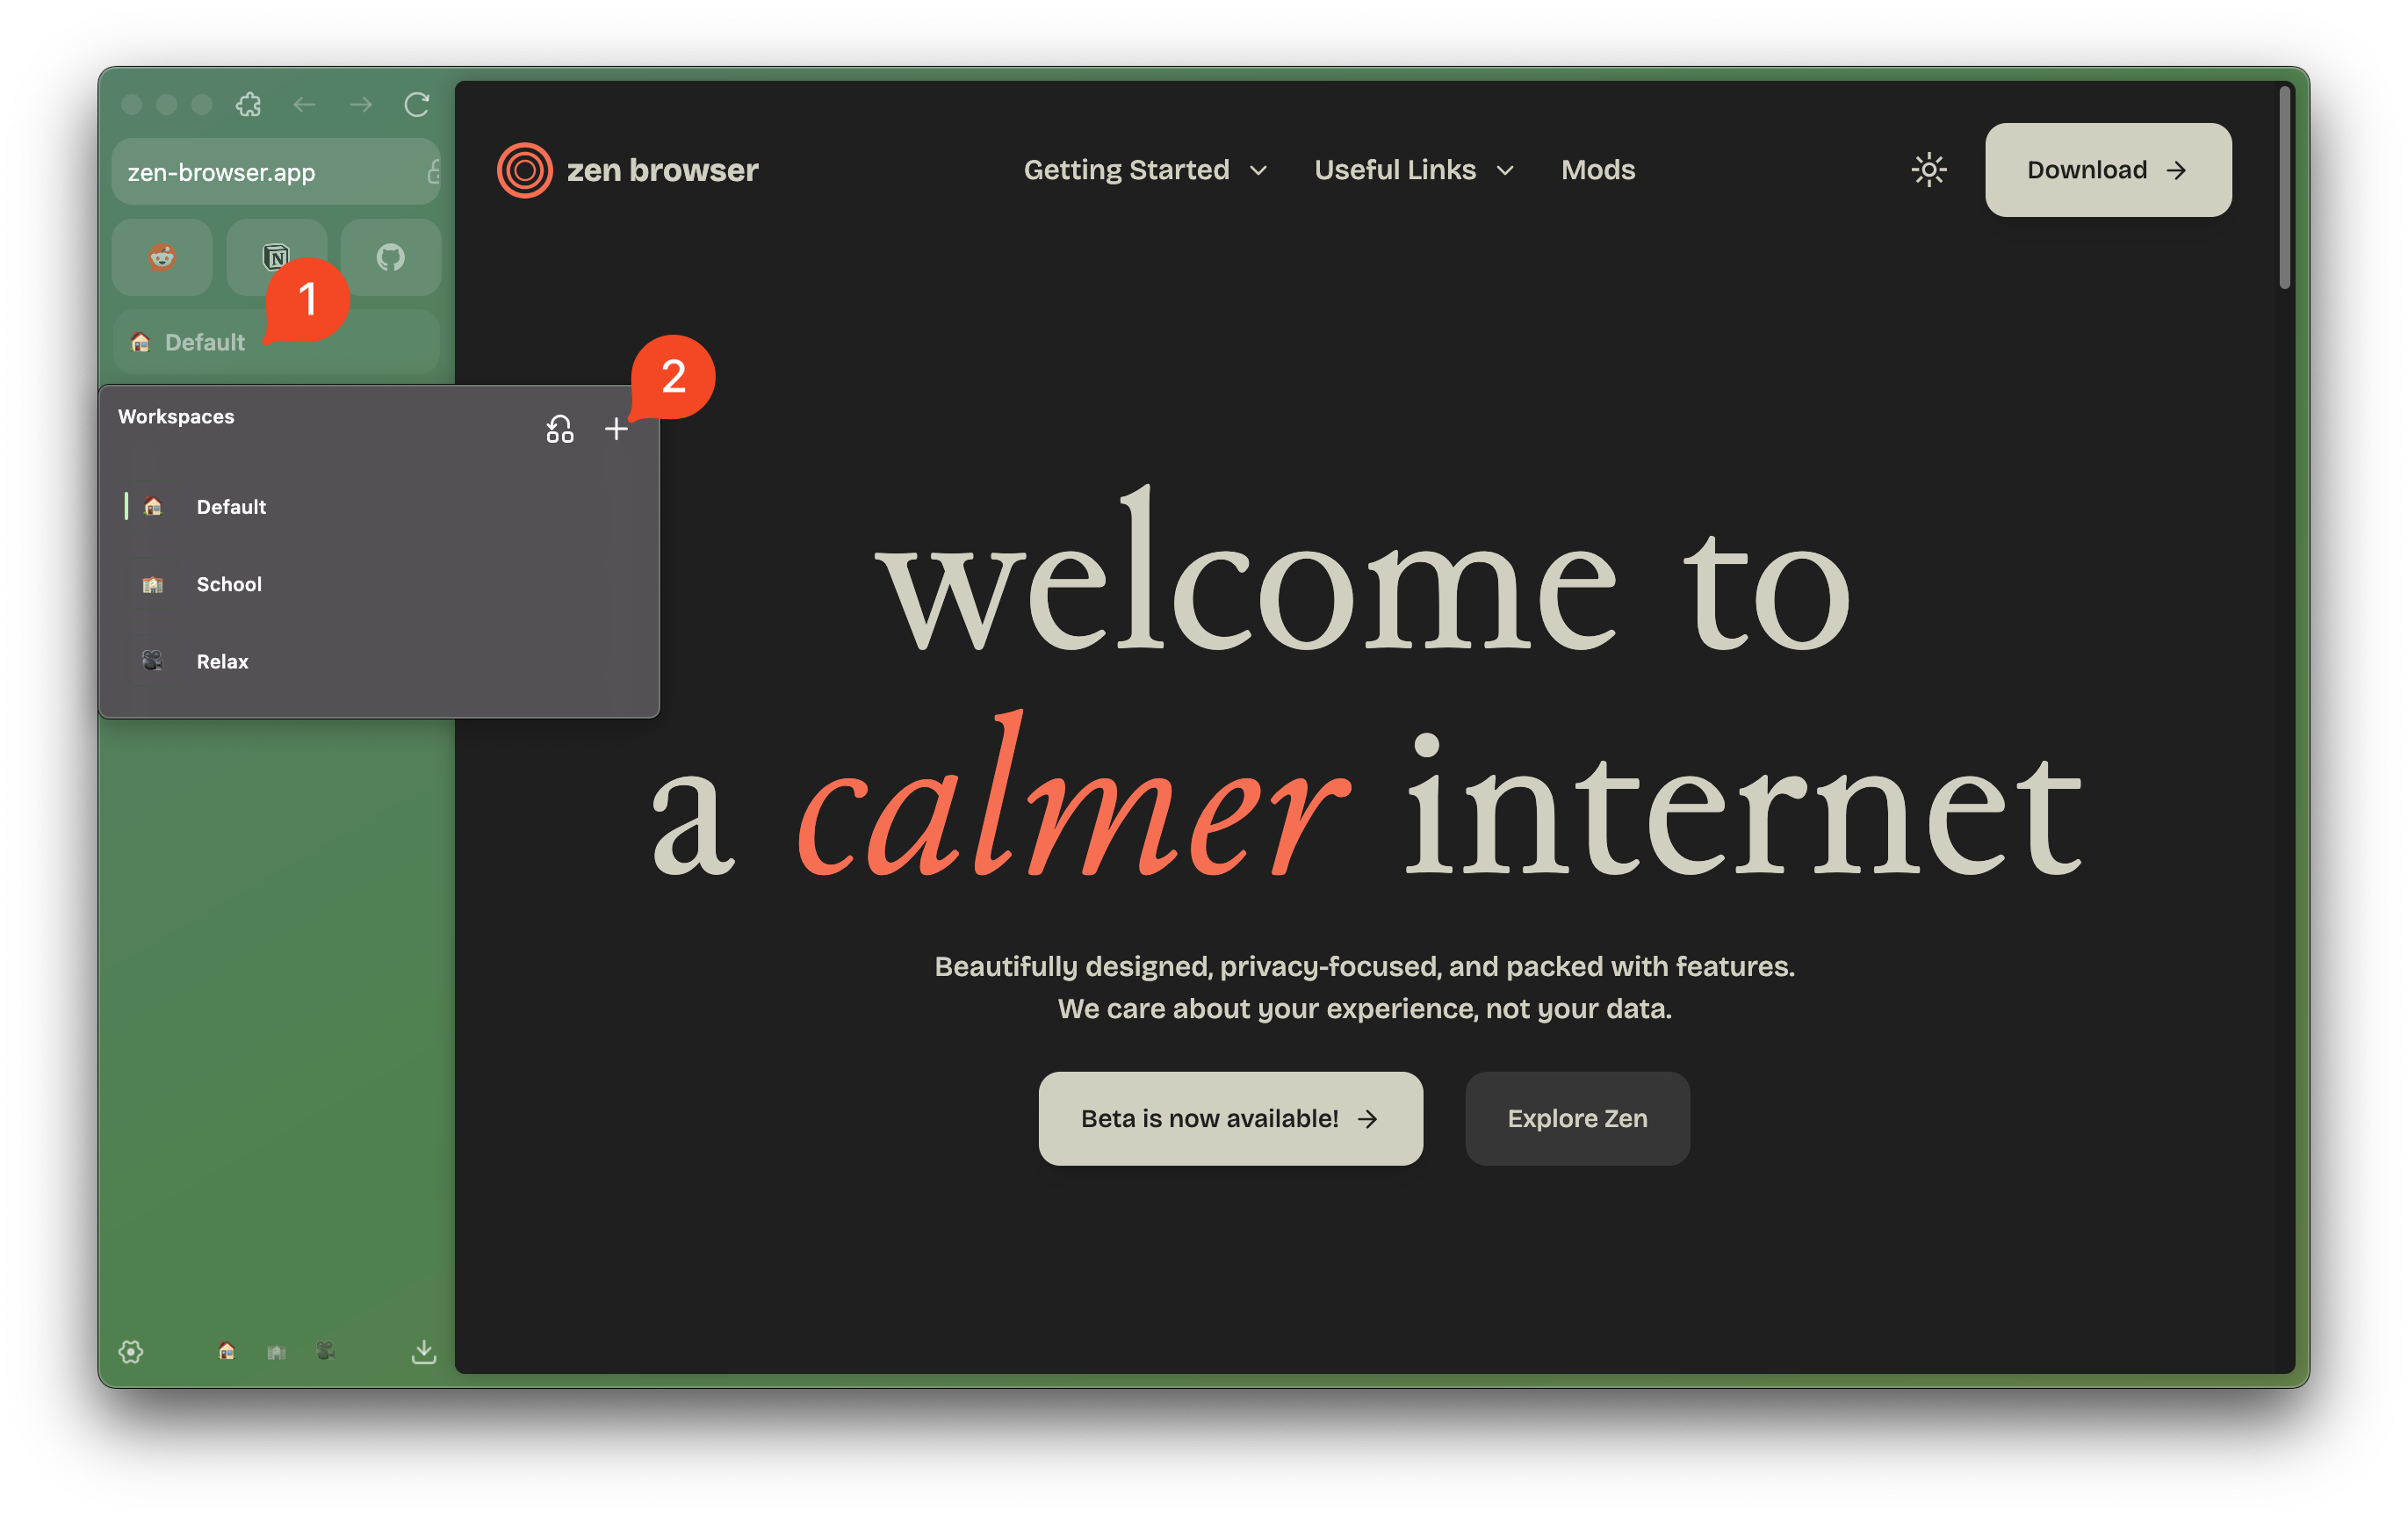
You can make each workspace your own by adding **default container tabs** to keep accounts or projects isolated within one workspace, preserving privacy and making navigation easy. Customize each workspace with unique icons and names, so it’s a breeze to find what you need.
Perfect for power users, workspaces bring the flexibility of multiple browser windows into one streamlined experience, complete with shortcuts to switch between them in an instant. Organize, focus, and explore your tabs with Zen Browser’s workspaces for a truly efficient browsing experience.
### Container Tabs / Multi-Account Containers
Container Tabs is a feature derived from Firefox that provide separate cookie sessions within the same browser profile. With Container Tabs, you can log in with multiple accounts on the same sites without having to log out/in multiple times.
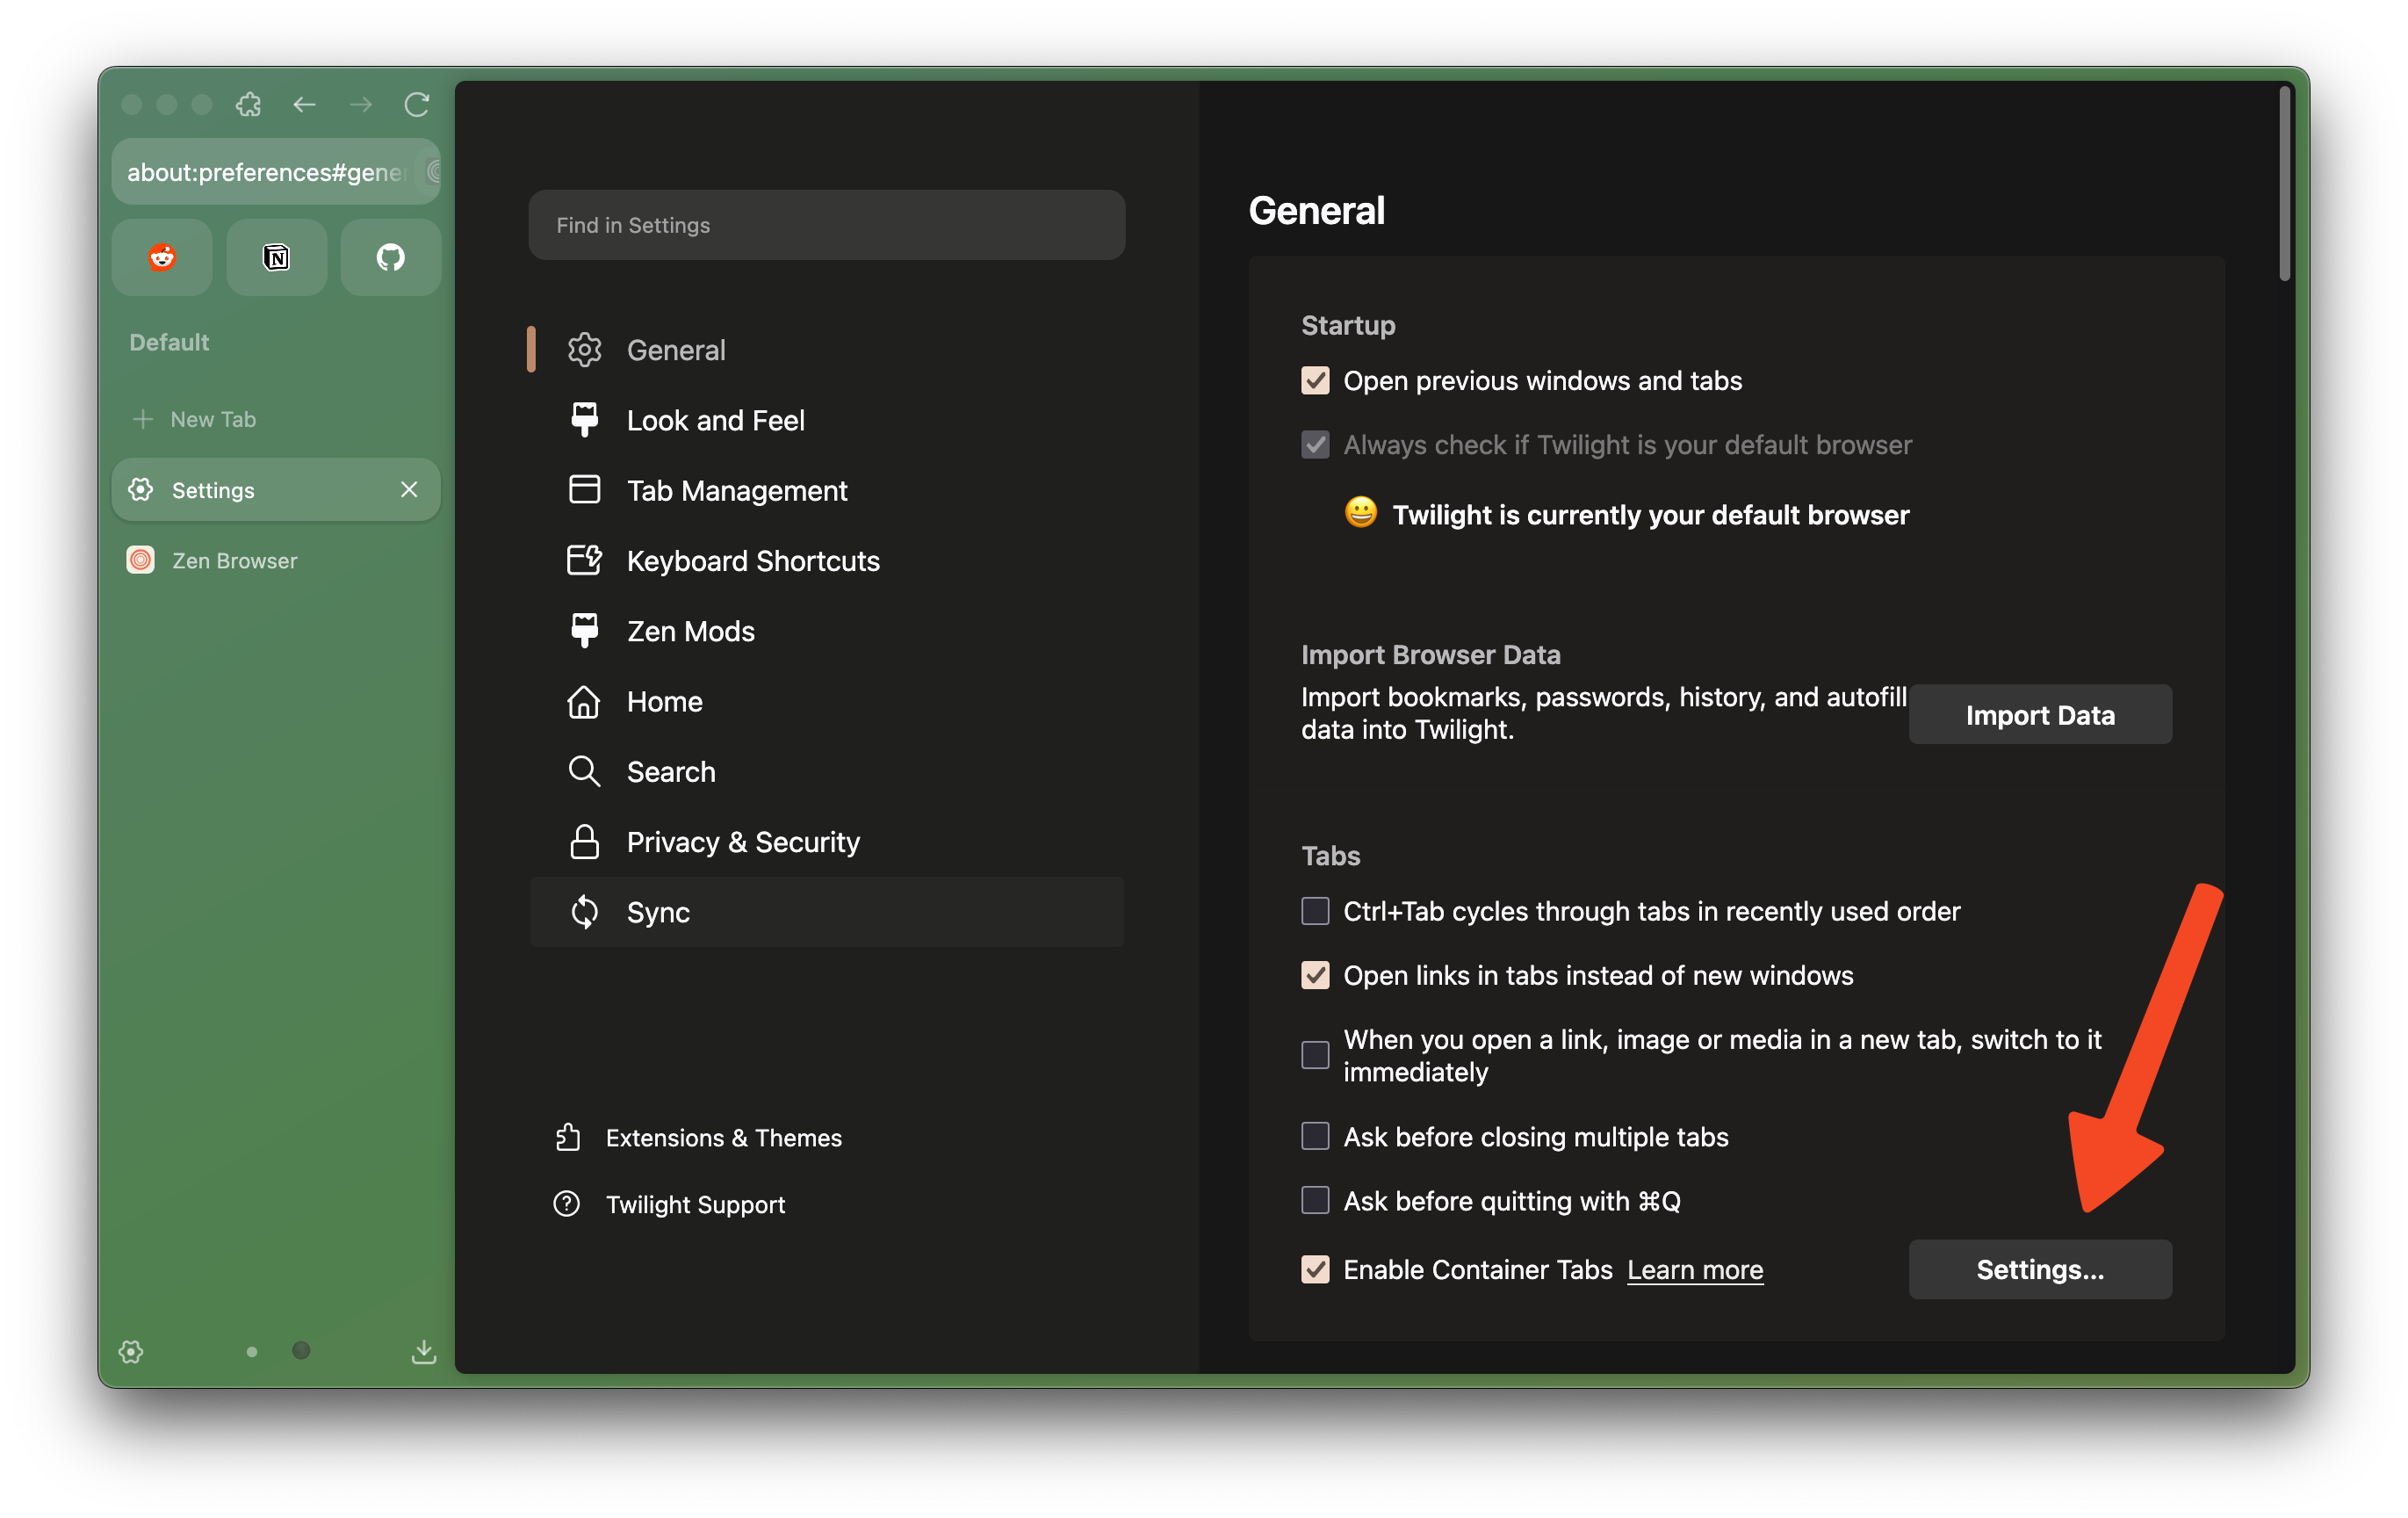
By default, there are four containers provided by Firefox: **Personal**, **Work**, **Banking**, and **Shopping**. You can manage, remove, or add new containers from `"Settings" > "General" > "Container Tabs"`. You can choose between 9 colors and 13 icons to customize or create your own containers.
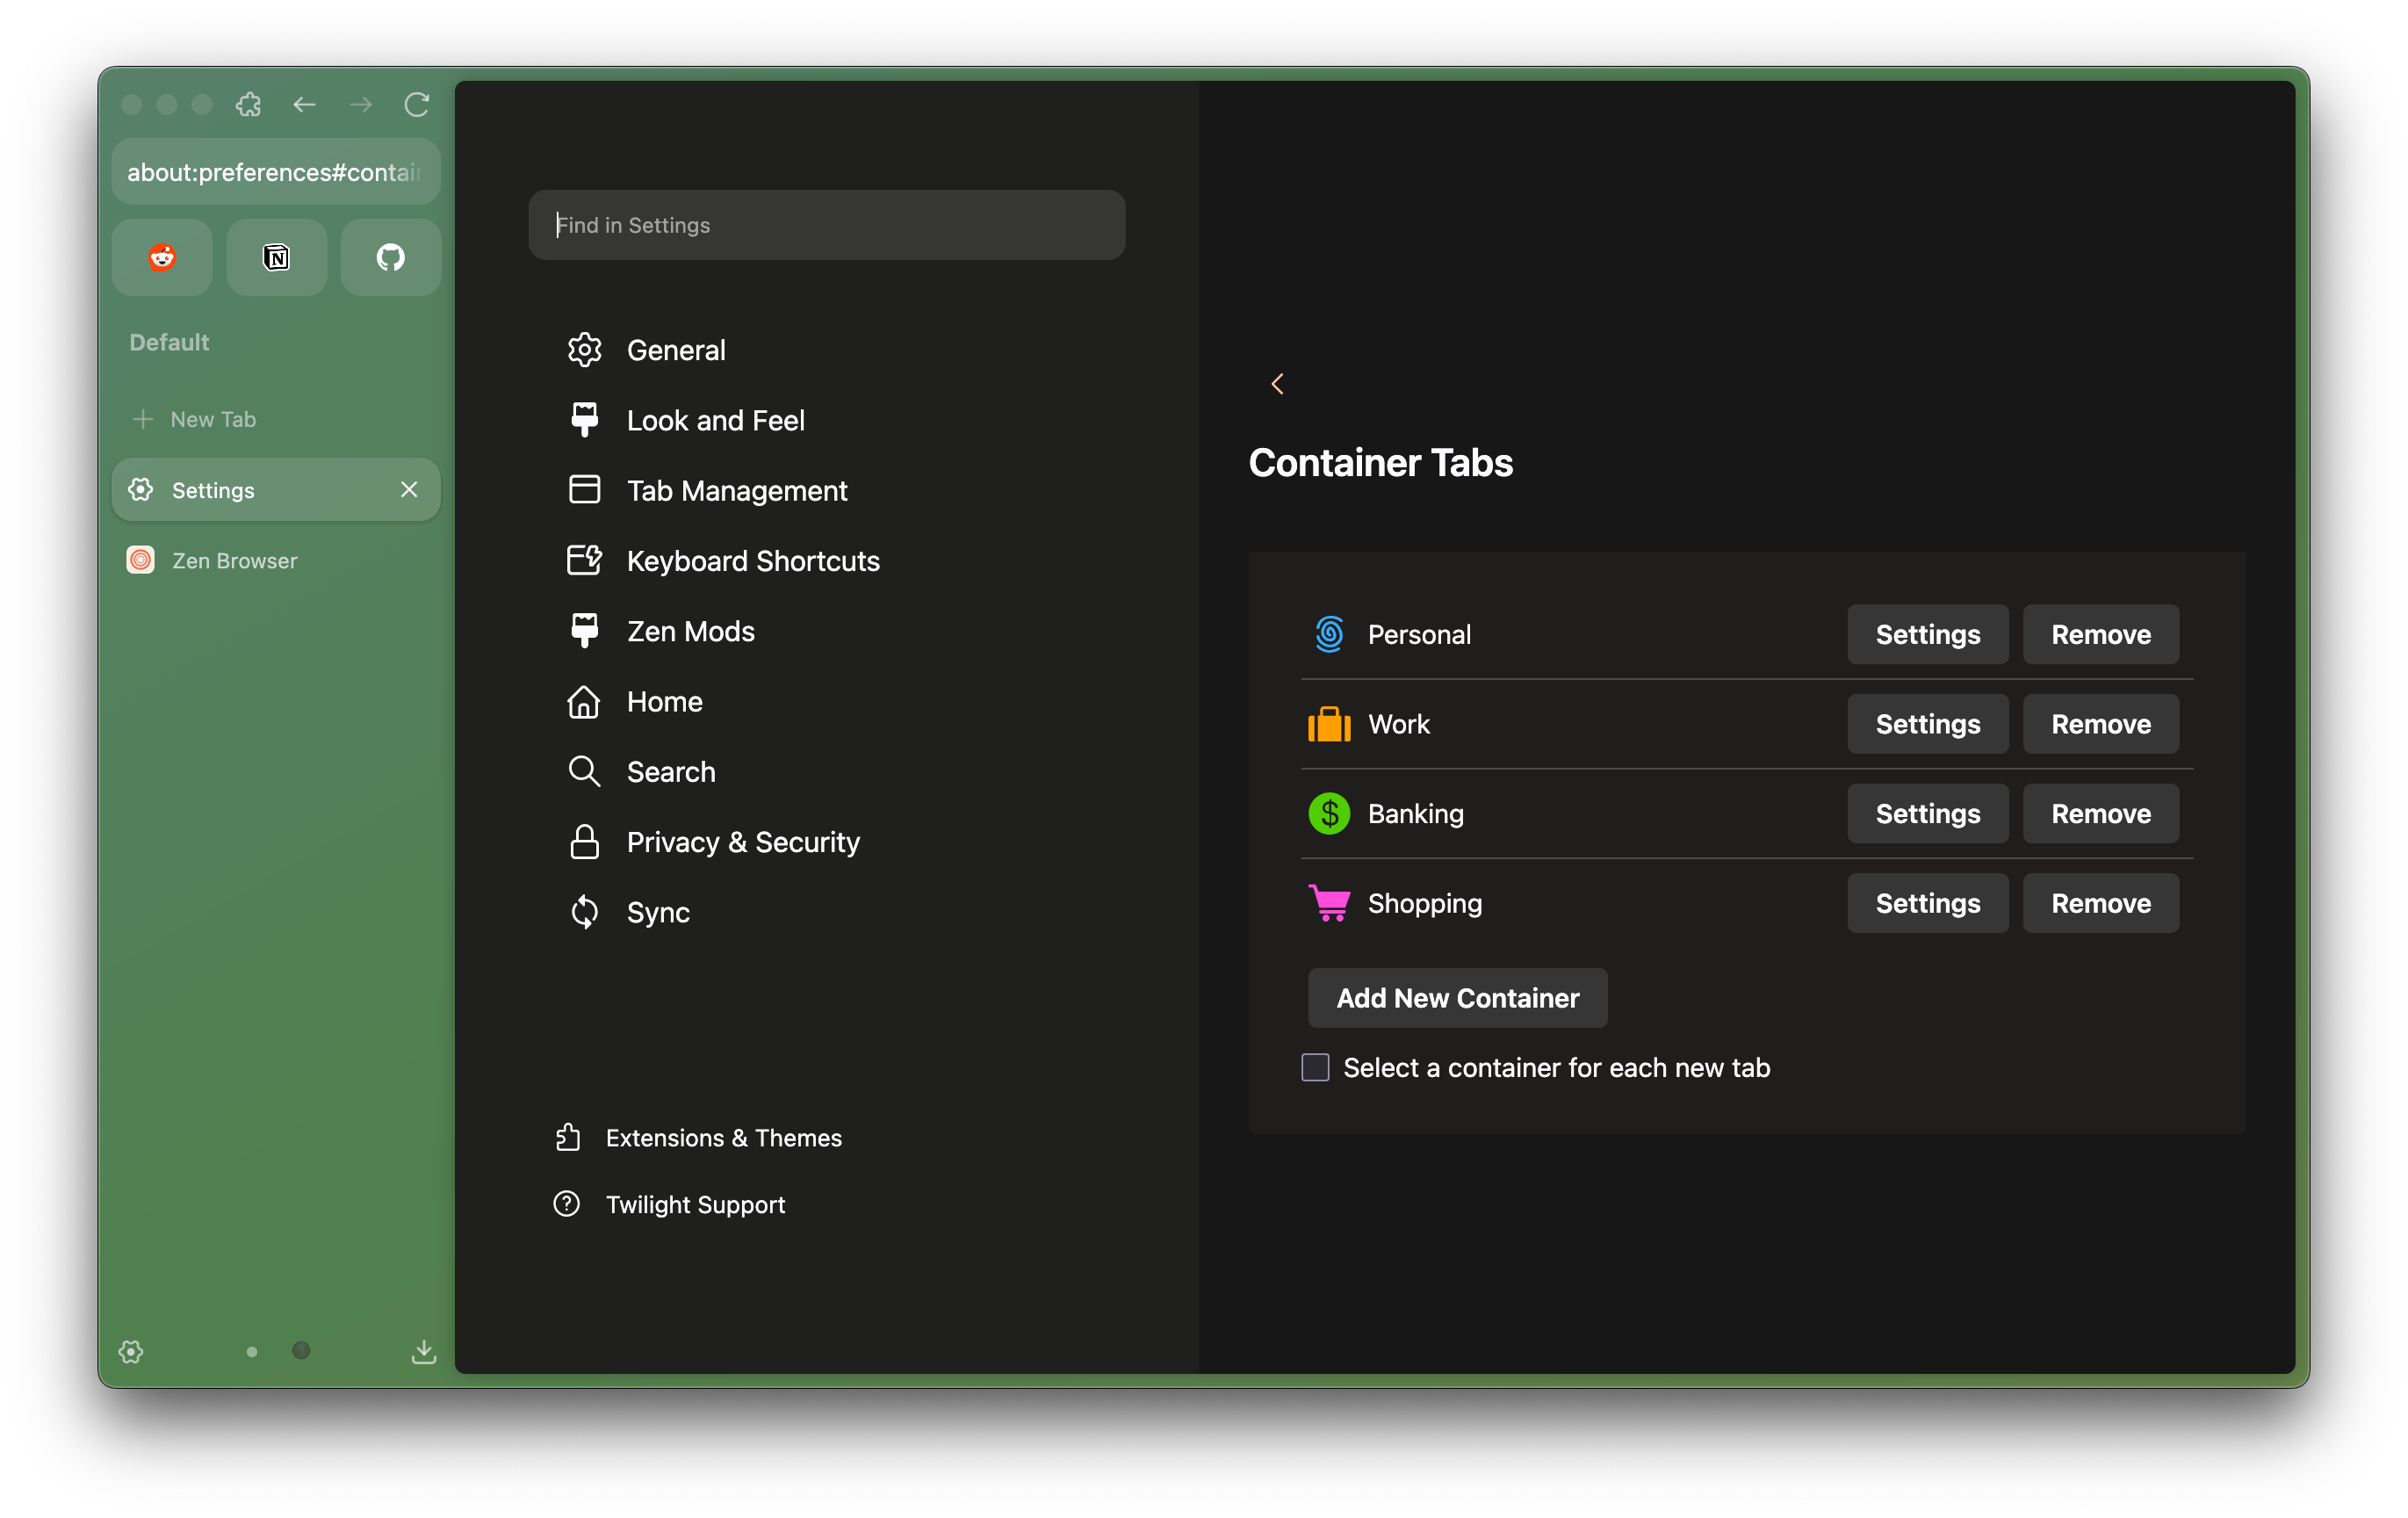
Browsing sessions with Zen in regular tabs are automatically classified as No Container. You can browse sites using container tabs by:
* Right click `"New Tab"` button and choose container to open
* Right click on `existing tabs > "Open in New Container Tab" > choose container to open`
* Right click on `links > "Open Link in New Container Tab" > choose container to open`
* After the sites is opened in a container tab, you can log in again with different account credentials.
By assigning containers to Workspaces in Zen, you can devote a workspace for certain usage of accounts without affecting your current login session (registered in regular/No Container tabs.)
If you assign one container for each workspace and open a container tab outside of the assigned workspaces, you can make it automatically move to the intended workspaces with checking `"Switch to workspace where container is set as default when opening container tabs"` option in `"Settings" > "Tab Management" > "Workspaces"`.
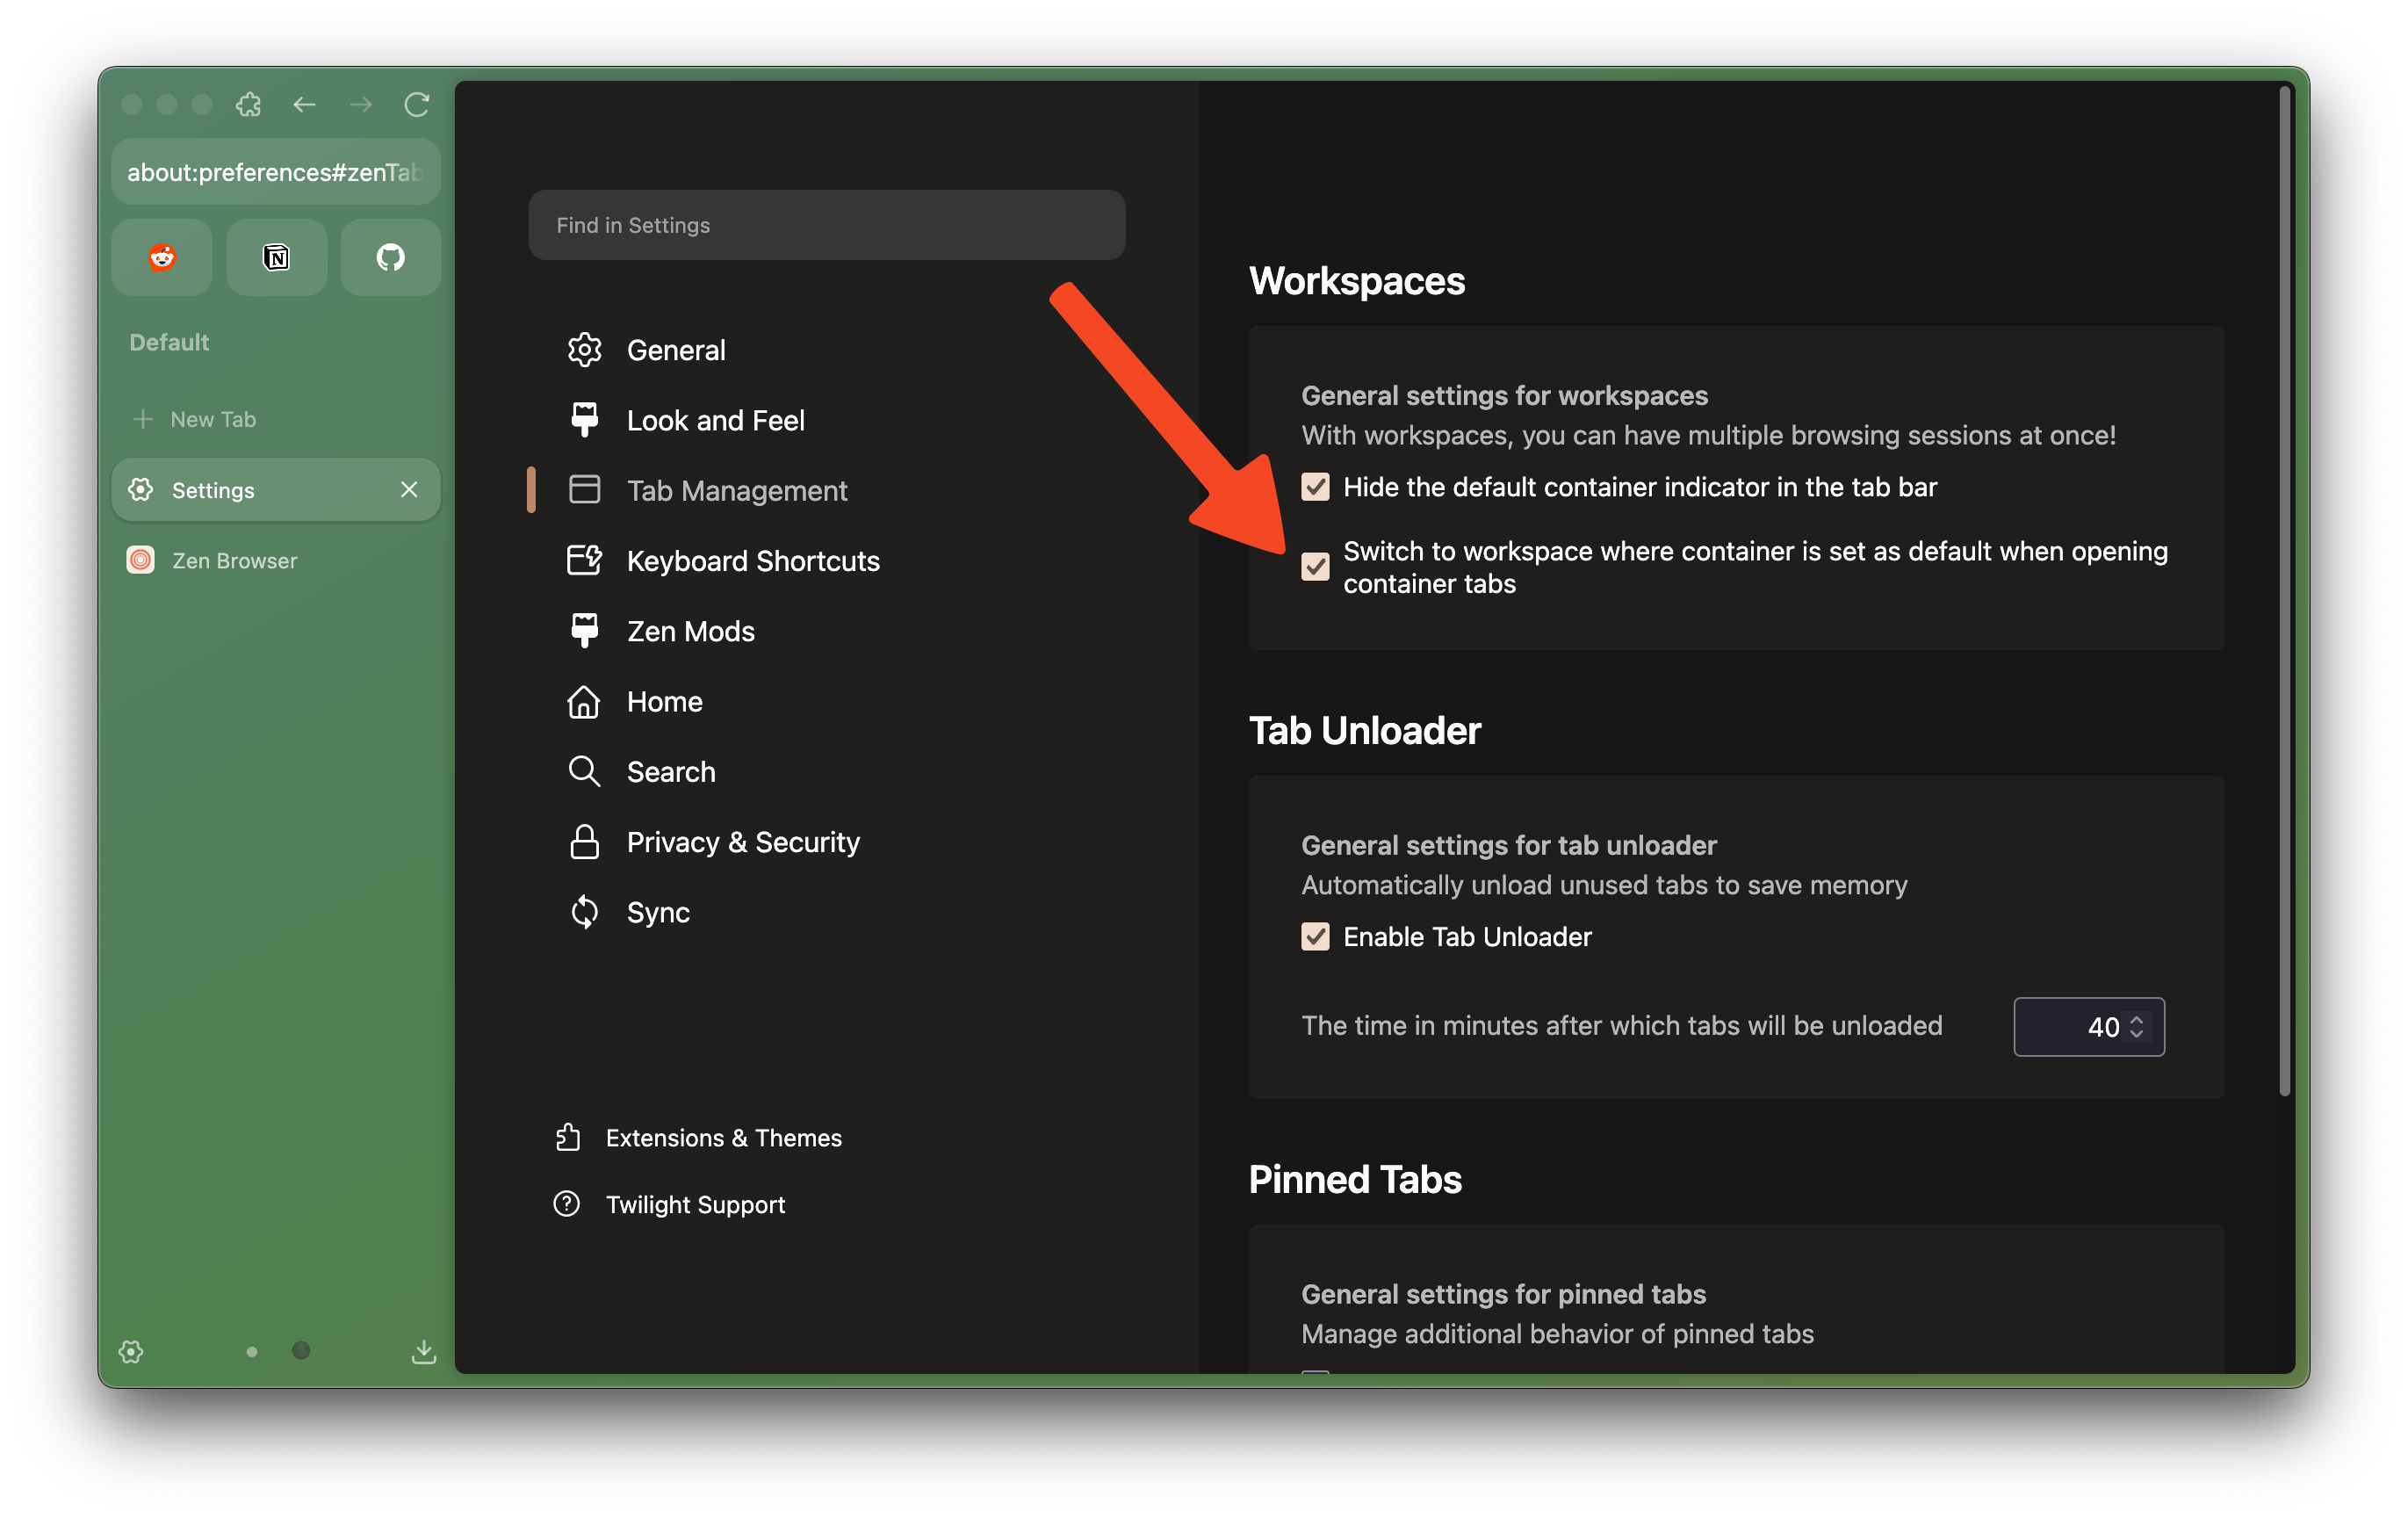
**Limitation**: Currently Container Tabs separate your cookies/browsing sessions, but it doesn't separate your browsing history and extensions.
Learn more about Multi-Account Containers in Mozilla Support: [https://support.mozilla.org/kb/containers](https://support.mozilla.org/kb/containers)
file: ./content/docs/contribute/desktop/building.mdx
meta: {
"title": "Building Zen"
}
import { Tabs, Tab } from 'fumadocs-ui/components/tabs';
We've taken the time to make building Zen Browser as easy as possible, independent of your operating system or technical knowledge.
#### Basic Requirements
The following resources are essential for a successful build. Without them, you will encounter unnecessary build failures:
* Disk Space: Keep *30GB* of free space on the disk (the build process is resource-intensive).
* Git ([Download here](https://git-scm.com/downloads)) – Required for version control and managing source code.
* Python 3 ([Download here](https://www.python.org/downloads/)) – Needed for running build scripts and automation tools.
* Node.js 21+ ([Download here](https://nodejs.org/)) – Required for managing dependencies and running JavaScript-based tools.
* sccache ([Download here](https://github.com/mozilla/sccache/releases)) – A caching tool that speeds up rebuilds by storing compiled objects.
* Rust and Cargo ([Download here](https://doc.rust-lang.org/cargo/getting-started/installation.html)) - Required to apply firefox patches.
If you're using Windows, ensure that all the basic software requirements are added to the `PATH` variable.
We cannot provide support if a build fails. Please understand this before proceeding with the following steps.
## Step 1: Getting Started & Clone the Project
First, let's get your system ready for building Zen.
Follow the steps below to set up your Windows environment for building Zen Browser:
Install [MozillaBuild](https://wiki.mozilla.org/MozillaBuild) and add it to your `PATH`.
Install [7-Zip](https://www.7-zip.org/) and add it to your `PATH`.
Ensure you have Visual Studio with the "Desktop development with C++" workload installed.
Follow the steps below to set up your Linux environment for building Zen Browser:
For Debian-based Linux (such as Ubuntu): `sudo apt update && sudo apt install curl python3 python3-pip git sccache`
For Fedora Linux: `sudo dnf install python3 python3-pip git sccache`
Note: To avoid permission issues, it's recommended to work within a Python virtual environment.
Follow the steps below to set up your macOS environment for building Zen Browser:
Install Xcode from the App Store, after that run the following command in your terminal:
```
sudo xcode-select --switch /Applications/Xcode.app
sudo xcodebuild -license
```
After having everything set up, you need to clone the Zen Browser repository to your local machine. This will create a local copy of the project that you can work on.
```bash
git clone https://github.com/zen-browser/desktop.git --depth 10
cd desktop
```
* **`--depth 10`**: This makes sure you dont download the entire git history, it would take a long time otherwise due to that we used to store compiled binaries on the repository.
## Step 2: Install Dependencies
Once you have cloned the project, navigate to the project directory and install the necessary dependencies using npm:
```bash
npm i
```
This command will install all the packages listed in the `package.json` file, which are required for building and running Zen Browser.
## Step 3: Download and Bootstrap the Browser
To set up the browser, you need to download additional files and prepare the environment:
```bash
npm run init
```
This command handles all the necessary bootstrapping tasks, such as setting up configuration files and downloading essential resources. The process may take some time, and there may be periods of time where it appears inactive — but rest assured, the commands are running in the background.
## Step 4: Update Language Packs
Before building the browser, it’s recommended to update the American English language packs to ensure that all localization files are up-to-date:
```bash
python3 ./scripts/update_en_US_packs.py
```
This script updates the "en-US" localization files, which are necessary for proper language support in Zen Browser. Running this step ensures that your build includes the latest translations and language resources.
## Step 5: Build the Browser
Now that everything is set up, you can build the browser:
```bash
npm run build
```
This command compiles the source code and creates the necessary files for running Zen Browser.
* If your changes are only in JavaScript, you can run the following command after completing the first build for faster rebuilds:
```bash
npm run build:ui
```
This skips unnecessary compilation steps and only rebuilds the UI components.
For changes in other languages or core functionality, you should always run the full build using `npm run build` after every code change.
## Step 6: Run the Browser
After building the browser, you can start it using:
```bash
npm start
```
This command launches the browser, allowing you to see your changes in action.
***
### Common Build Errors & Fixes
#### Q: "mach not found" error?
> Install [MozillaBuild](https://wiki.mozilla.org/MozillaBuild), add it to your `PATH`, then restart your terminal.
#### Q: "7z" or "7-Zip" missing during build?
> Download [7-Zip](https://www.7-zip.org/), add it to your `PATH`, then restart your terminal.
#### Q: "Unsupported Microsoft Visual Studio version" or build failing for similar reasons on Windows?
> Ensure Visual Studio is installed with the "Desktop development with C++" workload and Windows 10/11 SDK.
#### Q: Build stuck or freezing?
> Try running with fewer threads:
>
> ```sh
> npm run build -- --jobs 2
> ```
#### Q: "Git submodule" errors after cloning?
> Run:
>
> ```sh
> git submodule update --init --recursive
> ```
#### Q: "npm run init" fails?
> Manually bootstrap the project:
>
> ```sh
> npm run bootstrap
> ```
#### Q: "zen.exe" not found after build?
> Perform a clean rebuild:
>
> ```sh
> npm run reset-ff && npm run init && npm run build
> ```
file: ./content/docs/contribute/desktop/code-structure-and-prefs.mdx
meta: {
"title": "Code Structure",
"description": "Zen Browser Code Structure and Preference Management"
}
The Zen Browser is a fork of Firefox with custom features like vertical tabs, workspaces, and themes. The source code is organized in the `src/` directory, with patches and custom implementations for Zen-specific features.
## Main Directories
* **src/zen/**: Contains Zen-specific features.
* `workspaces/`: Implements workspace functionality (e.g., ZenWorkspaces.mjs, ZenWorkspace.mjs).
* `compact-mode/`: Handles compact mode UI.
* `glance/`: Quick tab preview feature.
* `common/`: Shared utilities like ZenUIManager.mjs and ZenStartup.mjs.
* `tabs/`: Tab management, including pinned tabs.
* **src/browser/**: Browser components with patches (e.g., browser.xhtml patches).
* **prefs/**: Preference files in YAML format for various features (e.g., zen.yaml for general prefs, glance.yaml for glance feature).
## How to Patch the Firefox Source Code
You can create patches on the Firefox source code by modifying the files in the `engine/` directory which is created after you've run the `npm run init` command.
### Steps to Make Changes on the Firefox Source Code
1. **Find the file you want to modify**
* You can easily navigate the Firefox source code using Mozilla's [Searchfox](https://searchfox.org/) tool
* Modify the file in the `engine/` directory
2. **Patch the file and import the changes**
* Run `npm run export `
* Run `npm run import`
3. **Build and Test**
* Rebuild the browser
## How to Add New Preferences
Preferences in Zen Browser are defined in YAML files under `prefs/`. These are loaded and applied to customize behavior.
### Steps to Add a New Pref
1. **Choose or Create a YAML File**:
* For workspace-related prefs, edit `prefs/zen.yaml` or create a new one like `workspaces.yaml` if needed.
* Example structure in YAML:
```yaml
- name: zen.workspaces.new-pref
value: true
```
2. **Define the Pref**:
* `name`: The preference key (e.g., 'zen.workspaces.enable-feature').
* `value`: Default value (bool, string, int).
* *`condition`: Optional*
3. **Integrate in Code**:
* Use `Services.prefs.getBoolPref('zen.workspaces.new-pref', defaultValue)` in JavaScript files (e.g., ZenWorkspaces.mjs).
4. **Build and Test**:
* Rebuild the browser.
### Glance Example
To add a pref for enabling/disabling the Glance feature:
* In `prefs/glance.yaml`:
```yaml
- name: zen.glance.enabled
value: true
```
* In `src/zen/glance/ZenGlanceManager.mjs`:
```javascript
const glanceEnabled = Services.prefs.getBoolPref('zen.glance.enabled', true);
```
For more details, refer to existing preference definitions in the `prefs/` directory and their corresponding code implementations in `src/zen/`.
## Additional Resources
* [Firefox Source Docs](https://firefox-source-docs.mozilla.org)
file: ./content/docs/contribute/desktop/index.mdx
meta: {
"title": "Contributing To Desktop"
}
import { BookIcon, HammerIcon } from 'lucide-react'
} description="Getting Started with Zen Browser Development" href="/contribute/desktop/building" />
} description="Zen Browser Code Structure and Preference Management" href="/contribute/desktop/code-structure-and-prefs" />
file: ./content/docs/contribute/docs/editing-with-vscode.mdx
meta: {
"title": "Editing with VS Code",
"description": "How to use Visual Studio Code to contribute to the Zen Browser documentation."
}
import KeyboardShortcut from '@/components/KeyboardShortcut';
Visual Studio Code (VS Code) is a popular and powerful code editor that works well for editing Zen Browser documentation, especially with the right extensions.
## Prerequisites
* [**Visual Studio Code**](https://code.visualstudio.com/) installed on your machine.
* *Note: Popular forks of VS Code, such as [VSCodium](https://vscodium.com/), should also work well.*
## Recommended Extension: MDX
To get the best experience editing `.mdx` files in VS Code, we recommend installing the official MDX extension.
* **Extension Name:** MDX
* **Publisher:** unifiedjs
* **Marketplace Link:** [MDX - Visual Studio Marketplace](https://marketplace.visualstudio.com/items?itemName=unifiedjs.vscode-mdx)
### Benefits
* **Syntax Highlighting:** Provides accurate syntax highlighting for both Markdown and JSX components within `.mdx` files.
* **IntelliSense:** Offers autocompletion and suggestions for MDX syntax and potentially imported components.
* **Error Checking:** Helps identify syntax errors in your MDX code.
### Installation
1. Open VS Code.
2. Go to the Extensions view by clicking the Extensions icon in the Activity Bar on the side of the window or by pressing .
3. Search for `mdx`.
4. Click **Install** on the MDX extension by unifiedjs.
## Steps
1. **Open the Repository Folder**:
* In VS Code, go to `File > Open Folder...` (or `File > Open...` on macOS).
* Navigate to the cloned `docs` repository folder on your local machine and open it.
2. **Start Editing**:
* Open VS Code's File Explorer (left sidebar) and navigate to these key directories:
* **`content/docs/`** - Contains all documentation `.mdx` files you'll be editing
* **`public/assets/`** - Stores images and static assets referenced in documentation
* ***`src/`** - Contains site source code (no editing needed here)*
* Select any `.mdx` file to begin editing. With the MDX extension installed, you'll get:
* Syntax highlighting for Markdown and JSX
* IntelliSense suggestions
* Error checking
When adding images, reference them from `/assets` (not `/public/assets`). Example:
```

```
3. **Using Fumadocs Components**:
* Our documentation uses [Fumadocs UI](https://fumadocs.vercel.app/docs/ui) components like ``, ``, ``, etc.
* You can use these components directly within your `.mdx` files.
* **Global Components:** Components like `` are globally available and don't require an explicit import.
* **Imported Components:** Components like `` or `` need to be imported at the top of the `.mdx` file. Check existing files or the Fumadocs documentation for import examples.
```ts
import { Tabs, Tab } from 'fumadocs-ui/components/tabs';
import { Steps, Step } from 'fumadocs-ui/components/steps';
```
* Refer to the [Fumadocs UI Documentation](https://fumadocs.vercel.app/docs/ui) for details on available components and their usage.
4. **Run the Development Server** (Recommended):
* Open a terminal within VS Code (`Terminal > New Terminal`).
* Run the command `npm run dev`.
* This will start the development server, usually accessible at `http://localhost:3000`.
* The site will automatically update in your browser as you save changes to the `.mdx` files.
5. **Follow Contribution Steps**:
* Once you've made your changes, follow the standard contribution steps outlined in the main [Docs Contribution Guide](/contribute/docs#writing-guidelines): commit your changes, push them to your fork, and create a pull request.
Using VS Code with the MDX extension provides a robust environment for contributing to the Zen Browser documentation.
file: ./content/docs/contribute/docs/index.mdx
meta: {
"title": "Docs",
"description": "Getting started with contributing to the documentation for Zen Browser."
}
This guide will help you get started with contributing to the documentation for Zen Browser. The documentation is crucial for helping users and developers understand and use the project effectively. We use Fumadocs for generating the static documentation site.
## Prerequisites
Before you begin, ensure you have the following tools installed:
* [**Git**](https://git-scm.com/): Version control system to clone the repository and manage your code.
* [**Node.js**](https://nodejs.org/): Required for building the NextJS site.
* [**npm**](https://www.npmjs.com/): Node package manager, which comes with Node.js.
* [**IDE of your choice**](/contribute/docs/editing-with-vscode): You can use any text editor or IDE of your choice.
## 1. Fork the Repository
1. Navigate to the [Zen Browser Documentation Repository](https://github.com/zen-browser/docs).
2. Click on the "Fork" button at the top right of the repository page to create a personal copy of the repository under your GitHub account.
## 2. Clone the Repository
Once you have forked the repository, clone it to your local machine using the following command:
```bash
git clone https://github.com//docs.git
cd docs
```
Replace `` with your GitHub username.
## 3. Install Dependencies
Navigate to the project directory and install the required dependencies:
```bash
npm install
```
This command installs all the necessary packages listed in the `package.json` file.
## 4. Open the Project in IDE
Open the cloned repository folder in your IDE to begin editing. If you're using Visual Studio Code, check out our [VS Code setup guide](/contribute/docs/editing-with-vscode) for detailed instructions.
1. Open IDE.
2. Select "Open Folder" or "File > Open Folder".
3. Navigate to the cloned repository folder.
## 5. Make Your Changes
You can now start editing the documentation. The project structure is as follows:
* **`content/docs/`** - contains the Markdown files for the documentation.
* **`public/assets/`** - contains images and other static assets used in the documentation.
* ***`src/`** - contains the source code for the documentation site. No changes are required here.*
### Writing Guidelines
* Follow the existing structure and formatting conventions.
* Use clear and concise language.
* Include examples and code snippets where applicable.
* Ensure all links and references are accurate.
## 6. Preview the Documentation
To preview the documentation site locally, run the following command:
```bash
npm run dev
# or
pnpm dev
# or
yarn dev
```
This command starts a local server running on `http://localhost:3000` that you can access from your browser. The site will automatically reload whenever you make changes to the Markdown files.
## 7. Check the Build
Before committing your changes, ensure the documentation site builds successfully:
```bash
npm run build
```
This command will build the static site. If there are any errors, fix them before proceeding.
## 8. Commit and Push Your Changes
Once you are satisfied with your changes, commit them to your local repository:
```bash
git add .
git commit -m "Description of your changes"
```
Push your changes to your forked repository:
```bash
git push origin main
```
## 9. Create a Pull Request
After pushing your changes, go to the original Zen Browser Documentation Repository and submit a pull request:
1. Navigate to the repository you forked from.
2. Click on the "Pull Requests" tab.
3. Click on "New Pull Request" and select your branch.
4. Provide a clear and concise description of your changes.
5. Submit the pull request.
Your pull request will be reviewed by the maintainers, and you may be asked to make some adjustments. Once approved, your changes will be merged into the main branch.
## Additional Resources
* [Zen Browser Documentation Repository](https://github.com/zen-browser/docs)
* [Fumadocs Documentation](https://fumadocs.vercel.app/docs/ui)
* [Contribution Guidelines](/contribute)
* [Code of Conduct](/contribute/code-of-conduct)
* [Editing with VS Code](/contribute/docs/editing-with-vscode)
***
Thank you for contributing to Zen Browser's documentation! Your contributions help users and developers understand and effectively use the project.